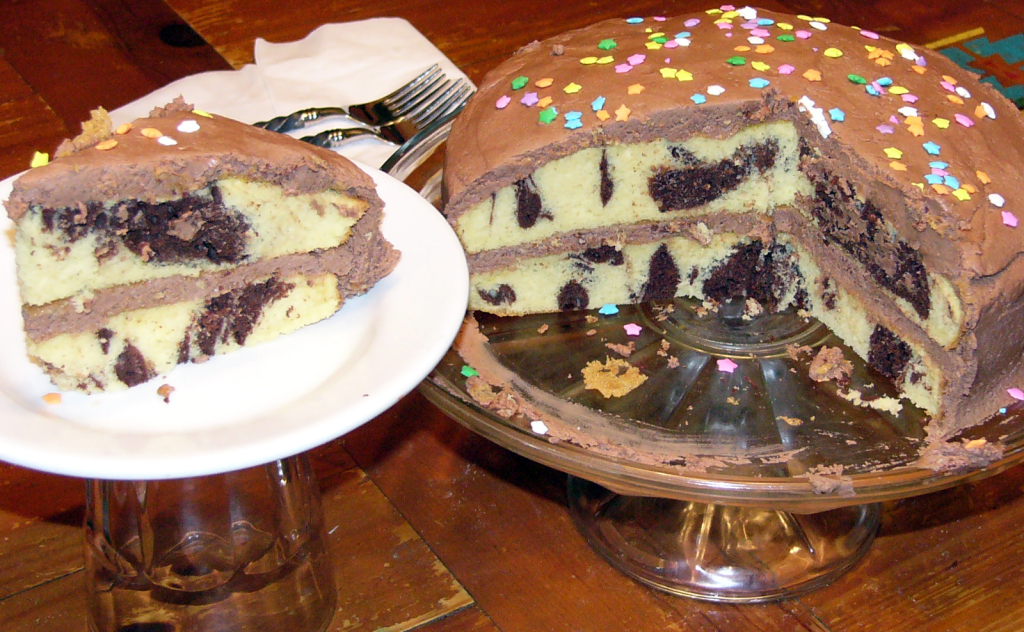
For Hubby’s birthday, I am baking up his favorite cake – a marble cake. This cake can be made with your favorite yellow cake recipe as a base (traditional); a white cake (for a tuxedo marbled cake) or even a strawberry. Marbling a cake is so easy. It’s simply a matter of putting chocolate into some of your cake batter to create a marbling effect. While this cake is a traditional Birthday Cake, it’s easy to bake and would be welcome anytime. The cake is moist and the frosting is wonderfully creamy, the real highlight to the cake. Not a baker? That’s okay. A boxed cake can be transformed into a marble cake just as easily as a scratch cake. Simply make the batter according to the box, reserve 1 cup and add chocolate to the reserved batter. It’s as easy as that.
Whenever I bake a cake, people are always asking me the same question (it doesn’t seem to matter if I’ve baked from scratch or from a box) – how do you get your cakes to come out so moist? I’ve given this question a lot of thought. The answer is simple – under-cook the cake. Not to the point that the center is doughy, that wouldn’t be good. I simply reduce the cooking time on every recipe – if the recipe says bake for 22-28 minutes, I set my timer for 20. Sometimes, when checking, I might need to bake the cake a minute or two longer, but usually it’s perfectly baked. After all, once pulled from the oven your cake will remain in the hot pan another 10 minutes before moving to a wire rack for cooling. During those 10 minutes, the cake continues to bake and dry out. This is especially true for light-colored cakes such as yellow or white cakes.
The first thing to a marble cake is to make your favorite batter, then reserve 1 cup of batter for the chocolate. I have two favorite Yellow Cake Recipes for the base. One requires cake flour, the other does not.
This recipe is perfect for when you don’t happen to have cake flour on hand.
Basic All-Purpose Yellow Marble Cake
1/2 Cup Butter-Flavored Shortening
1/2 Cup Butter, softened
2 Cups Baker’s Ultra-Fine Sugar
4 Eggs
2 Teaspoons Vanilla Extract
3 Teaspoons Baking Powder
2 ¾ Cups All-Purpose flour
1 Teaspoon Salt
1 ¾ Cups Whole Milk
1/2 Cup Quality Baking Cocoa (see recipe)
Preheat oven to 350-degrees (325 for dark pans).
Prepare cake pans with grease and flour, parchment paper lightly greased or brushing pans with Wilton’s Cake Release (best!). Set pans aside. Cream shortening, butter and sugar together.
Beat in eggs, one at a time and then add vanilla.
In a separate bowl, sift together flour, baking powder and salt. Stir until well incorporated.
Add flour mixture and milk to creamed shortening in alternating batches, starting and ending with the flour mixture. Blend gently between additions.
Reserve 1 cup of cake batter and set aside. Pour remaining cake batter into prepared pans (this will fill a 9×13 inch pan or 2 round 8″ or 9″ pans).
To the reserved batter, add 1/2 cup of good quality unsweetened baking cocoa. Whisk well, breaking up the cocoa until the batter is smooth and lump-free. Spoon equal amounts of the chocolate batter onto the batter in the pan(s), then swirl with a knife and bake.
Bake 9×13 pan for 35-45 minutes or until cake is just done.
Bake 9″ pans for 22-28 minutes or until cake is just is done.
Bake 8″ pans 25-30 minutes or until cake is just done.
Cool for 10 minutes in pan, invert onto cooling rack and cool completely.
This recipe uses cake flour – for the baker with a well-stocked pantry or when you’ve thought ahead.
Basic Cake Flour Yellow Marble Cake
1 cup unsalted butter, softened, room temperature
2 cups white sugar
2 eggs, separated, room temperature
3 teaspoons pure vanilla extract
2 cups cake flour
1 tablespoon baking powder
1 teaspoon salt
1 cup Buttermilk, room temperature
1/2 Cup Good Quality Baking Cocoa
Preheat oven to 325.
Grease and flour two 9-inch cake pans. Set aside.
In a large bowl, cream together butter and sugar.
Add in egg yolks and vanilla, mixing until fully incorporated. Set aside.
In a separate bowl combine flour, baking powder and salt.
Gradually add dry ingredients into wet ingredients, alternating with the buttermilk.
Mix until batter is fluffy.
Beat egg whites until foamy and thick.
Fold egg whites into batter and mix until incorporated.
Reserve 1 cup of cake batter and set aside. Pour remaining cake batter into prepared pans and set aside.
To the reserved batter, add 1/2 cup of good quality unsweetened baking cocoa. Whisk well, breaking up the cocoa until the batter is smooth and lump-free. Spoon equal amounts of the chocolate batter onto the batter in the pan(s), then swirl with a knife and bake.
Bake for 30-35 minutes.
Remove from oven and let cake cool in pans until pans are warm to the touch.
Carefully remove cakes from pan and place on a cooling rack to finish cooling.
Chocolate Buttercream Frosting
½ Cup Solid Butter-Flavored Vegetable Shortening
½ Cup Butter, Softened
1 Oz Semi-Sweet Chocolate, Melted
1 teaspoon Vanilla extract
3 Tablespoons Powdered Dutch Chocolate
4 Cups sifted powdered Sugar
3 tablespoons milk**
Melt Semi-Sweet Chocolate in the microwave on HIGH 45 seconds or until almost melted. Whisk to melt completely. Let cool.
Cream butter and shortening with electric mixer.
Add vanilla and blend. Add cooled chocolate, beat until a nice, chocolate butter is formed.
Sift Powdered Sugar and Dutch Chocolate together.
Gradually add chocolate-powdered sugar, one cup at a time to creamed butter mixture. With each addition, beat on low until incorporated, gradually increasing speed to medium high. Scrape sides and bottom of bowl between additions and after the last of the sugar has been added.
When all Coco-sugar has been mixed in, the frosting will appear to be dry. Add milk one tablespoon at a time and beat a medium speed until light and fluffy. For thinner frosting, add 3-4 tablespoons light corn syrup. Corn Syrup will also create a frosting that is smoother. Keep frosting covered with a damp cloth until ready to use.
To frost, first trim any “crown” from one cake round to allow cake to sit flat on serving platter. Place trimmed cake round on a serving platter, trimmed side down, bottom side up. Spread frosting over the top and down the sides. Place next layer on top of first, bottom side down. Frost top and down the sides, pressing in slightly where the two layers come together. Frost sides and top a second time to frost completely.
Yields approximately 3 Cups of frosting, enough to frost a two-layer cake or about 24 cupcakes. Double recipe for large, full size cakes.
")
")
")
")
")
Happy baking everyone!
