
In case you haven’t guest, today is National Candy Corn Day. I must be one of the few people on the planet that actually likes candy corn. When I was a kid, I could gobble it down like no body’s business. Not so much now that I’m an adult, but I don’t hate it either.
This year I thought we’d take a slightly different approach to Candy Corn Day – by eliminating the overly sweet candy altogether. Before we do that, I thought it might be fun to learn the history of Candy Corn.
Like nearly every kind of candy out there, the history tends to be a bit muddled. Most attribute Candy Corn to George Renninger, and employee of the Wunderlee Candy Company of Philadelphia. It’s said George was fascinated with the colors and shape of corn kernels. George came up with his sugary concoction sometime in the 1880s. As you can imagine, back then it was all made by hand. George called his treat Chicken Feed because it looked like something fed to chickens. As you can imagine, the name really didn’t help this candy gain in popularity. It wasn’t until nearly a hundred years later when Candy Corn was mass produced as a Halloween staple that Candy Corn finally caught on.
These days most adults and a few children find the candy far too sweet. Which is why I thought a Buttermilk Chocolate Cupcake made to resemble Candy Corn might be a better tribute to National Candy Corn Day. Enjoy!
Candy Corn Cupcakes
Buttermilk Chocolate Cupcakes
16 tablespoons Butter (2 sticks softened)
4 large Eggs, room temperature
6 oz Unsweetened Chocolate
2 cups Flour
1 teaspoon Baking Soda
1 cup Sugar
1 cup firmly packed Light Brown Sugar
1 cup Buttermilk
1 teaspoon Vanilla Extract
Let butter soften at room temperature and eggs warm on the counter.
Set up a double boiler to melt chocolate. Chop chocolate, place in a double boiler over simmering water on low heat for approximately 8 minutes. Stir occasionally until completely smooth and no pieces of chocolate remain. Remove from the heat and let cool to lukewarm; about 10 minutes.
Heat oven to 350 degrees. Line two 12-cup muffin tins with cupcake papers. Set aside.
In a small bowl, sift together the flour and baking soda. Set aside.
In a stand mixer fitted with a paddle, cream butter until smooth on the medium speed. Add the both sugars and beat until fluffy, about 3 minutes. Add the eggs, one at a time, beating well after each addition. Add the cooled melted chocolate, mixing until well incorporated.
Add the dry ingredients to the chocolate mixture in three parts, alternating with the buttermilk and vanilla. With each addition, beat until the ingredients are incorporated, taking care not to overbeat.
Use a rubber spatula to scrape down the batter in the bowl; making sure the ingredients batter is well blended smooth. Carefully scoop the batter into the cupcake liners, filling about three-quarters full.
Place cupcakes in the heated oven. Bake for 20 minutes, or until a cake tester inserted in the center of the cupcake comes out clean.
Cool the cupcakes in the tins for 15 minutes. Remove from the tins and cool completely on a wire rack before frosting.
White Chocolate Buttercream Frosting
16 tablespoons Butter (2 sticks softened)
12 oz White Chocolate Chips
1 cup Powdered Sugar, sifted
1 teaspoon Vanilla Extract
Yellow Food Coloring as desired
Orange Food Coloring as desired
Let butter soften at room temperature.
Set up a double boiler to melt chocolate. Place white chocolate chips in a double boiler over simmering water on low heat for approximately 8 minutes. Stir occasionally until completely smooth and no pieces of chocolate remain. Remove from the heat and let cool to lukewarm; about 10 minutes.
While the melted chocolate cools, sift powdered sugar and set aside.
In a large bowl, using a handheld electric mixer, beat the butter at medium speed until creamy. Beat in the melted white chocolate. Add the powdered sugar and vanilla; beat at low speed, scraping the sides and bottom of the bowl as needed. Beat frosting until light and fluffy.
Divide buttercream frosting evenly into two smaller bowls. Add yellow coloring to one bowl, whip or stir to blend until desired tint is achieved. Add orange coloring to the second bowl and blend until the tone of desired orange is reached
When ready, transfer buttercream frosting to a pastry bag fitted with a star tip. Pipe orange frosting on each cupcake in a swirl from the outside in. Pipe yellow frosting in the same swirl design.
Whipped Cream
1-1/2 cups Heavy Cream
2 tablespoons Sugar
Place the bowl of a stand mixer and whisk attachment in the freezer to chill for 20 minutes.
Place heavy cream in the chilled bowl. Add sugar. Whip on low until the sugar has dissolved into the heavy cream. Increase speed to medium. As the whipped cream thickens, increase speed and continue to whip until stiff peaks form.
Place whipped cream into a pastry bag fitted with a star tip. Finish Candy Corn Cupcakes with a pipping of whipped cream. Arrange on a large platter or a tiered cupcake server. Enjoy!
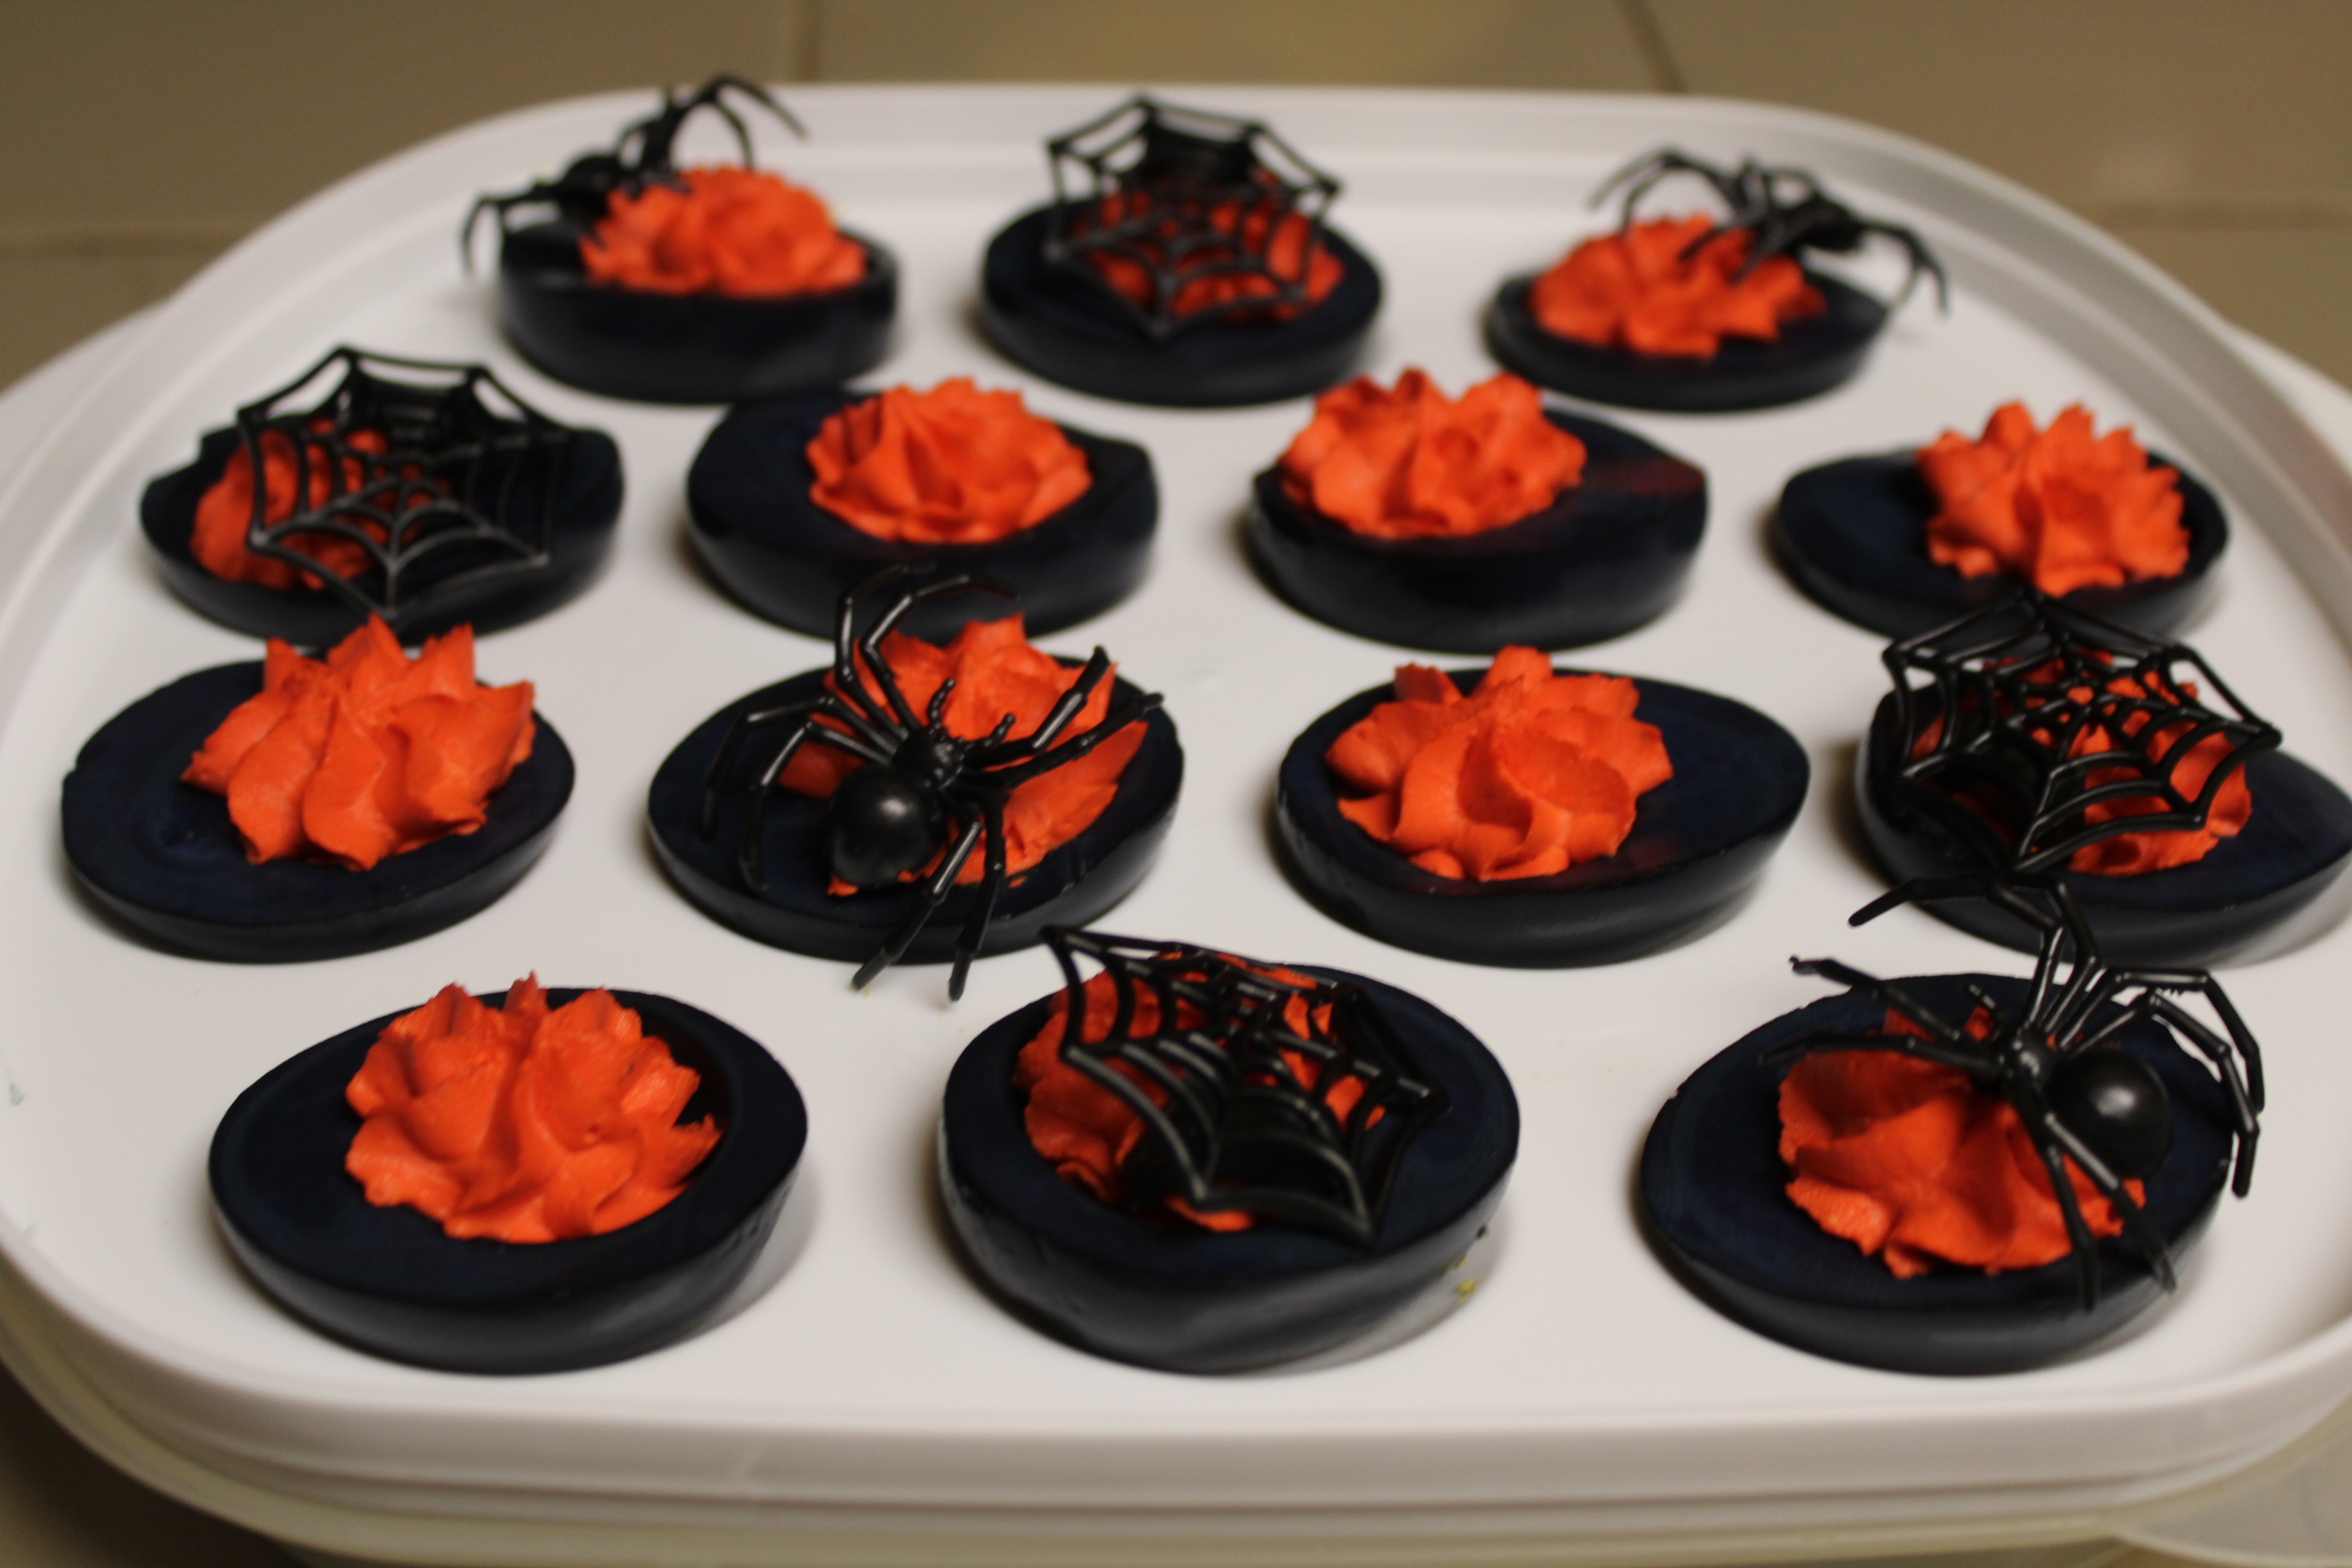
Every year, the Saturday before Halloween my youngest sister and I get together for some spooky fun. This year I wanted to keep my contribution simple – Spooky Deviled Eggs and a store bought Cheesecake. Rather than wait an enitre year to share, in addition to my planned recipe post, I thought I’d give you a fun and easy “Spooky” treat. Enjoy and have fun!
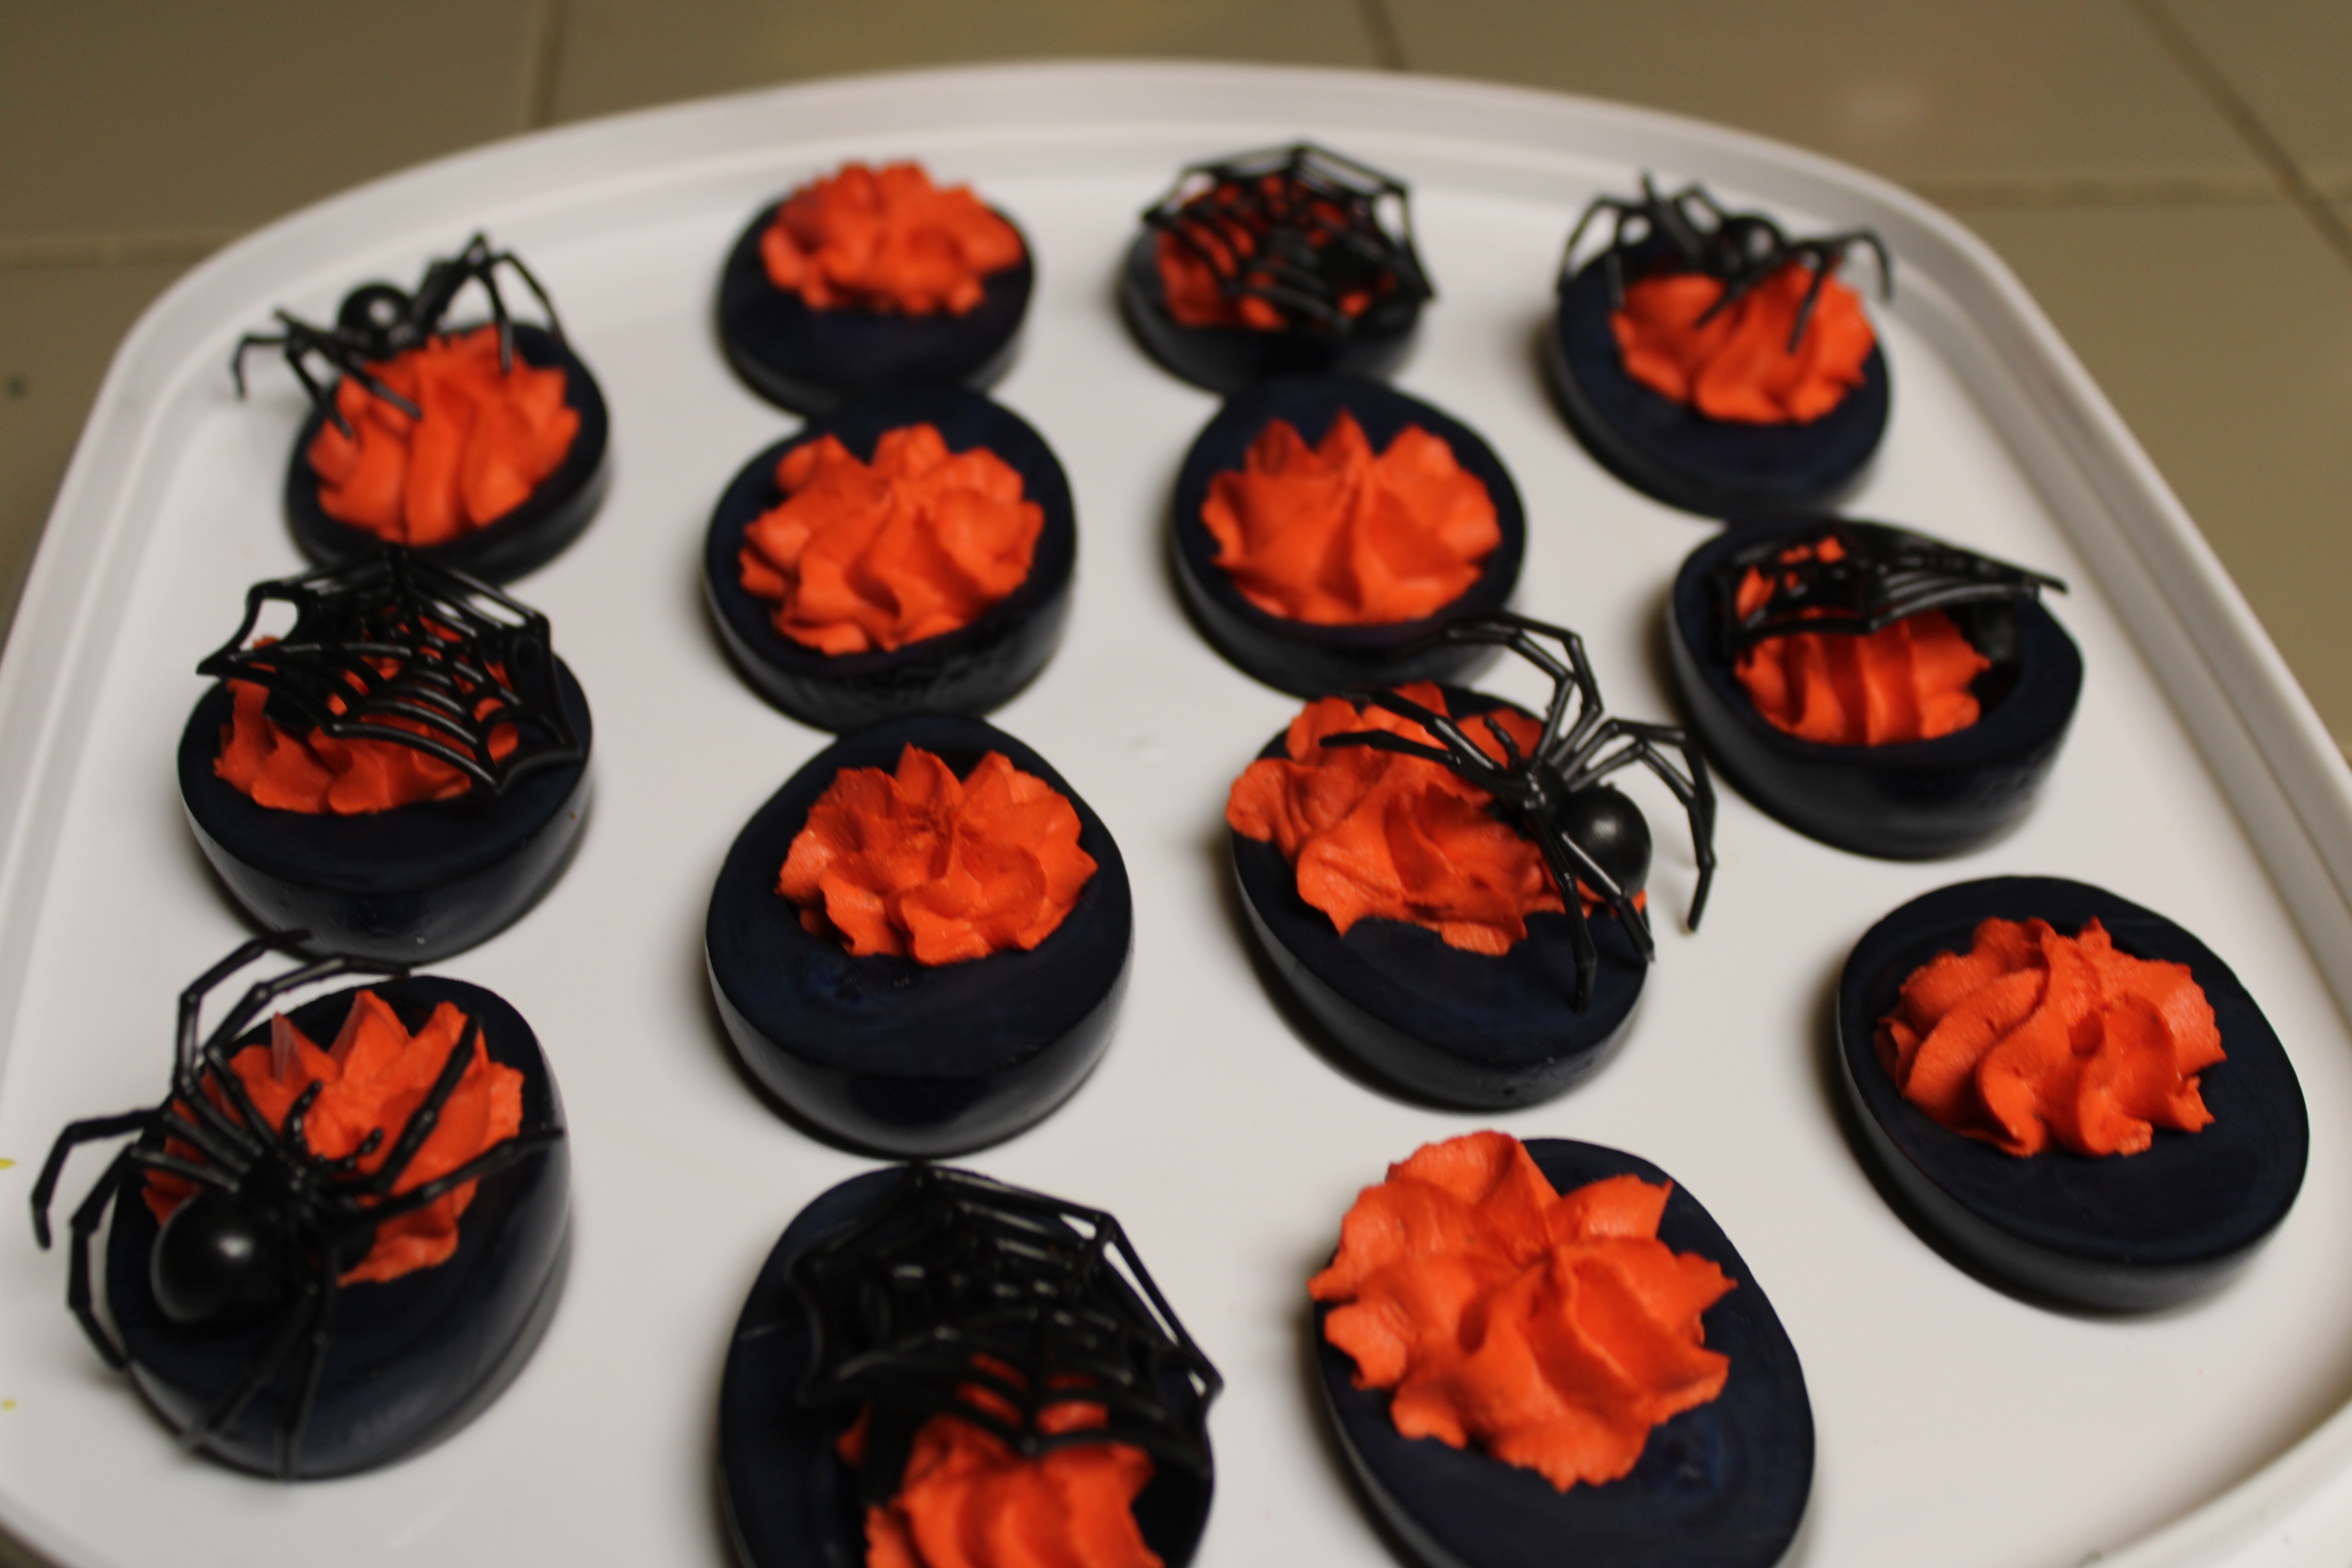
Spooky Deviled Eggs
16 large Eggs
6 tablespoons Mayonnaise
2 tablespoons Sour Cream
1 teaspoon Dry Mustard
1 tablespoon Red Wine Vinegar
1/8 teaspoon Cayenne Pepper or to taste
Salt to taste
White Pepper to taste
No Taste Red Food Coloring Gel as needed
Tip: Hard Boil 2 or 3 extra eggs. This was you can pick the best shells and have extra yolks for the filling.
To Boil Eggs: Place about a tablespoon or so of Baking Soda into a pan fitted with a tight fitting lid. Place eggs into the pan, fill with just enough could water to cover the eggs. Bring to a boil. Remove from heat, cover and let eggs steep for 14 minutes.
Create an ice-water bath. Once the eggs have steeped in hot water, remove with a slotted spoon and plunge into the ice-bath to cease the cooking process. Let eggs cool for 20 minutes. Crack shells, return to the cold water for another 10 minutes. The water will seep into the cracks and help loosen the shells for an easy peel.
Peel eggs, cut in half lengthwise. Remove egg yolks, place yolks into a food processor fitted with a chopping blade.
Mix/chop yolks until fluffy, resembling fresh breadcrumbs. Add Mayonnaise, Sour Cream, Dried Mustard and mix again until creamy. Add red wine vinegar, season to dates.
Add food coloring a little at a time and mix until desired color is achieved. Chill filling until ready to use.
Color Whites
1 cu Hot Water
1 tablespoon White Vinegar
Black Food Coloring Gel as needed
In a glass bowl mix hot water, distilled vinegar and food coloring. Add additional coloring until desired color is reached.
Place 4 white shells at a time upside down into the dye. Let soak in the color until desired shade is reached. Remove, place upside down on paper towels to drain. Repeat until all the whites have been colored. Turn right side up and let sit until fully dried before filling.
Fill and Decorate
1 Pastry Bag or Cookie Press
1 large Star Tip
Desired Spooky Food-Safe decorations
Spoon yolk filling into the piping bag or cookie pres fitted with star tip. Arrange dyed shells on serving trays. Pipe filling into the shells. Finish with spooky decorations. Chill until ready to serve.
The LORD is faithful in all His works
