For Earth Day I had planned an outdoor picnic to be served on our patio as we spent the better part of the morning and early afternoon planting our garden. One of the things Hubby and I love about our “new” old house is that there is a huge side yard, fenced off from the backyard, that is perfect for gardening. Although not in the best of shape, there are five planter boxes in the yard with good planting soil. When we moved into our 50-year-old home at the end of last summer, there were tomatoes growing in the largest of the boxes, while the rest had gone to weed. The tomatoes weren’t in cages, but rather poorly staked. It was difficult to tell where one plant ended and the next began – the tomatoes seemed to be growing wild. Hubby and I thought it best to let the plants die, then prepare the boxes for this year’s crop. We did not water the tomatoes, and yet those unruly plants continued to produce cherry tomatoes well into October! With no care at all, the plants thrived in the rich soil. We are excited to see what a maintained garden will produce.
")
")
")
Planting day was a glorious day. The sun was bright, the birds were singing and the sky was a beautiful shade of blue. A good day for a picnic. An even better day to fire up the grill. This is especially true when the local market had a buy-one-get-one-free special on grilling meats. Our grill has been sitting idle since January, when we grilled up some crab legs. It was high time we did a little backyard cooking.
 In our house, grilled tri-tip is always a barbecue favorite. While Tri-tip can be found in just about any grocery store in California, it’s most popular along the central coast and central valley. Up until the 1950’s Tri-Tip was ground into hamburger meat. Then a man named Otto Schaefer started selling the roast in his market in Oakland, California. From there, the popularity of this particular cut of meat took off. When prepared correctly, it’s a wonderful, flavorful, tender beef treat that will knock your socks off.
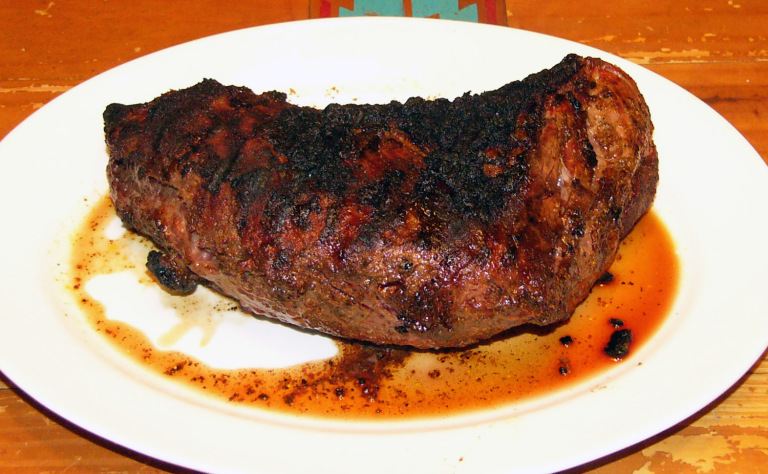
  A tri-tip is well marbled, naturally full-flavored and is anything but pedestrian. You’ll want to look for a tri-tip with a thin layer of fat remaining on one side. Don’t worry, it will melt away on the grill, basking the meat with its succulent flavor. What I like best about a nice tri-tip is that everyone gets their beef fix cooked “just right”. Hubby is a well-done kind of guy (although he’s learning that a little pink is good), Kiddo is the medium of the road type, and I’m (you guessed it) just a notch about rare. I like my meat warm to the touch in the center while still oozing with blood.
There are a few basic “musts” for a successful tri-tip that is flavorful, tender and juicy. According to all the experts out there, letting the meat rest on the counter for about 45 minutes prior to grilling has no bearing on the final outcome. However; my own experience tells me differently. Allowing the meat to rest on the counter makes it easier to grill because the meat starts out at a slightly elevated, even temperature. Unless you are using an indirect method of grilling, with lots of smoke, the less time on the grill, the better. Next, it’s important to sear the meat well. Not only will the searing give the meat a nice flavorful crust, it helps to seal in the juices. Finally, always UNDER COOK your meat. Grilled meats need to rest another 10 minutes after being pulled from the grill. Wrap well in foil to keep warm, and allow the meat to rest. Two things will happen: 1) the meat will retain all its extraordinary juicy goodness instead of letting those flavors run all over the carving platter. 2) the internal temperature of the a thick tri-tip will continue to rise – as much as 15 degrees. If you cook it to your liking, then let it rest, you’ll run the risk of overcooking the meat. Tri-tip is best when pulled from the grill once it reaches an internal temperature of about 130 degrees. Oh, and one last tip – DON’T POKE the meat. When grilled properly, a lot of poking, prodding, flipping and abundance of handling isn’t necessary. The more you handle your meat, the tougher it will become. No one wants a dried out, leathery piece of meat on their plates. So when grilling, less renders more.
My hubby and I make a great pair when it comes to grilling. I make the rubs and sauces for whatever we’ve going to throw on the grill, he builds the fire and tends to the meat while it’s cooking. This allows me time to prepare all the sides to round out our feast. Nothing like teamwork and timing.

")

Tri-Tip Barbecue with Spicy Dry Rub
2 1/2 lb Tri-Tip Roast, trimmed
1 Teaspoon Ancho Powder
1/4 Teaspoon Cayenne Powder
1 Teaspoon Chili Powder
1/2 Teaspoon Chipotle Spice
2 Teaspoons Garlic Powder
1 Teaspoon Mustard Powder
1 Tablespoon Onion Powder
1 Tablespoon Salt, Kosher
1 Tablespoon Salt, Smoked
1 Tablespoon Sugar
Note: Smoked salt can be found in specialty stores such as World Market or Trader Joes. If you don’t have smoked salt, simply omit
Mix all ingredients for spice rub. Use a tablespoon or so at a time to rub into the meat. Depending upon the size of your tri-tip, this will make more than enough rub to coat the meat well. Store any unused rub in a jar and use it for another time.
Wrap the roast in plastic wrap, refrigerate for 1 hour 15 minutes. Remove from refrigerator, let stand on counter for 45 minutes prior to grilling. (Combined time is at least 2 hours. Longer time is okay).
Build nice bed of hot coals. Open the lower vents and upper vents half way, place grate over coals and close lid to heat, about 5 minutes. Clean grate and oil paper towels dipped in vegetable oil.
Raise coals to high position (or lower grate, depending upon grill). Grill meat, fat side up, for 3-5 minutes or until nicely seared. Turn and sear other side. Lower coals (or raise the grate, depending upon grill), cover and continue to cook meat 7-10 minutes longer. Turn and cook 6-8 minutes longer. Transfer to platter or cutting board and tent loosely with foil to keep warm.
The key to a juicy piece of meat is to let the meat rest 10-15 minutes after grilling to allow the juices to soak back into the meat rather than run all over the cutting board. Slice the meat against the grain as thick or as thin as you like. If using for tri-tip sandwiches, thin is good. Or wow your guests with a nice, thick tri-tip steak.
My guys are real meat and potatoes eaters. Whenever we fire up the grill, I love to make either roasted potatoes or country fried potatoes. There’s just something about grilled meats and roasted or fried potatoes. Is it just me, or do these seem to go hand in hand?
Roasted Rosemary-Garlic Red Potatoes
8 Medium Size Red Potatoes, cut into wedges
2 Tablespoons Olive Oil, enough to coat potatoes
4 Garlic Cloves, minced
2 Tablespoons Fresh Rosemary, roughly chopped
Kosher Salt, to taste
White Pepper, to taste
2 Tablespoons Butter
Heat oven to 400 degrees. Line a rimmed baking sheet with foil, then lightly spray with cooking spray. Set baking sheet aside until ready to use.
Wash potatoes and pat dry. Cut each potato into 8 wedges. Place potatoes into a large bowl and drizzle with olive oil. Set aside
Peel and mince garlic cloves. Sprinkle over potatoes.
Strip Rosemary needles from sprig. Rough chop and sprinkle over potatoes.
Season potatoes with salt and pepper. Toss to coat the potatoes nicely.
Spread potatoes out onto baking sheet in a single layer. Roast potatoes in the oven for 15 minutes. Remove pan from oven, shake pan, then rotate and return to oven for another 15 minutes.
When the potatoes are nicely roasted on the outside, tender on the inside (about 30 minutes), remove pan from the oven. Sprinkle butter over hot potatoes. Cover pan with foil and return to oven. Let potatoes continue to roast, covered, for an additional 10 minutes.
Remove from oven. Place potatoes in a serving dish and enjoy.
Now mind you, nothing in this world compares to grilled corn on the cob, cooked right in the husks and allowed to “steam” in its own natural flavors. I know, it’s 80 degrees in April. Still, it’s far too early in the year for locally grown corn. I’ve heard tell you can use frozen ears of corn in the off-season for corn on the cob. Personally, I don’t care much for frozen corn on the cob. I don’t know what it is exactly about corn that has been frozen on the cob, but it has a flavor and texture that is somehow off. All I know is I sure can tell the difference between a frozen ear of corn and an ear that was picked that morning. Yet I love corn with barbecue. So what’s left? Canned corn. Now before you turn up your nose and walk away, hear me out.
Sure, we all prefer our veggies fresh from the market, especially when shopping at your local farmers market. When it’s been a matter of hours and not days between harvest and market, the flavor is so much better. However; that’s not always possible unless you only eat what is in season. Yet you can make the best of canned vegetables. First, always drain your canned vegetables well. Rise under cold water for several minutes to “refresh” the flavor. Warm the vegetables over low heat with as little liquid as possible. That way you avoid “boiling” the flavor out as the vegetables warm in their own natural juices. While this might not be “fresh”, it will do in a pinch.
Buttery Canned Corn
1 Can Corn, well-drained
¼ Cup butter
Salt to taste
Drain corn and rinse well under cold to remove any of the packing liquid.
Place corn in a saucepan over low heat until all liquid has evaporated, about 5 minutes.
Add butter, increase heat to medium-low. When butter melts, stir into corn.
Season with a pinch of sea salt. Continue to heat until corn is hot, about 10 to 15 minutes.
Transfer corn to a serving bowl and serve immediately.
