
Yesterday was Good Friday. Our alter has been stripped bare. The church seems sparse, crosses and statues are covered. There is no morning Mass before the Easter Vigil. The Church remains as empty as the world must have felt on the eve of that first Easter morning.
Continue reading “The Long Wait”Tag: Tea Sandwiches
Reflections and Easter Favorites to Share

And so it begins. Tomorrow is Palm Sunday, the final week of Christ’s Sorrowful Passion. As we draw ever closer to Good Friday, our hearts grow heavy. But for now, we can race ahead to the joy that we know awaits us all.
Continue reading “Reflections and Easter Favorites to Share”Feast of the Little Rose

It’s been a little while since we’ve talked faith. With all this pandemic and social unrest and fear-driven distractions, faith should be in the forefront. For many of us on a personal level, faith has been center stage even if we haven’t been vocal about sharing it.
Continue reading “Feast of the Little Rose”The Indulgent Pleasures of Afternoon Tea
This has to be the longest, most thought out recipe share I’ve ever written. Hope you manage to stick with me all the way to the end. I promise, you won’t be disappointed.
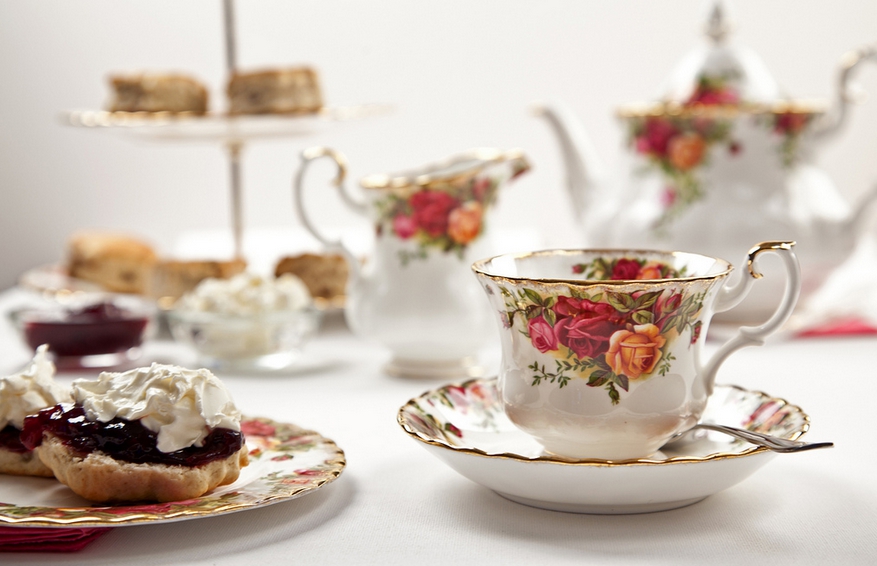
Back in November 2015, my sister treated me to Afternoon Tea at The Tea List in Davis. We indulged in what can only be described as a lovely French Style Afternoon Tea. Oh my, one afternoon was all it took for me to get hooked on the concept of Afternoon Tea. I am so hooked on the idea of the pure indulgences of an Afternoon Tea that I make it a point to pamper myself once a month. Sometimes I’ll take my tea in the dining room, sometimes in the living room while leaving through a magazine. Other times, when it isn’t stifling warm outside, I’ll putter in the garden before sitting down to tea on the back patio. How I would love to gather a group of like-minded ladies of leisure for a monthly meeting of the Afternoon Tea Club.
If you are like me, you don’t own enough tea cups and saucers for a tea party – and that’s okay. You can invite your guests to bring their own cups and saucers – it’s fun to see what everyone will bring. Another possibility would be to search through yard sales, flea markets and antique malls. You don’t have to spend a fortune or have matching sets. An eclectic collection of plates, cups and saucers adds a new dimension of interest to the table or buffet. There are only a few basic “rules” when it comes to Tea – those served in the late afternoon are always “Afternoon Teas” and those served in the evening are always “High Teas” regardless of what is served. And above all else, enjoy the company of your guests. The whole point to “tea” is to relax, take a well-earned break from life and savor the moment.
With the holidays just around the corner, wouldn’t it be fun to host a tree-trimming tea party or Secret Santa Gift Exchange with the ladies at work where everyone receives a tea-cup and saucer from their secret Santa?
Before I get into my rather extensive recipe offerings, I thought it might be fun to share a bit of history of the evolution of Afternoon Tea. I was amazed by what I learned when this journey into the customs first began.
Afternoon tea, that most quintessential of English customs is, perhaps surprisingly, a relatively new tradition when it comes to the consumption of tea. Drinking tea dates back to the third millennium BC in China. Tea was first introduced to European culture in France during the 1600s and became popular in England by the 1660s when King Charles II and his wife the Portuguese Infanta Catherine de Braganza (who adored tea) introduced the hot beverage to the Royal Court. Yet it wasn’t until the mid 17th century that the concept of “Afternoon Tea” first appeared.
As the story goes, in 1840, Anna Maria Stanhope, the 7th Duchess of Bedford, a lady-in-waiting to Queen Victoria, gave birth to the concept of Afternoon Tea. The Duchess grew hungry around four o’clock in the afternoon and since the evening meal was served fashionably late, at eight o’clock, she longed for something to tide her over. She asked that a tray of tea, bread and butter and cake be brought to her room during the late afternoon. This became a habit of hers and she began inviting friends to join her.
This pause for tea became a fashionable social event. During the 1880’s upper-class and society women would change into long gowns, gloves and hats for their afternoon tea which was usually served in the drawing-room between four and five o’clock.
Like so many Americans, I had always associated fancy tea parties with the notion of “High Tea”, an indulgent of English Nobility. Afternoon Tea, or so I had thought, was akin to an American coffee break for the common workers. As it turns out, I was wrong on both assumptions.
Afternoon Tea is a social event, while High Tea is an evening meal. Afternoon Tea (also known as Low Tea) is served in a drawing-room or sitting room to well-dressed ladies seated in low, comfortable chairs. High Tea on the other hand, is generally served at six in the evening, and is always taken while seated at the dining room table. (High table, thus “High” tea). The concept of High Tea first began with the working class. Traditionally speaking, High Tea consisted of five or six courses, including soups, vegetables and if the pocketbook allowed, various roasted meats and concluded with sweet treats such as cake. Eventually, the prominent among society adapted the concept of High Tea as their evening meal when the servants were unavailable. The servants prepared the food for the household in advance their departure and the meal was intended to be served cold by the lady of the house to her family. Today one would rarely find soup, vegetable platters or trays of roasted meats at any Tea setting, High or otherwise.
Nowadays in the Tea Houses across America, it doesn’t seem to make a difference as to when the tea is served, or how one is seated that defines “Afternoon” or “High” tea, but rather what is served. Our concept of Afternoon Tea is a scone and a simple selection of finger sandwiches consisting of cucumber, egg salad and cheese sandwiches. High Tea is distinguished from Afternoon Tea with the addition of salmon and other meat sandwiches as well as an array of fine pastries and seasonal fruit.
Call it what you will, all I know is that I loved the whole “tea” experience – from the fine bone china cups and laced doilies to the wonderful selection of savory sandwiches, pastries and seasonal fresh fruits.
**** Afternoon Teas ****
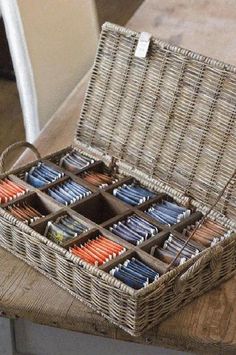 Hosting an Afternoon Tea, be it for two or twenty-two, requires a great deal of thought to presentation. The selection of a menu dictates all that follows while the preparation and presentation of the teas themselves are by far the easiest to deal with. Unless you are a huge consumer of teas, (which I am not) it really isn’t practical to have individual tea-pots with infusers and an assortment of loose-leaf teas in canisters for each guest. Yet you don’t want to brew a large pot of one kind of tea. Besides, in researching tea pots and the proper way to brew, I discovered that, unlike coffee, you don’t brew up a big pot. Tea truly is an individual experience. So how does the home-cook give guests variety? The best way to accomplish this might not be the “correct” way, but it is the easiest both in presentation and the pocket-book. First buy a selection of high-quality teas in bags. Arrange the tea bags in a basket. Fill a nice pot with hot water (for smaller groups, a silver tea-pot would be an elegant touch). Have teaspoons, cups and saucers arranged in front of the basket, flanked by a sugar bowl and milk saucer. Lemons would also be a nice addition, sliced thin and arranged attractively on a small plate or platter. Since there is always the issue of what to do with the bag once the cup of tea has steeped to the desired strength, there are several ways to handle this – one would be to place “disposal” bowls either on the tables themselves or near the tea station. The other would be to have a small, plastic lined basket for this purpose. It’s entirely up to you, to the space available and to where guests are seated (be it low or high). One thing is certain, the disposal bowls should never be with the food. If you wanted to, you could walk among your guests and offer the bowl, then remove it completely from the setting.
**** Afternoon Tea Scones ****
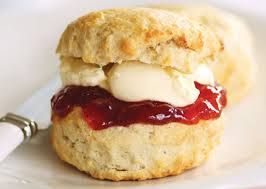 Generally speaking, only one type of scone is served at an Afternoon or High Tea. Usually the scone is plain and simple, served with Clotted Cream and a fruit preserve. The scones may be served alone to accompany a pot of freshly brewed tea, or to begin the Afternoon Tea, before the trays of sandwiches are served. Just remember, you will only need one scone per guest as there is more food to come. Below are a few suggestions for scones. Or serve your favorite scone recipe.
Scone Selection
Apple Biscuit Scones with Apple Butter
Orange Poppy Seed Scones with Orange Glaze
Simple Scones with Mock Clotted Cream and Fruit Preserves
Apple Biscuit Scones with Apple Butter
Apple Butter
1 3/4 pounds Golden Delicious apples
1/2 pound Granny Smith apples
2 1/2 cups dry apple cider
Sugar (1 1/2 cups per 2 1/2 cups of apple pulp), grated zest and juice of 1/3 orange
Grated zest and juice of 1/2 Lemon (Mylar, if available)
1/4 teaspoon ground cinnamon
1/4 teaspoon ground cloves
Peel, core and slice the apples.
In a large saucepan, place apple cider and bring to a rapid boil. Keep boiling until the apple juice is reduced by 1/3. When apple juice is reduced, add sliced apples to the pan. If needed, add enough water to just cover the apples. Half cover the top of the saucepan and simmer, gently stirring and crushing the apple pulp until the apples are pulpy, soft in the reduced liquid. NOTE: If pulp remains lumpy, remove and process in a food processor or blender to a crude puree. Remove from heat and measure the crude puree and then return to the saucepan.
Add 1 1/2 cups of sugar for every 2 1/2 cups of measured apple puree. Mix in the orange zest and juice, lemon zest and juice, cinnamon, and cloves.
Over low heat, stirring frequently, cook until the sugar has completely dissolved. After sugar has dissolve, continue to simmer, stirring frequently, until the majority of the liquid is gone. When a sliding spoon across the top leaves an indent, the mixture is ready. Remove from heat.
Place apple mixture into a clean, room temperature jar. Refrigerate. Once reopened, the shelf life is 3 to 4 days.
Yield: 2 to 3 small jars. Serve with scones or toast points.
Apple Biscuit Scones
2 cups all-purpose flour
2 teaspoons baking powder
1/2 cup of salt-free butter, chilled
2 apples, peeled, cored, sliced, and diced
1/2 cup granulated sugar
1/3 cup golden raisins
1 egg, beaten
1 tablespoon granulated brown sugar
Preheat oven to 350 degrees. Grease a cookie sheet.
In a large bowl, sift flour and baking powder together. With a pastry blender or two knives, cut butter into flour until particles resembles coarse crumbs.
Stir in diced apples, sugar, and golden raisins. Stir in beaten egg until dough is soft. NOTE: If the batter appears too soft, slowly add an additional 1/4 cup of flour until dough reaches desired consistency.
Place amount of dough on cookie sheet to fit desired scone size. Sprinkle brown sugar on the top of each scone.
Bake until risen and golden brown, approximately 8 to 15 minutes depending on size. Remove from oven and let cool.
Serve with Apple Butter.
Orange Poppy Seed Scones with Orange Glaze
Orange Poppy Seed Scones
2 1/2 cups all-purpose flour
1/3 cup granulated sugar
3 tablespoons poppy seeds
1 1/2 teaspoons cream of tartar
3/4 teaspoon baking soda
1/4 teaspoon salt
3/4 cup chilled unsalted butter, cut into 1/4-inch pieces
2 large eggs, divided
5 tablespoons freshly squeezed orange juice
2 teaspoons grated orange zest
1 tablespoon milk
Preheat oven to 400 degrees. Spray a large baking sheet with vegetable-oil cooking spray.
In a large bowl, combine flour, sugar, poppy seeds, cream of tartar,baking soda, and salt. With a pastry blender or two knives, cut butter into flour mixture until particles are the size of small peas.
In a medium bowl, beat (1) one egg lightly with orange juice and orange zest. Add to flour mixture; stir just until mixed.
On a lightly floured surface, knead dough gently. Pat or roll out the dough into a circle 1/2-inch thick. Using a lightly greased and floured 2- or 3-inch biscuit cutter, cut into rounds, cutting close together to generate as few scraps as possible. Dip cutter into flour as often as necessary to keep dough from sticking. Push scraps of dough together so that edges join; firmly pinch edges with fingertips to make a partial seal. Pat this remaining dough to 1/2-inch thick; continue to cut 3-inch rounds. Space 1-inch apart onto prepared baking sheet. NOTE: When making scones, work the dough quickly and do not over mix.
Note: Scones can be cut into any shape you desire. Use a drinking glass to make circles, or cut into squares or wedges with a knife. Dip the edges of the cutter in flour to prevent the dough from sticking. Do not pat the edges of the scone down; instead leave the cuts as sharp as possible to allow the scones to rise in layers.
In a small bowl, combine 1 egg and 1 tablespoon milk; brush onto top of scones.
Bake 10 to 15 minutes or until golden brown. (A good check is to use an instant digital thermometer to test your scones. The temperature of the scones should be at 200 degrees when done).
Orange Glaze
1 Cup Powdered Sugar
1 Teaspoon Vanilla Extract
1 Tablespoon Orange Juice
Combined some powdered sugar (confectioners’ sugar), vanilla extract and orange juice together to make a thick icing. Pour or brush over tops of scones just before serving.
Simple Scones with Mock Clotted Cream and Fruit Preserve
Simple Scones
3 cups all-purpose flour
2 tablespoons granulated sugar
2 tablespoons baking powder
1/2 teaspoon salt
1/2 pound (1 cup) unsalted cold butter, diced
1 1/2 cups half and half cream
1 tablespoon pure vanilla extract
Preheat oven to 350 degrees.
In a large bowl, combine flour, sugar, baking powder, and salt together.
With a pastry blender or two knives, cut the cold butter into flour mixture until particles are the size of small peas. Fold in your Alternative Ingredients of choice to the flour mixture.
Add half and half cream and vanilla extract to the mixture and blend until dough forms. DO NOT over mix the dough.
With floured hands, pat dough to a 1-inch thickness onto a floured board. With a floured cutter of your desired shape, cut out and place 1-inch apart on a parchment paper lined or a lightly greased and floured baking sheet.
Bake 20 to 25 minutes until lightly golden brown. Baking time will vary according to the size of your scone.
Mock Clotted Cream
1 cup heavy cream
1/3 cup sour cream
1 tablespoon confectioners’ sugar
Using a whisk attachment on a mixer, whip heavy cream until stiff peaks form.
Remove bowl from mixer and hand whisk in sour cream and confectioners’ sugar until just combined.
Store in the refrigerator until ready to serve.
When serving, place clotted cream in a small bowl and serve alongside a small bowl of your favorite fruit preserves such as Boysenberry or Blackberry.
**** Afternoon Tea Sandwiches ****
 The tea sandwich may take a number of different forms, yet should be easy to handle, and be capable of being eaten in two bites. It may be a long, narrow sandwich, a triangular quarter-sandwich, or a small biscuit round. The sandwich, once made, may also be cut into different shapes using a cookie cutter. Traditionally speaking, the tea sandwich is made using thin slices of white bread that is “sealed” with butter or cream cheese to prevent the bread from becoming soggy. The crust is always removed once the sandwich has been made (unless using a baguette round or roll) but before serving. Modern renditions of tea sandwiches include breads such as wheat, pumpernickel, sourdough or rye. Fillings should always be kept light and delicate in proportion to the amount of bread. The Cucumber Tea Sandwich is considered the quintessential tea sandwich. Other popular choices include tomatoes, pimento cheese, smoked salmon, curried chicken and egg salad. The sandwiches may be served closed (topped with a second slice of bread) or open-faced. Variety is the key to a successful tray of Tea Sandwiches. Five or six different sandwiches should more than suffice. To help in the selection, I have selected a few of my favorites. These represent a lovely cross-section of Tea Sandwiches, with different fillings, breads and presentation style.
Tea Sandwich Selection
Caviar Egg Salad on White Bread
Chicken Salad on Mini Croissants
Creamy Vegetable on Rye Bread
Cucumber and Watercress on White Bread
Feta, Roasted Peppers and Chive on Choice Bread (Open Faced)
Pimento Cheese and Pecans on Baguette Rounds (Open Faced)
Red Pepper-Feta Cheese Roast Beef on White Bread
Smoked Salmon with Dill Cream Cheese on White and Wheat Breads
Sun-Dried Tomatoes and Fresh Basil on Wheat Bread
Caviar Egg Salad Tea Sandwiches
12 large eggs, hard-boiled
3/4 cup good-quality mayonnaise
2 tablespoons prepared mustard
Salt to taste
4 ounces caviar
10 Slices white or wheat bread
In a large bowl, finely grate the hard-cooked eggs; stir in mayonnaise, mustard, and salt. Cover and refrigerate until ready to serve. NOTE: May be made up to 36 hours in advance.
Just before serving, gently fold caviar into egg salad, being careful not to break the fish eggs (caviar).
Spread a thin coating of butter onto bread slices. Spread egg salad mixture over half of the bread slices, top with remaining half.
Carefully cut the crusts from each sandwich with a long, sharp or serrated-blade knife. Cut the sandwiches in half diagonally and then cut in half again.
Transfer the prepared sandwiches to a platter and wrap in plastic wrap. Refrigerate at least 4 hours or overnight to soften before serving.
When ready to serve, remove from refrigerator. Uncover sandwiches just before serving.
Chicken Salad on Mini Croissants Tea Sandwiches
2 cups shredded, cooked chicken,
1/2 cup thinly sliced celery
1/4 cup chopped pecans
2 tablespoons thinly sliced green onions
3/4 cup mayonnaise
2 teaspoons lime juice
12 Mini Croissants
Combine chicken, celery, pecans, and green onions in a bowl.
In a small bowl, mix mayonnaise and lime juice. Fold mayonnaise mixture into chicken mixture; stir to coat. Cover and refrigerate until ready to serve.
Split Croissants to form a “pocket” and fill with chicken mixture. Close and secure with cocktail skewer if necessary.
Creamy Vegetable Tea Sandwiches on Rye Bread
1 English cucumber
1 medium-size red bell pepper
3 carrots
3 garlic cloves
1/2 cup sliced green onions
2 tablespoons minced fresh parsley
2 (8-ounce) packages cream cheese, softened
2 tablespoons mayonnaise
1/2 teaspoon salt
16 thin rye bread slices
Butter, softened, enough to coat bread slices
Peel and dice cucumber. Core and dice bell pepper. Grate carrots, and mince garlic. Mix vegetables in a large bowl.
Add sliced green onions, parsley, cream cheese and mayonnaise. Season with salt and mix to create a vegetable spread.
Spread a thin layer of butter on one side of bread. Spread mixture on half of rye bread slices, and top with remaining bread slices. Cut vegetable sandwiches in half diagonally.
Cucumber and Watercress Tea Sandwiches
32 thin slices peeled English cucumber
1/2 stick unsalted butter, at room temperature
8 thin slices white sandwich bread
1/2 cup watercress leaves, plus more for garnish
Coarse salt, preferably fleur de sel, to taste
Using paper towels, pat the cut surfaces of the cucumber slices to remove any excess moisture.
Lightly butter one side of each bread slice. Scatter the 1/2 cup watercress leaves evenly over all of the buttered bread slices. Layer the cucumber slices over the watercress leaves on 4 of the bread slices. Top the cucumber with some of the sprouts and a pinch of salt. Top with the remaining 4 bread slices, buttered side down.
Using a sharp knife, cut off the crusts from each sandwich and then slice the sandwiches in half, either straight down the middle or on the diagonal. If smaller portions are desired, cut each half in half again.
Arrange the sandwiches on separate plates of a tiered plate stand or on a cake stand or platter. Garnish each sandwich with a watercress leaf. Serve immediately.
This is my personal favorite.
Feta, Roasted Peppers and Chive Tea Sandwiches (Open Faced)
4 slices sandwich bread
3 ounces feta cheese, crumbled
1/3 cup roasted peppers, coarsely chopped
Fresh chives, finely chopped
One Day Ahead: Use a selection of red, yellow and orange peppers for a more colorful presentation. Toss peppers in a little olive oil and roast until skins are nicely charred but not blackened. Allow peppers to cool. Core and chop peppers. Store in an air tight container in the refrigerator until ready to use.
Toast the bread in a toaster, and then, using a round food cutter, cut 2 circles from each slice of bread.
Place the feta, roasted peppers and chives on the bread. Serve open-faced to show off all the lovely colors.
Pimento Cheese and Pecans on Baguette Rounds (Open Faced)
1 1/2 cups mayonnaise
1 (4-oz.) jar diced pimento, drained
1/4 tsp. ground red pepper
1 (8-oz.) block extra-sharp Cheddar cheese, finely shredded
1 (8-oz.) block sharp Cheddar cheese, shredded
1 Baguette, sliced into thin rounds
1/2 cup finely chopped pecans
In a food processor fitted with a blade, blend together mayonnaise, pimento and cheeses until smooth.
Pipe or spoon cheese mixture onto baguette slices. Sprinkle with finely chopped pecans and serve.
Red Pepper-Feta Cheese Roast Beef Tea Sandwiches
1 (8-ounce) package cream cheese, softened
1 tablespoon heavy whipping cream
¼ cup Feta cheese crumbles
¼ cup finely chopped roasted red pepper, divided
10 slices white sandwich bread
15 thin slices deli roast beef
15 blanched long fresh chives, for garnish
1 tablespoon finely chopped roasted red pepper, for garnish
In a small bowl, combine cream cheese and cream. Beat at medium speed with an electric mixer until smooth. Add feta cheese and roasted red pepper, stirring until incorporated. Set aside.
Using a serrated bread knife, trim crusts from all sides of bread slices. Cut each slice into 3 rectangles, approximately 3 x 1½ inches.
Spread approximately 1 tablespoon cream cheese mixture onto each bread slice. Ruffle a slice of roast beef on top of half of bread slices. Top with another bread slice, cream cheese side down.
Garnish each sandwich by tying a blanched chive around it and topping with a piece of red pepper.
Smoked Salmon with Dill Cream Cheese Tea Sandwiches
2 slices white bread
2 slices wheat bread
4 teaspoons unsalted butter, softened
2 tablespoons fresh dill, minced
2 ounces cream cheese, softened
2 ounces smoked salmon
Spread one teaspoon of butter on one side of each slice of bread. Set aside.
Mix dill into cream cheese. Spread cream cheese mixture on the buttered sides of each slice of bread.
Layer the smoked salmon over the cream cheese on the WHITE slices of bread. Top salmon with the WHEAT slices of bread.
Trim crust from bread, cut sandwiches to create four triangles. This will yield 8 small triangle smoked salmon tea sandwiches.
Sun-Dried Tomatoes and Fresh Basil Tea Sandwiches
1/4 cup sun-dried tomatoes
2 tablespoons extra-virgin olive oil
6 slices whole-wheat sandwich bread
3 slices mild cheese
6 large, fresh basil leaves
12 small, fresh basil leaves, for garnish
In a mini chopper, combine the sun-dried tomatoes and olive oil. Blend until the tomatoes are finely chopped and combined well with the oil.
On a slice of bread, place 1 slice of cheese, spread some sun-dried tomato paste, and then top with 2 basil leaves. Cover with another slice of bread.
Slice the sandwich into 4 triangles. Garnish each triangular sandwich with the small basil leaves.
**** Afternoon Tea Sweet Treats ****
 The best part of any party are the sweet goodies the come at the conclusion of the event. Pastries can be as simple as mini-cupcakes to elaborate productions such as Napoleons or White Chocolate Mousse piped into puff-pastry cups. Candies can be as simple as English Kisses or as stunning as Dark Chocolate Truffles. You could always cheat a little and visit your favorite bakery to pick up an assortment of petite desserts. (Remember, everything is small, bite size morsels of wonderful goodness). Or you could make a few of your own, to show off your talents, tastes and style. You don’t need to make more than 3 or 4 selections, at lease one or two per person.
Afternoon Tea Cakes
Almost Homemade Petit Four Cakes
Boston Cream Pie Mini Cupcakes
Afternoon Tea Cheesecakes
Brûléed Mini Cheesecake Bites
Strawberry Topped Cheesecake Bites
Afternoon Tea Cookies
French Almond Macaroons with Swiss Meringue Butter Cream Filling
Lemon Macaroons with Lemon Curd
Afternoon Tea Pastries
Napoleon Pastry
White Chocolate Mousse with Raspberry Garnish Pastries
******** Cakes ********
Almost Homemade Petit Fours
Petit Four Cakes:
1 store-bought Pound Cake or Sponge Cake
Filling of Your Choice (Such as Nutella, fruit preserves, lemon curd)
Either refrigerate or freeze the cake (once chilled or frozen, the cake can be easily cut into different shapes).
Prepare Buttercream Icing (see below); set aside.
Use a long serrated knife, slice the cold cake in half or layers (depending on the size of your cake).
You can measure the sides and mark them with toothpicks to help guide the knife; gently saw your way through. Cover cake layers with plastic wrap until you’re ready to assemble them. Spread the filling (of your choice) between the layers. Place the top layer over the top of the filling.
Remove any crumbs from your work area. Position the petit fours 2 inches apart on a thin mesh wire cake rack suspended over a baking pan (to catch drips).
Decorate the top of the petit fours with sprinkles, candies pearls, Edible Flowers, (can be Crystallized/Candied Edible Flowers) or a design of whimsy.
Allow frosted cakes to sit until they are dry, then remove the cakes from the rack, trimming any excess frosting away from the bottoms with a sharp knife.
Pure White Buttercream Icing
1/2 cup Vegetable Shortening
1/4 cup milk, room temperature
1 teaspoon pure vanilla extract
2 tablespoons of rose-water or rose extract
1 pound box powdered (confectioners’) sugar
In a large mixing bowl, combine butter, milk, vanilla extract, rose-water or rose extract, and powdered sugar; and mix at a low-speed until smooth. If stiffer icing is needed or the weather is very warm, add a little extra sugar.
To create pastel colors, divide icing into a separate bowls for each desired color. Using a toothpick, add one drop of color at a time and mix until desired color is reached.
Chocolate Buttercream Icing: To create a chocolate icing, add 2 tablespoons of dark cocoa to the above recipe.
Boston Cream Mini-Cupcakes
Mini Cupcakes
1 Box Yellow Cake Mix (or favorite yellow cake recipe)
4 Eggs
1 Stick of Butter, melted
Cream Filling
1 (4 serving size) package instant French vanilla pudding & pie filling mix
1 1/2 cups heavy cream
1 tablespoon water
Chocolate Ganache
1/2 cup heavy cream
2/3 cup dark chocolate chips
HEAT oven to 350°F. Line 24 muffin cups with paper baking cups.
MINI CUPCAKES: – Melt butter in a heat-proof bowl in the microwave. Let butter cool to room temperature without solidifying. Empty box mix into the bowl of a stand-up mixer. Add eggs, one at a time, and mix until just blended. Add butter, mix for 2 minutes. Spoon batter into muffin cups.
BAKE 15 to 18 minutes or until toothpick inserted in center comes out clean. Cool 5 minutes. Remove from pans. Cool completely on wire rack.
CREAM FILLING: Combine pudding mix, cream and water in medium bowl. Whisk 2 minutes.
CHOCOLATE GANACHE: Heat cream in small saucepan on low heat until hot, but not boiling. Remove from heat. Stir in chocolate chips until melted. Let stand 5 minutes.
TO ASSEMBLE: Remove cupcakes from paper baking cups. Cut cupcakes in half crosswise using a serrated knife. Spread 1 rounded tablespoon filling on bottom halves. Place tops back on filling. Spread 2 teaspoons ganache over tops. Store in refrigerator until ready to serve.
******** Cheesecakes ********
Brûléed Mini Cheesecakes
1⁄2 cup graham cracker crumbs
2 tablespoons unsalted butter, melted
2 tablespoons plus 1⁄3 cup granulated sugar
12 oz. cream cheese, at room temperature
2 eggs
1⁄4 cup heavy cream
6 tsp. crème brûlée sugar or superfine sugar
Preheat an oven to 325°F. Lightly butter the wells of a mini cheesecake pan.
In a bowl, combine the graham cracker crumbs, butter and the 2 tablespoons granulated sugar and stir until blended. Divide the mixture among the prepared wells. Using the bottom of a shot glass or other small glass, press the mixture evenly into the bottom of the wells. Bake the crusts for 10 minutes. Transfer the pan to a wire rack and let cool.
Reduce the oven temperature to 275 degrees.
In the bowl of an electric mixer fitted with the flat beater, combine the cream cheese and the 1/3 cup granulated sugar and beat on low-speed until smooth, scraping down the sides of the bowl often. Beat in the eggs one at a time, scraping down the sides of the bowl after each addition. Add the cream and beat until blended. Pour the filling into the crusts, dividing it evenly among the wells.
Bake until the filling is set, 15 to 20 minutes. Transfer the pan to the wire rack and let cool to room temperature. Cover the pan with plastic wrap and refrigerate for at least 3 hours or up to 2 days before serving.
Just before serving, sprinkle about 1/2 teaspoon of the crème brûlée sugar evenly over each cheesecake. Using a culinary torch, melt the sugar according to the manufacturer’s instructions. Remove the cheesecakes from the pan and serve immediately.
Strawberry Topped Cheesecake Bites
18 Oreos finely crushed to about 1 3/4 cups*
2 1/2 tablespoons butter, melted and divided
2 (8 oz) packages cream cheese, softened
1/4 cup + 2 tablespoons granulated sugar
2 large eggs
1/2 tsp vanilla extract
1 1/3 cups white chocolate chips
1/2 cup + 1/3 cup heavy cream, divided
25 fairly small, fresh strawberries (or more if cutting more squares)
2 Tbsp powdered sugar
Preheat oven to 325 degrees.
Line an 8 by 8-inch baking dish with two large sheets of tinfoil (one going horizontally and one over the top of the other vertically. Make sure your sheets are long enough that you’ll have an overhang of foil over the edges of the pan. Also, be sure to mold it well to the pan).
Brush foil with 1/2 tbsp melted butter. In a mixing bowl, using a fork blend together crushed Oreos and 2 Tbsp melted butter until mixture is well combined and evenly moistened. Press mixture firmly into the bottom of the prepared baking dish (the bottom of a flat measuring cup or glass works well for pressing crust), set aside.
In a large mixing bowl, using an electric hand mixer set on medium-low speed, blend together cream cheese and granulated sugar until mixture is smooth, about 30 seconds. Add in eggs and vanilla extract and mix until well blended.
In a separate microwave safe bowl, heat white chocolate chips with 1/3 cup heavy cream on 50% power in 30 second intervals, stirring after each interval until melted and smooth. Pour melted white chocolate mixture into cream cheese mixture and blend on low-speed until combined. Tap bowl against counter top about 30 times to release some of the air bubbles then pour mixture over prepared crust in baking dish.
Bake in preheated oven for 40 minutes then turn oven off and without opening oven door allow cheesecake to rest in warm oven for 15 minutes. Remove from oven and let rest at room temperature for 30 minutes, then cover with plastic wrap and freeze for 3 hours or refrigerate for 6 hours.
Once cheesecake is fully chilled and set, remove from freezer or refrigerator and lift cheesecake out of pan using the foil overhang. Cut cheesecake into squares (I’d recommend you keep some clean paper towels close by to clean your knife while cutting squares).
In a mixing bowl, using an electric hand mixer set on high-speed, whip remaining 1/2 cup heavy cream until soft peaks form, then add powdered sugar and mix until stiff peaks form.
To assemble: Cut tops from strawberries. Thinly slice berries to create a fan, leaving 1/4 of top still attached. Fan out berries.
Fill a pastry bag with sweetened whipped cream and pipe over top of each cheesecake square. Gently place fanned berry over whipped cream. Serve immediately (for do ahead you can make cheesecake the day before then assemble within an hour of serving the following day). Store in refrigerator in an airtight container.
******** Macaroons ********
French Almond Macaroons with Swiss Meringue Buttercream Filling
French Almond Macaroons
1 1/4 cups confectioners’ sugar
1 1/2 cups (4 ounces) sliced almonds, finely ground, or almond flour
All-purpose flour, for dipping
3 large egg whites
Pinch of salt
1/4 cup granulated sugar
1/4 teaspoon pure vanilla extract
Preheat oven to 300 degrees. Sift confectioners’ sugar into a bowl. Whisk in almonds; set aside.
Line 2 baking sheets with parchment paper or nonstick baking mats, and mark circles using a 1 1/2-inch cutter dipped in flour.
Put egg whites in the bowl of an electric mixer fitted with the whisk attachment. Beat on medium speed until foamy, then beat in salt. Beat in granulated sugar, 1 teaspoon at a time, until medium-soft peaks form. Transfer mixture to a large bowl.
Using a rubber spatula, fold half the almond mixture into the egg white mixture until just incorporated. Fold in vanilla and remaining almond mixture until just incorporated. Firmly tap bottom of bowl on counter to eliminate air pockets.
Transfer mixture to a pastry bag fitted with a 1/2-inch plain tip. Pipe mixture into marked circles on prepared baking sheets.
Bake, rotating sheets halfway through, until macaroons are slightly firm and can be gently lifted off parchment (bottoms will be dry), 20 to 25 minutes. Let cool on sheets 5 minutes. Transfer macaroons on parchment to a wire rack; let cool completely.
Swiss Meringue Buttercream Filling
4 large egg whites
1 1/4 cups sugar
1 1/2 cups unsalted butter, (3 sticks), softened, cut into tablespoons
2 1/2 teaspoons pure vanilla extract
Put egg whites and sugar in the heat-proof bowl of an electric mixer set over a pan of simmering water. Whisking constantly, cook until sugar has dissolved and mixture is warm (about 160 degrees).
Attach bowl to a mixer fitted with the whisk attachment. Beat egg white mixture on high-speed until it forms stiff (but not dry) peaks. Continue beating until fluffy and cooled, about 6 minutes.
Switch to the paddle attachment. With mixer on medium-low, add butter several tablespoons at a time, beating well after each addition. (If frosting appears to separate after all butter has been added, beat on medium-high speed until smooth again, 3 to 5 minutes more.) Beat in vanilla.
Reduce speed to low; beat 2 minutes to eliminate air bubbles. Stir with a rubber spatula until smooth.
To Assemble: Spread 2 teaspoons buttercream on flat sides of half the macaroons, then sandwich with remaining halves, keeping flat sides together. Refrigerate until firm, about 20 minutes, before serving.
Lemon Meringue Macaroons with Lemon Curd
4 large egg whites, at room temperature
1 cup plus 2 tablespoons pure cane sugar
2 tsp. pure vanilla extract
zest of 1 lemon
1 tsp. cream of tartar
1 jar (about 10.5 oz) prepared good lemon curd
Preheat your oven to 350 degrees. Line two baking sheets with parchment paper.
In a large mixer bowl, combine the egg whites and 1/4 cup of the sugar. Whip with an electric mixer (hand-held or stand) until frothy. Continue whipping and adding the remaining sugar gradually until the egg whites have reached soft peaks and all the sugar is incorporated.
Add the vanilla, lemon zest, and cream of tartar to the egg whites and continue whipping at high-speed until the egg whites are stiff and glossy. Using two spoons, scoop the meringue out into small mounds on the prepared baking sheets, about 1 inch apart from each other (you’ll get between 24 and 36 meringues).
Use the handle of a small spoon to form a well in the center of each meringue, as if you’re making them into nests. The indentations will hold the lemon curd after the meringues are baked. Turn off the oven and put the meringues in to bake. Set a timer for 90 minutes. After 90 minutes, check the meringues and, if they’re not dry and crisp all over, switch the positions of the baking sheets in the oven. Continue allowing the meringues to sit in the warm oven for another 30-60 minutes, until they are perfectly crisp and dry (make sure to check the bottoms of the indentations, which are often the last part to become fully dry).
Remove the meringues from the oven and gently pull them off of the parchment paper. Allow them to cool for a few minutes, then fill the indentations with lemon curd — about 1/2 tsp. per cookie should suffice. Let them cool completely before serving.
******** Pastries ********
Napoleon Pastries
2 cups milk
1 vanilla bean, split lengthwise
5 egg yolks
12 tbsp. granulated sugar
2 tbsp. cornstarch, sifted
3 tbsp. unsalted butter, softened
2 8″ x 18″ sheets puff pastry
1/4 cup confectioners’ sugar
To make the pastry cream, put milk into a medium saucepan. Scrape seeds from vanilla bean, add seeds and pod to milk, and bring to a simmer over medium heat. Remove pan from heat, cover, and set aside to steep for 1 hour. Strain milk into a bowl, discarding pod. Return milk to saucepan and bring to a simmer again over medium heat.
Meanwhile, beat egg yolks, 10 tbsp. of the granulated sugar, and cornstarch together in a mixing bowl with an electric mixer on medium speed until pale yellow and mixture falls from beaters in thick ribbons, 3-5 minutes. Gradually add 1 cup of the hot milk to egg yolk mixture, whisking constantly; then gradually add egg yolk-milk mixture back into hot milk in saucepan. Cook over medium heat, stirring constantly with a wooden spoon, until custard is thick enough to coat the back of a spoon, about 5 minutes. Transfer to a medium bowl and stir constantly until custard is very warm (about 125° on an instant-read thermometer), 5-10 minutes. Add butter, 1 tbsp. at a time, whisking well after each addition. Cover surface of pastry cream with plastic wrap to prevent a skin from forming and refrigerate until ready to use.
Preheat oven to 375°. Put 1 sheet of puff pastry on a parchment paper-lined baking sheet, cover with another sheet of parchment, and refrigerate until chilled, 20-30 minutes. Put another baking sheet directly on top of parchment-covered pastry to weight it, then bake until pastry begins to turn brown, 10-15 minutes. Remove baking sheet and parchment from top of pastry. Sprinkle pastry with 1 tbsp. granulated sugar, then bake, uncovered, until pastry is golden brown, 6-8 minutes more. Transfer pastry to a clean surface and remove parchment from bottom. Set aside to cool. Repeat process with remaining 1 sheet puff pastry and 1 tablespoon sugar. Using a serrated knife, cut each pastry into twelve 4″ x 2″ rectangles, making 24 rectangles in all.
To assemble the Napoleons, spoon 2 tbsp. of the pastry cream down center of each sugared side of 8 pastry rectangles and stack another pastry rectangle on top. Repeat process with remaining pastry cream and pastry rectangles. Sift confectioners’ sugar over Napoleons.
When I’ve done teas for my family, this is Dad’s favorite pastry dessert. I think he could skip the rest of the tea, and have nothing but these instead.
White Chocolate Mousse With Raspberry Garnish Pastries
1 Package (10 oz) Frozen Puff Pastry Shells
6 Squares (1 oz each) White Chocolate
1 ½ Cups Heavy Cream
1 Square (1 oz) Semi-Sweet Chocolate, melted
Raspberries for garnish, if desired
Bake and cool pastry shells according to package directions.
In a microwaveable bowl, heat white chocolate and ¼ cup heavy cream on high for 2 minutes or until chocolate is almost melted, stirring halfway through heating process. Stir until white chocolate is completely melted. Cool to room temperature, approximately 20 minutes, stirring occasionally.
Meanwhile, chill a bowl to beat remaining cream. Beat with electric mixer at medium speed until soft peaks form. DO NOT OVER BEAT. Fold half the whipped cream into white chocolate mixture.
Fold in remaining whipped cream just until blended. Spoon or pipe filling into pastry shells. Drizzle with melted semi-sweet chocolate. Top each with a raspberry. Refrigerate 1 hour.