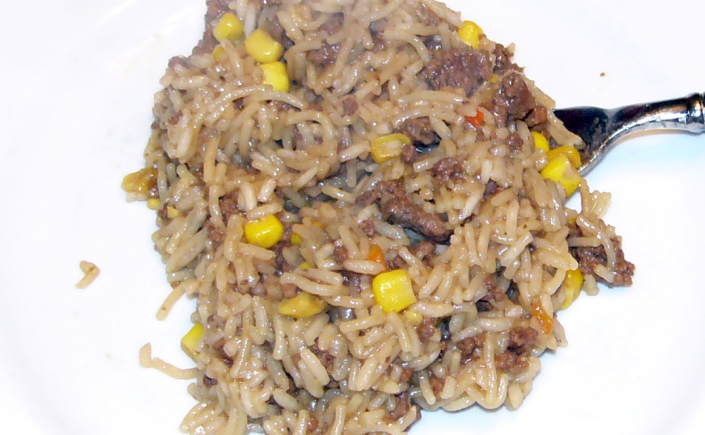
It’s amazing what one simple, little change can make.. For those of you who have followed my blog for a while, you might recognize the recipe for Beefy Corn Rice-A-Roni – When “Quick” is All That Matters. It’s a simple family favorite for those nights when time is of the essences. Recently, I whipped up the Rice-A-Roni based dish as I always do, with one tiny change.
Italian Garlic Focaccia with Rosemary and Roma Tomatoes

Focaccia is a flat Italian bread similar to pizza – but without all the sauces. It is simple, usually topped with a little salt, some herbs, sliced vegetables such as tomatoes and a little cheese (or a lot of cheese – if you like). Typically this is served as a side bread and goes well with soups or other saucy dishes. This also goes well with a nice bottle of wine, a crisp salad (for summer evenings) and a casual evening with friends. My favorite kind of entertaining – warm and casual in good company.
My Focaccia recipe is a “cheaters” recipe in that it utilizes refrigerated pizza crust. (Not the canned stuff – we’re talking the stuff sold in bags; usually found in the deli section of your grocery store).
Italian Garlic Focaccia with Rosemary and Roma Tomatoes
1 Package (10 oz) Refrigerated Pizza Crust
2 or 3 Cloves Garlic, pressed
1/4 Cup Olive Oil
Sea Salt – just enough to flavor bread without imparting a salty taste
2 or 3 Sprigs Fresh Rosemary
1 Firm Roma tomatoes, sliced and quartered
1/3 Cup Parmesan Cheese (or as desired)
Note: If you cannot locate the pizza dough in a bag, you can use refrigerated canned pizza dough such as Pillsbury. If that is the case, there is no need to let the dough rest on the counter.
Preheat oven to 425-degrees. Remove dough from refrigerator and let rest on counter for about 30 minutes.
Lightly oil hands with a little olive oil to make working the dough a little easier. Brush cooking stone with olive oil as well.
Stretch and press pizza crust into 12” circle on a stone baking sheet. This will take a few minutes, be patient and don’t force the dough too quickly.
Brush lightly with a little olive oil. Lightly sprinkle with a little sea salt.
Insert little tufts of Rosemary all around the bread as desired.
Arrange sliced tomatoes around the Rosemary. Sprinkle garlic evenly over crust. Finish by sprinkling Italian Blend over everything.
Bake 20 to 25 minutes or until a beautiful golden brown. Cut and serve hot.
This bread is great with just about any Italian meal. It’s also awesome with a big bowl of soup such as Smoked Gouda Mushroom Soup, Slow Simmered Creamy Potato and Bacon Soup or Autumn Minestrone with Tortellini Pasta.


Unbelievably Quick Chicken, Rice and Tomato Soup with Buttery-Chive Crescent Rolls

Somewhere out there I came across an article about making soup in five easy steps. Actually, I’ve read several articles on the subject – most dealing with using left-over vegetables and meats. And there’s nothing wrong with that.
This soup uses cans and a quick microwave rice to render a chicken soup that is packed with flavor. Since I’m still in recovery mode from heart surgery, an easy supper I could make myself and have ready when my guys came home from a long day was just what the doctor ordered. They have been great through this long recovery process, and I wanted to show them that there was light at the end of the tunnel. Great tasting food that they didn’t have to cook for themselves.
Just a silly side-note: When I was balancing our bouillon spoons on the rim of the large coffee mugs, Hubby wandered into the kitchen. He smiled and said “Now are you happy? You get to use your fancy new soup spoons.” Yep – I was happy.
 Chicken, Wild Rice and Tomato Soup
2 Envelopes Uncle Ben’s Long Grain and Wild Rice
16 oz Chicken Stock
2 Cans (10 oz) Chunky Chicken White Meat
1 Can (14 oz) Italian Diced Tomatoes
1 Teaspoon Dried Basil
1 Teaspoon Mrs. Dash Garlic and Herb
Vent Uncle Ben’s 90-Second Long Grain & Wild Rice according to package direction. Place bags, one at a time, into the microwave and “zap” each bag for 90 seconds.
While rice is “cooking”, pour chicken stock into a pot. Add chicken meat, without draining, into the pot with the broth. Break up the larger pieces of chicken.
Open can of diced tomatoes, then dump into pot with stock and chicken. Add rice, stir everything together. Season and continue to heat over low heat until bubbling. The longer the soup simmers, the better the flavors come together.
Ladle into soup bowls or large coffee cups, throw out the evidence and call it home-made. Serve with Buttery-Chive Crescent Rolls.
 Buttery-Chive Crescent Rolls
1 can refrigerated crescent dinner rolls
1 tablespoon butter, soft
¼ cup fresh chives, chopped
Heat oven to 375-degrees (350 for darker pans). Unroll dough; brush with butter.
Sprinkle buttered side with chives.
Separate rolls along perforated lines. Roll each into crescent shape and place on ungreased cookie sheet.
Bake for 8 to 10 minutes or until golden brown. Immediately remove from cookie sheet. Serve warm.
Makes 8 rolls; double for more.
************
Happy slurping everyone!
Bratwurst – for Breakfast?

When I bought a package of Johnsonville Bratwurst Grillers at the outlet market earlier in the week, Hubby gave me a look. Really? Bratwurst – for breakfast? I could tell he thought I was a little nuts. Hey, I argued – do you want me cooking up some kind of sausage other than Bratwurst on Saturday? Packers – playoffs. Hubby agreed, we shouldn’t be taking any chances.
Farmhouse Buttermilk Biscuits

It’s Sunday morning, and I have been up before the dawn. Sipping yet another piping hot cup of freshly pressed Almond Coffee, I’m chatting with Kiddo while searching through my collection of breakfast recipes. This is no ordinary Sunday. It’s football season. That means Green Bay at New England and Sunday dinner wolfed down in front of the big screen TV.
Continue reading “Farmhouse Buttermilk Biscuits”Crown Pork Roast with Mushroom Stuffing
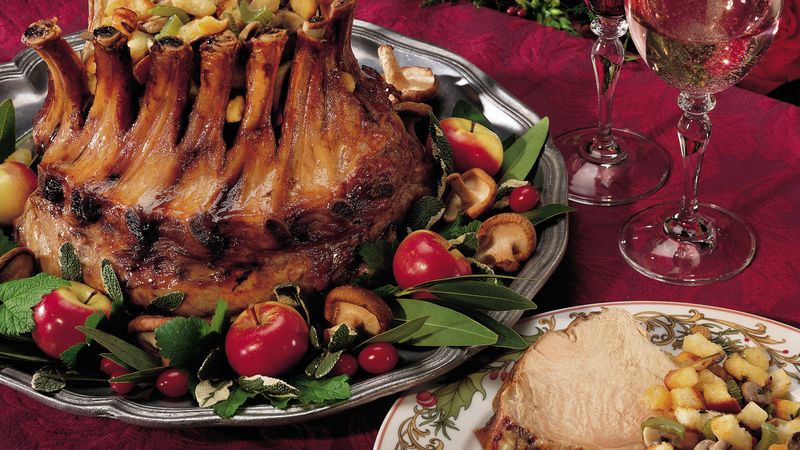
Would you believe I have two Crown Rib recipes? Would you believe that both of those recipes came to me courtier of Betty Crocker? Betty Crocker, the expert in the kitchen since 1921. She hosted cooking shows on the radio, and has written countless cookbooks. One of my first cookbooks was from Betty Crocker. Not bad for a woman who does not actually exist.
A stuffed Crown Roast is one of those buck list meals I have dreamt of for as long as I can remember. Placing this beautiful roast on the table and reveling in all the awes of my guests – such is my fantasy holiday. Everyone is dressed to the nines. The room is bathed in the warm glow of candle light. We raise our glasses of Champagne and toast to the promise of tomorrow. Perhaps this fantasy stems from my American desire to feel like Royalty, even if we are not willing to admit it. Crown Roast – even the name is regal. Once upon a time, usually around the holidays, (from just before Thanksgiving to just after Christmas) these beautiful roasts were a prominent feature in the meat section. These days, markets don’t necessarily carry a cut of meat that requires any sort of culinary execution. You really can’t blame the mega markets – it’s all about movement – space is valuable. No one wants to feature cuts of meat that aren’t going to sell. While we dream of fancy feasts, when it comes right down to it most of us feel intimidated in our own kitchens. I say take a deep breath, make friends with your butcher, and just do it.
Crown Pork Roast with Mushroom Stuffing
Crown Roast:
8- to 10-lb pork crown roast (about 16 to 18 ribs)
2 teaspoons salt
1 teaspoon pepper
Mushroom Stuffing:
2/3 cup butter
2 Celery Stalks, chopped (1 cup)
1 medium onion, finely chopped (1/2 cup)
1 lb fresh mushrooms, sliced (6 cups)
8 cups unseasoned croutons
1 tablespoon chopped fresh sage or 1 teaspoon dried
1 tablespoon chopped fresh thyme or 1 teaspoon dried
1 tablespoon chopped fresh marjoram leaves or 1 teaspoon dried
1 teaspoon poultry seasoning
1 teaspoon salt
1/2 teaspoon pepper
Finishing Touches:
8 to 10 Small red apples
10 Fresh Bay Leaves
6 Sprigs Thyme
6 Sprigs
Handful Fresh Cranberries
Handful Fresh Mushrooms
Preheat oven to 325 degrees.
Sprinkle pork roast with salt and pepper.
Place roast, bone ends up, on a rack in a shallow roasting pan. Wrap bone ends in foil to prevent excess browning.
Insert an ovenproof meat thermometer so that the tip is in the thickest part of the pork. Make sure probe DOES NOT touch bone or rest in fat.
Crumple foil and place in the middle of the crown to help roast hold its shape while roasting evenly.
Place roast in the oven, uncovered, and cook for 3 about hours.
While roast is cooking, make mushroom stuffing.
In 4-quart Dutch oven, melt butter over medium heat. Cook celery, onion and mushrooms in butter about 3 minutes, stirring occasionally, until tender.
Stir in half of the croutons. Cook, stirring frequently, until evenly mixed and croutons are softened. Stir in remaining croutons and ingredients. About 1 hour before pork is done, remove foil from center and fill center of crown with stuffing. Cover stuffing with foil for first 30 minutes.
Remove pork from oven when thermometer reads 150 degrees cover with tent of foil and let stand 15 to 20 minutes or until thermometer reads 160 degrees. Temperature will continue to rise about 10 degrees and pork will be easier to carve.
To serve, remove foil wrapping from bone ends transfer crown to a serving platter. Spoon any stuffing that may have fallen out during transfer back into center of crown. Garnish as desired with finishing touches. To plate, spoon stuffing from center of crown, cut pork between ribs.
Traveling Dinner Party – Part 10 – Conclusion

Bet you thought Part 9 was it – the end of our traveling dinner party. After all; Part 9 was all about desserts. Aren’t desserts the end of any meal? Yes – most of the time. However; lavish affairs generally end as they began. Friends gather, raise a glass and toast the success of an evening well-spent.
Continue reading “Traveling Dinner Party – Part 10 – Conclusion”
Autumn Morning Eggnog French Toast

I love this time of the year – from now until New Year’s. It’s this magical time of the year when grocery stores stock and carry Eggnog. I have several recipes for making my own Eggnog, but why make it when it’s so convenient to simply reach for it in the dairy section? Maybe one of these years I’ll make it from scratch, but only at this time of the year.
Slow Cooker Spicy Chicken Thigh Tacos

Most Chicken Taco recipes call for breast meat. Why not change things up a bit by using boneless, skinless chicken thighs instead? The flavor of the dark meat is superior to the white meat. The boneless, skinless variety of thigh meat isn’t overly fatty. And it’s a heck of a lot cheaper. All of these are definite reasons in favor of changing things up a bit.
Continue reading “Slow Cooker Spicy Chicken Thigh Tacos”Italian Macaroni and Cheese

First let’s talk about Kraft Mac and Cheese for a moment. You know the stuff I’m talking about – comes in a box with a package of powdered cheese. In 1916, Kraft was awarded a patent on their powdered cheese. While the company did not create powdered cheese, it did come up with a new way of processing the powdery substance. By 1937 Kraft had perfected its Mac and Cheese Dinner. The timing was perfect. World War II was looming just over the horizon, and the impact of a world war would create a demand for Kraft Mac and Cheese.
Pâté de Foies de Volaille au Cassis

Doesn’t the title of this recipe sound wonderful? Everything in French sounds sinfully delicious. What does it mean in English? Pâté of Chicken Liver with Black Currant. And since today is National Pâté Day, it is only fitting that I share this wonderful recipe with you. It’s one I picked up from my favorite French Food Site, The Everyday French Chef. The recipes are simple and yet true to their very French roots.
Continue reading “Pâté de Foies de Volaille au Cassis”Peachy Almond Up-Side-Down Skillet Cake

This is a recipe I had intended to publish months ago – as in the height of the summer season, when peaches are at their best. Unfortunately, time slipped away from me. (Can it really be the first day of November already?) I could have put this recipe off until next summer, but I was afraid I’d let it slip into obscurity, and this cake is far too moist and yummy to let that happen. So here it is – a well intended share, even if it is a little late in the year.
On a beautiful Saturday morning this past summer, Hubby and I were at our local Farmers Market. I love wandering around the market, with all the colors and smells of fresh picked fruits. One stand in particular had the most luscious selection of yellow and white peaches. At fifty-cents a peach, how could I resist? Besides, we were having a wonderful country-style barbecue later that day, and what could be better than a southern-style up-side-down cake for dessert? (Isn’t it funny that we think of the south when we think of peaches? You know, Georgia Peach – yet peaches actually were first cultivated in China.) Hubby and I picked out several of each, some for baking, some for eating. These peaches were packed with juice, and eating them became a sticky proposition. Hubby finally resorted to eating his peach over the kitchen sink.
Kiddo isn’t much of a fresh fruit kind of guy, but he loved the peach topped cake. His approval is always a plus in my book.
NOTE: The recipe below is for an Almond-Flour cake from scratch. However; if baking from scratch isn’t your thing, you could use a yellow cake mix. Just add a little Almond Extract to the batter, and soldier on.
Peachy Almond Up-Side-Down Skillet Cake
1 stick unsalted butter plus 1 tablespoon, at room temperature
3/4 Cup Brown Sugar
3 medium yellow peaches, pitted and cut into 6 wedges each
1 medium white peach, pitted and cut into 6 wedges each
3/4 cups white sugar
1 1/2 cups all-purpose flour
1/2 cup whole almonds
2 teaspoons baking powder
1/2 teaspoon salt
2 large eggs
1/2 teaspoon vanilla extract
1/4 teaspoon almond extract
3/4 cup whole milk
French Vanilla ice cream, for serving (optional)
Heat the oven to 350 degrees.
Melt 2 tablespoons butter in a 9-inch cast iron skillet over medium heat. Add 3/4 cup brown sugar and cook, stirring occasionally, until smooth and deep golden brown, 5 minutes. Remove from heat and arrange sliced peaches over top to create a “swirling” pattern. Layer center with white peaches, outer “ring” with regular peaches. If necessary, trim peaches to fit. (Reserve any remaining peach slices to garnish over ice cream, if desired). If your peaches leave a lot of juice on your cutting board, add the juices to the batter for a more “peachy” flavored cake.
Combine the flour, almonds, baking powder and salt in a food processor and pulse until the almonds are finely ground.
Beat the remaining 7 tablespoons butter and 3/4 cup white sugar in a large bowl with a mixer on medium-high speed until light and fluffy, about 4 minutes.
Add the eggs, one at a time, beating well after each addition.
Beat in the vanilla and almond extracts. Beat in the flour mixture in 3 batches, alternating with the milk and beginning and ending with the flour mixture; beat in each addition until just incorporated.
Spread the batter evenly in the prepared pan and bake until golden and a toothpick inserted into the center comes out clean, about 45 minutes. Transfer to a rack and let cool 30 minutes. Run a very thin knife around rim, invert cake onto a plate and let cool completely. Serve with ice cream.
Spicy Chinese Beef and Broccoli

Be it delivery or carry-out; whenever we order Chinese it always seems to include the same favorites – Orange Chicken and Beef and Broccoli. While Lemon Chicken might be included (if available) – Orange Chicken and Beef and Broccoli are an unwritten must. Another favorite in our house is General Tsao’s Chicken – if for no other reason than the heat.
Smoked Sausage and Potato Bake with Roasted Carrots

Those who have been following for a while now might remember how much Brother Dear loved smoked sausage. For that matter, how much he loved all things fried – unless it was a vegetable other than a potato. Cooking for Brother Dear could be a bit of a challenge. He was stubborn as a mule and as picky as most two-year-olds when it came to his food. (Notice that I say most – my children were adventurous at mealtime, as is Kiddo. The table was never a battlefield). My mom allowed Brother Dear to eat Chocolate Cake for dinner rather than to fight with him. He never outgrew those childish habits. It was up to me, and later our younger sister to come up with variations of his favorites to keep him from starving. We tried Kilebasa Sausage with Herbed Potatoes and Corn and A Corny Take on Smoked Sausage with Fried Potatoes. These variations of Brother Dear’s Smokes Sausage and Fried Potatoes met with his stamp of approval. That is all but one. For one thing, the entire dish was baked, not fried. And I had the audacity to include carrots! Try as I might to convince him that he could pick out the carrots, he was convinced that the carrots had somehow gotten their carrot cooties on everything. (Ha! Little did he know about all the times I minced carrots so finely to put into sauces and such).
Word of advice to parents everywhere: Don’t raise picky eaters. Encourage your children to try new things. Well-rounded children grow up to be well-rounded adults. Life is overflowing with wonder and flavor and color and . . . you get the idea. Embrace it all!
Smoked Sausage and Potato Bake with Roasted Carrots
1 ½ lbs small Red Potatoes, cut in haves or quartered
1 Onion, slivered thin
½ lb Baby Carrots
2 Tablespoons Melted Butter
1 Teaspoon Salt
1 Teaspoon Garlic Powder
½ Teaspoon Thyme leaves
½ Teaspoon Black Pepper
2 Packages Hillshire Farms Smoked Sausage, coin-cut
Preheat oven to 400-degrees. Spray a 13 x 9 inch casserole dish with cooking spray. Set aside until ready to use.
Clean and cut Red Potatoes. Place in a large bowl.
Add onions, carrots, butter and seasonings to potatoes. Toss to coat evenly.
Place potato mixture into prepared casserole dish. Bake, uncovered, for 40-45 minutes.
While potatoes are cooking, coin-cut smoked sausage, set aside until ready to use.
Add sausage to potato mixture, mix well. Continue to bake 15-20 minutes longer or until potatoes are tender and golden.
Note: For more color, try Purple Potatoes (when you can find them) or Red Onions.
Crock Pot Pork Chile Verde

For a few months now I’ve been cooking up some yummy dishes from Mexico. An extension on the whole Taco Tuesday craze if you will. We’ve done so many delicious Mexican inspired dishes.
