One-Skillet Ziti Bake with Cucumber Salad and Warm Bread

It’s been a while since I last shared a complete dinner menu. It’s been a while since we last indulged in one of my favorite cuisines – Italian. This one-skillet Pasta dish has been on the weekly menu for a while now, but you know how plans go – by the wayside. Especially during the holidays – last-minute shopping, errands and other distractions such as pot lucks and decorating and on it goes.

Continue reading “One-Skillet Ziti Bake with Cucumber Salad and Warm Bread”

Honey and Spice-Glazed Pork Chops

What’s that you say? Another “kissed with honey” recipe for this, I love Honey Day? No problem . . .

I love pork chops. For the most part, they cook up quickly and easily. A little of this, a little of that and you’ve got a meal that is delicious in no time at all. Although not the fastest among my pork chop recipes, one of our favorites is my Mexican Pork Chops with Ancho Chile Cornbread Stuffing. I thought the Mexican Pork Chops were going to remain Hubby’s all-time favorites until recently, when Hubby, Kiddo and I got together and cook up to-die-for Hunter’s Pork Chops – Heaven on a Plate. I’m always on the lookout for a new recipe to try. When Kiddo was a little Kiddo, we were big on the Book Fairs. He would tell me “you can’t have too many books”, which is exactly the way I feel about new recipes. There’s no such thing as too many. This little ditty is a recipe I picked up at Everyday Tastes.com – the recipe seemed very straight forward, and the photo on their website showed beautiful, glistening chops. Food needs to be appealing to the senses – the look and the aromas are the first things that greet you long before that first bite. If it looks bad and stinks, it’s hard to get that fork to your lips, although I must admit I’ve sampled some mighty tasty dishes over the years that at a glance were down right ugly!

While cooking up these chops, I learned a few things and needed to adapt quickly. The original recipe had the pork chops brushed with the glaze immediately after browning. While I started to follow those instructions, a little of the glaze dripped from the brush and the sugar in the honey began to brown quickly. It was necessary to turn down the heat more to the low of medium-low. Fearful that the chops would dry out, I added the chicken stock, let them “steam/simmer” in a covered pan. Once I was sure the chops were cooked through, I brushed on the glaze. Adding a little butter at the end gave a nice finish to the pan drippings. A little drizzle over the finished chops gave everything a deep, beautiful color.

Honey and Spice-Glazed Pork Chops
1/4  cup  honey
1 Tablespoon Dijon mustard
1/2  teaspoon  ground ginger
1/4  teaspoon  ground cinnamon
1/8  teaspoon  ground cloves
4  (4-ounce) boneless center-cut pork chops (about 1/2 inch thick)
Salt and pepper to taste
1/2 Cup Chicken Stock
2 Tablespoons Butter

In a small bowl, combine honey, mustard and spices. Set aside until ready to use

Heat a large nonstick skillet over medium heat and coat with cooking spray. Sprinkle pork with salt and pepper; cook 3 minutes on each side or until browned.

Reduce heat to medium-low and chicken stock. Cover and cook for 10 minutes longer, or until pork is cooked through, turning once.

Brush pork chops with honey-spice mixture. Cook 3 minutes more. Turn, brush with remaining mixture. Add butter to pan and cook another 3 minutes.

Remove from pan and serve immediately.

If desired, serve on a bed of rice such as butter and garlic or a rice pilaf. You can also drizzle a little of the pan drippings over the chops.


Spicy Beef and Chorizo Tacos

Growing up, Dad made the best tacos. What made his tacos so flavorful? It was the blend of meat filling – Ground Chuck and good quality Chorizo. By good quality Chorizo, I mean the good stuff you find in a Mexican Meat Market – the stuff sold in bulk, not in  plastic tubes in the grocery store. And there was more.

Continue reading “Spicy Beef and Chorizo Tacos”

Chili’s Honey Chipotle Chicken Crispers

Today is a special day for Honey. Not just National Honey Day, but I Love Honey day – a celebration of all things with honey. These wonderful Chicken Crispers are sticky with sweet honey and spicy with chipotle – the best of two worlds. Yeah, I love honey . . . and Chipotle . . . and Chicken . . . and, well you get the idea.

Have a Sweet Day!

Chili’s Honey Chipotle Chicken Crispers
Honey-Chipotle Sauce
3/4 cup Sage Honey
1/4 cup chicken broth
2 tablespoons ketchup
2 teaspoons chipotle powder
1 tablespoon apple cider vinegar

Make the Honey-Chipotle Sauce: Combine all ingredients in a medium-sized saucepan over medium-high heat. Whisk and bring to a boil for about 2-3 minutes, letting it reduce. Remove from heat and set aside to cool.

Chicken Crispers
3/4 cup flour
1/4 teaspoon salt
1/4 teaspoon Pepper
1 teaspoon garlic powder
2 Eggs, beaten
1 tablespoon chicken broth
1 1/2 cups panko
1 teaspoon paprika
1 1/2 lb. boneless, skinless chicken breasts, cut into strips

Make the Crispy Chicken: Heat oven to 425 degrees. Line a large rimmed baking sheet with foil for easy cleanup. Insert baking rack (a cookie cooling rack will work) inside rimmed baking sheet. Set aside.

Set up three bowls as a breading station. In the first bowl, combine flour, salt, pepper and garlic powder. In the second bowl, the beaten eggs with chicken broth. In the third bowl, combine panko and paprika.

Cut each chicken breast into three strips lengthwise. Use tongs to dip chicken strips into flour mixture, coating both sides, then into the egg mixture, allowing excess to drip back into the bowl and finally in the panko mixture.

Place dipped chicken on a baking rack over a rimmed baking sheet. Once all the chicken has been dipped, let rest for 10 minutes for the breading to better adhere to the chicken.

Once rested, place baking sheet into the heated oven. Roast until chicken is cooked through, about 20 to 25 minutes.

To finish, toss tenders in Honey-Chipotle sauce, coating each one, and serve.

This can be enjoyed as a finger snack food, served with French Fries or for a casual meal, add corn on the cob and enjoy!


Beef Enchilada Skillet

I love to collect recipes.  I have hundreds of cookbooks (an ever-growing collection that hubby claims borders on obsession). I seek out cookbooks everywhere we go – flea markets, antique stores, used book stores – even the grocery store checkout lines. I read my cookbooks the same way some people read a novel – from cover to cover. Generally speaking; unless it’s a multi-step, complicated recipe with techniques I’ve never tried before; I tend to read through a new recipe and then tweak it a bit. Most of what I “create” are actually inspired by others, prodding me ever forward to create a rendition which reflects my unique style. Like most cooks in this modern age, my quest for new revelations in the kitchen is not limited to those bound in books – the internet is an ocean of tantalizing dishes just waiting to be discovered. My inspired creations are then added and saved to my online stockpile of cookbooks on yumprint.com (over 4,000 recipes thus far. It can be months or even years before a recipe is taken for a test drive).  Most of my online collection is composed of recipes created by others that have inspired me to try new things, to reach new heights and learn through trial and error. That said, I invite – no make that encourage – you do the same with anything you like. In my humble opinion, recipes are designed to evolve with each individual, taking on new depth and flavors as they are joyfully passed along.

Recently I was inspired (by necessity mind you) to tweak a simple one-skillet dish I stumbled upon four years ago while perusing the recipe collection at 99cooking.com. The original recipe wasn’t complicated. I liked it just the way it was. Simple, straight forward, flavorful and perfect for a busy weeknight meal.  So I added the dish to my weekly menu plan (one of the features I love so much in Yumprint – the ability to create menus and shopping lists from that).

In our house, we have our assigned “duties” when it comes to food preparation.  Mine is to create and execute a weekly meal plan.   This includes creating the shopping list for the week.  My husband’s contribution to the “creative” process is to take that shopping list, rummage through the pantry; refrigerator and freezer, marking off the ingredients we have on-hand.  That way we buy only what we need.  I bring this up because the recipe I am about to share called for “Mexican Hot Chili” seasoning.  I love my husband dearly, but he’s not necessarily the best person to check our spices.  We had chili powder, so he marked it off the list, not realizing that there is a difference.  When it came time to prepare dinner, I realized we didn’t have the correct chili seasoning, so I improvised. This improvisation resulted in an enchilada sauce that was HOT!!!  So if you like it hot, use the notes at the bottom of the recipe.  Or make up your own . . .

Skillet Beef Enchilada
Enchilada Meat
1 ¼ lb ground chuck
1 cup uncooked Minute Rice
½ cup shredded cheddar cheese (more if you like)

Enchilada Sauce
3 tablespoons flour
3 tablespoons Hot Mexican-Style Chili Powder (McCormick)
½ teaspoon cumin
1 teaspoon unsweetened coca powder
1 ½ teaspoon garlic powder
1 ½ teaspoon onion powder
1 teaspoon Mexican Oregano
1 can (8 oz) Hunts Tomato Sauce (plain)
2 Cups Water
1 Cup Beef Broth (from 32 oz container)

Brown the meat in a large skillet. Drain off any fat.

While the meat is browning, make the enchilada sauce. In a bowl, mix the dry ingredients using a wire whisk to blend well. In a medium sauce pan, add 1/2 cup water and dry spices. Whisk until smooth. Add tomato sauce and remaining water and the broth. Cook over medium heat, stirring frequently until sauce thickens, about 8 minutes.

Add the rice and about half of the enchilada sauce to the cooked beef. Cook over medium heat until the rice is cooked, about 8 minutes. Add more enchilada sauce as needed to keep moist.

Sprinkle the shredded cheese over the mixture and lower the heat to prevent rice from burning. Cover and cook until cheese is melted, about 5 minutes.

Sprinkle with the chopped green onion and serve. If desired, top with a dollop of sour cream.

* NOTE:  To replace 3 tablespoon Hot Mexican-Style Chili Powder, I used 1 tablespoon each: Chili Powder, Chipotle Powder & Cayenne Powder.  Next time I’ll use a little less Cayenne Powder – this blend was SUPER hot!  My guys loved it, but then they like to each roasted jalapeno peppers, so they aren’t exactly shy when it comes to spicy foods. I thought it was a little over the top in the heat department.

On a closing note, the enchilada sauce was super easy to make.  I plan to play with it a bit – maybe use the sauce to create a chicken dish (similar to a Mole).  Like I said in the beginning, recipes are a source of inspiration, meant to deviate from as one sees fit.  When I do make my chicken dish, I’ll be sure to share.

Chicken and Italian Cheese Stuffed Lasagna Roll-Ups

Hi there everyone. How’s everything going? Before I get too deep in posting, let me take a moment to say thanks. Thanks for stopping by. Thanks for taking an interest in what I’ve written. Most of all, thanks for simply being.

Continue reading “Chicken and Italian Cheese Stuffed Lasagna Roll-Ups”

Green Bay’s Amazing Egg Muffin Cups

Those of you who have been following along for a while now know that Hubby is a huge Green Bay Packer fan. I don’t really understand the whole football thing. It just does not seem to be a pleasant way to spend a Sunday. Hubby yells a lot at the TV, disagrees with most of the calls and the veins in his neck look as though they are about to explode. At the end of the game, he always thanks me for letting him “enjoy” his day. I don’t get it. But then again, I enjoy watching the news while yelling at the TV.

Continue reading “Green Bay’s Amazing Egg Muffin Cups”

Malted Waffles – Almost from Scratch

My gang loves my Golden Malted Waffles from Scratch but sometimes I just don’t feel like whipping up waffles from scratch. We all have our lazy Sundays, when breakfast beckons, the heart is willing but the old bag of bones just isn’t in the mood. When I asked Hubby what he would like for breakfast, he looked at me with an eager smile and said “Waffles.” Hum, let’s see what I could do to satisfy his urge for waffles and my need to remain “lazy.”

At Christmas Time a few years ago, I gave my son a waffle maker. In keeping with the whole waffle theme, his Christmas package also contained a bag of Carbon Malted Waffle Mix, some top-shelf maple syrup and a cute “waffle” tongs from World Market.  The more I thought about those tongs, the more I realized a “gadget” crazy gal like myself could not live without a waffle tong. (Hey, I have a long-handled knife that’s sole purpose in life is to get mayonnaise from the jar, down to the last little bit without ending up with mayonnaise all over your knuckles using an ordinary knife. I’ll admit, sometimes I use that Mayonnaise Knife with Miracle Whip. What can I say – I’m the wild and reckless sort). All joking aside, I could not rest until I had gone back to World Market to get these cute little tongs for myself. In keeping with most of my gadget buys, the tongs haven’t been used since. As for the Carbon Mix, that’s a whole other story. When it comes to Malted Waffle Mixes, Carbon is used in more restaurants than any other brand. Good as it is, the mix needed a little help.

I’ve made waffles using just the mix. I’ve made waffles from scratch – and from scratch is better. With a little “doctoring” Carbon batter waffles turned out a close second the waffles from scratch with very little effort.

Malted Waffles – Almost from Scratch
2 Cups Carbon Malted Waffle Mix
4 Tablespoons Butter, Melted
1 1/2 Cup Water
2 Eggs
1/2 Tablespoon Malt Powder
1 Tablespoon Vanilla Extract

Mix Waffle Mix according to package directions until just blended. Add Malted Powder and Vanilla Extract. Whip until incorporated.

Prepare waffle iron according to manufacture’s directions. Fill iron, cook until golden. Serve with butter and syrup as desired.

************

As long as we’re cooking almost from scratch, how ’bout some syrup to go with those waffles?

The Perfect Cocktail Party begins with Fun Little Bites

I don’t know about you, but I simply adore the whole Holiday Season if for no other reason than the food. Especially all the “party” food and in particular Hors D’oeurves  – you know – appetizers. Who out there can resist those savory little bite-size morsels of wonderful delights?

Continue reading “The Perfect Cocktail Party begins with Fun Little Bites”

A Charles Dickens Christmas Goose

One Christmas, many moods ago, I got it in my head that we needed to serve goose for Christmas. I was feeling very nostalgic – thinking not of my own Christmas Past, but Christmas of long ago and far away. I was dreaming of a Charles Dickens Christmas. The problem was, I knew absolutely nothing about cooking a goose except a few basics.

Christmas Goose Fat
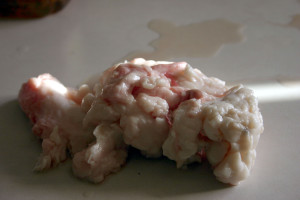
First – a goose is incredibly fatty – as in massive amounts of fat. (I was so shocked by the amount of fat, that I actually took a picture of it – long before blogging ever entered my mind. Glad I did, so I could share it with you today.) Goose fat is a good thing for future use, but not so good if you don’t remove as much as possible BEFORE roasting the bird. Good news here is that the fat is located in pockets, most found around the opening of the cavity and can be easily removed. Remarkably, this fatty bird actually has very lean meat.

Oranges 2pears 2
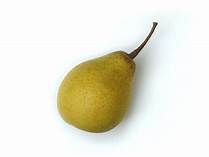
Second – because the meat itself is extremely lean, it can dry out easily. A goose needs some tender loving care to prevent the meat from drying out. After all, who wants to eat dry meat? I decided that filling the cavity of the bird with pears and orange slices would help keep the meat moist from the inside. (Inspired by my own experience with Apple Stuffed Roast Chicken).

gooseThird – a goose can be tough. At least that’s what I’ve heard, but having never eaten a goose much less cooked one – this was a rumor – the truth of which I sought to avoid. Common sense said a smaller bird was younger, and less likely to be tough. Still, I was afraid. What if the bird was so dry and tough that Christmas dinner was a complete bust? What to do . . . what to do . . . and then a light came on. First, slice an orange and rub the bird inside and out with the orange. The acid in the juice will act as a tenderizer and begin to break down the meat long before cooking. Second, inject the bird with apple brandy. The brandy will impart a wonderful flavor to the meat, as well as to help keep it moist and tender. What I didn’t realize when I made this decision was that injecting the bird would also allow some of the fat between the skin and the meat find a way to escape during the roasting process. This turned out to be a good thing as well since the bird wasn’t swimming in its own internal fat.

goose 2What I didn’t realize about a roasted goose is that the meat is all dark. And I’m not talking dark as in chicken dark – I’m talking dark as in beef dark. Sliced goose breast more closely resembles sliced roast beef. Another drawback to goose is that it does not render big, plump slices of breast meat the way a turkey does. So plan to serve a second meat dish if feeding more than a few people. A second meat selection wouldn’t be a bad idea no matter what – goose isn’t for everyone. It has a wonderful, gamey flavor. If you don’t like to walk on the wild side, you won’t like goose. However; for those feeling a big more adventurous, come swim with me on the deep end of the pool.

Sometimes when guessing, you guess right. Knowing that a goose tends to dry out, knowing that an overcooked goose tends to have a livery flavor, and knowing that a duck is served medium-rare (pink), it made sense that a goose would be cooked in the same fashion. Just as turkeys and chicken are cooked in similar fashion, it made sense that a goose would be cooked like a duck. Often ducks are served nearly raw. For whatever reason, you can eat an under-cooked duck but not an under-cooked chicken. Go figure.

Christmas Goose
1 Young Goose, about 6-8 lbs
1 large orange, sliced
1 Cup Brandy
½ Cup Butter
1 Tablespoon Poultry Seasoning
1 Teaspoon Paprika
1 Large Syringe or Flavor Injector
2 Bartlett Pears, cut into chunks
1 Orange, peeled and broken into natural slices

Lay goose on a clean counter. Reach inside the tail end and remove the excess fat. There will be an incredible amount of fat. Reach under the skin of the breast and remove some of the pockets of fat as well. (If desired, reserve and render for later use)

Slice first orange, rub bird inside and out with the orange. Discard orange. Inject bird inside and out with brandy. Let bird rest for a few hours in the refrigerator for the orange and brandy to soak in and begin to tenderize the meat. (Overnight is fine, too).

In a small bowl, mix butter and seasonings. Remove bird from the refrigerator and rub LIGHTLY with butter mixture. The goose will have enough fat on its own, this mixture is more to give the skin a nice golden color.

Fill the cavity with apples and oranges. Fill the neck with smaller pieces of fruit. Let bird rest again. It’s best to start roasting the bird once it has reached room temperature, so an hour or so before roasting is fine.

Heat oven to 450 degrees. Place bird, breast side up, in a roasting pan fitted with a rack to keep bird from soaking in the pan drippings. Once oven has reached temperature, place goose in the oven, then IMMEDIATELY turn the temperature down to 350 degrees. Roast goose for 20 minutes per pound, lightly basting every 30 minutes.

After about an hour, if the skin is nice and brown, turn bird breast side down and roast another 20 to 30 minutes or until cooked medium-rare.

Remove goose from oven, tent to keep warm and let rest for 10 minutes. Transfer to serving platter, garnish with grapes, orange slices and other fruit as desired.

Carve and serve.

Italian Red Potatoes with Fresh Green Beans

This is one of those dishes that is hard to classify. Is it a warm potato salad? A vegetable side dish? Yes, and yes. All I know for sure is that it’s delicious – anyway you want to serve it. These potatoes with green beans are colorful, easy to make and go great with a variety of Italian dishes when other starchy foods such as pasta are not being served. Awesome with Cuocere Stile Italiano or Italian Lemon Chicken Sauté. Popular at the family table, yet pretty enough for company. And such a snap to make. Once assembled, this dish will even hold well in the oven along side a platter of Savory Sensational Chicken Scaloppine. I could go on and on when it comes to Italian dishes. Hubby loves his Mexican; I adore my Italian and French. As for Kiddo, he’s not picky – he loves it all from Pizza and Burgers to Coq au Vin and everything in between.

Continue reading “Italian Red Potatoes with Fresh Green Beans”

Zesty Grand Marnier French Toast

Maybe it’s because the morning air is crisp and briskly-cool. Maybe it’s the way the morning light filters into the room. Maybe it’s for no other reason that I have a hankering for a French Toast that isn’t just ordinary. I want some “grown up” toast, made with Grand Marnier and fresh orange zest. Yeah, it’s a beautiful morning – might just need to whip up some fancy French Toast. Would you like a slice or three?

Zesty Grand Marnier French Toast
6 Eggs
1 1/3 Cups Milk
6 Tablespoons Grand Marnier
1 Tablespoon Fine Orange Zest
2 Teaspoons Cinnamon
1/4 Teaspoon Nutmeg
12 Slices Texas Toast
Butter
Maple Syrup

Heat electric griddle to about 325 degrees. Brush with butter-flavored margarine.

In a blender, blend eggs and milk until smooth. Add Grand Marnier, zest and spices. Blend until smooth. Pour mixture into a shallow bowl.

Slice Texas toast to create two points. Dip into batter and cook on griddle until golden brown. Flip and cook to golden brown. Just before removing from griddle, place a small pat of butter on each toast slice and allow it to melt.

Cook toast in batches if necessary to avoid overcrowding the griddle. As toast is finished, simply transfer to a large serving platter and keep in a warm (not hot) oven until ready to serve.

If desired, dust with powdered sugar and garnish with slices of orange just before serving. Serve with warm Maple Syrup.

This wonderful toast goes great with crisp bacon and fresh fruit. For awesome, crisp bacon check out Kiddo’s Secret to Crisp Bacon.

French Toast - With Bacon

Christmas Party Potato Platter with Fresh Dill and Red Caviar

Aren’t these potatoes pretty, all dressed up in their red and green?  I made them a few years ago, before my retirement, for an office Christmas Party. Even among people unfamiliar with the pleasures of caviar as a garnish, these pretty little potatoes were a big hit. These bite-size potatoes were so simple to whip up, yet looked so elegant on the cocktail buffet table. And best of all, you can make them a day in advance, perfect for office parties or when you want to have more time to relax with your holiday guests.

Continue reading “Christmas Party Potato Platter with Fresh Dill and Red Caviar”

Shrimp Risotto

I love Risotto. It is so creamy, so delicious. Yeah, I know, a good risotto requires tending. Yet the end results of a well-tended risotto are so worth the time and effort. The first time I made this Shrimp Risotto was as part of a meatless Valentine’s Day when Valentine’s Day fell on a Friday and I wanted everything special while keeping with the old school “no meat on Fridays” teaching of the Catholic faith.

Shrimp Risotto would make a great addition to a Christmas Eve Seafood Extravaganza. The Shrimp Risotto is mild and creamy. It can be garnished to dress it up or served “as is” for a simple setting. Small salad shrimp that has already been cooked is best in this recipe. Just remember when adding the shrimp to the risotto all you need do is warm the shrimp – avoid over cooking!

Shrimp Risotto
3 Tablespoons olive oil
2 finely chopped shallots
1 cup risotto rice, Arborio or Carnaroli
1/2 cup white wine
5 Cups (more or less) Shrimp or fish stock (you can substitute chicken stock)
1/2 cup chopped cooked shrimp
1 Tablespoon finely chopped dill or fennel fronds
1 Tablespoon finely chopped chives or the green parts of scallions
Zest of a lemon
Sea Salt

Chop shallots, set aside. Chop dill or fennel fronds, set aside. Chop chives or green scallions. Set aside.

In a heavy, medium-sized pot, add the olive oil and heat over medium-high heat for 2-3 minutes until it’s good and hot.

Add the chopped shallot and stir with a wooden spoon to cook without browning for another 3-4 minutes.

Add the uncooked rice and stir well with the wooden spoon. Coat the rice with the oil and shallot mixture and saute for a minute or two.

Sprinkle about a 1/2 teaspoon of salt over it all, then add the white wine and stir well. It will sputter at first, then settle into a good solid boil. Stir well.

When the wine is almost cooked away, start adding the seafood, fish or chicken stock. Ideally you would use shrimp stock, but the key here is to add flavor. Begin by adding about a 1/2 cup of stock, and stir it well to combine.

Continue to add stock in 1/2 cup additions and stir Risotto frequently. Let liquid almost cook away between additions, about 25 minutes total, or until rice is cooked al dente, still a bit firm.

Once you have the rice at a good consistency, turn the heat down to medium, add a touch more liquid (about 2 tablespoons), and then add the shrimp, the lemon zest and all but a about a teaspoon of the dill and chives. Stir well to combine.

To serve, either pile it free-form on the plate or pack it into a circle mold. Top with the remaining chopped herbs. If you do the circle mold trick, top the risotto with some delicacy, such as caviar or the sautéed cheeks from a cod or halibut or large striped bass. You could also garnish with whole shrimp on  or a shelled crab or lobster claw. Use your imagination!


Another great pairing of risotto and seafood can be found in my Cajun Sea Scallops over New Orleans Style Risotto (warning – this is spicy!).

Chocolat Soufflé de Mema

Once upon a time, a coworker told me I was setting Kiddo’s future wife up for failure since he would expect her to be able to cook like his grandmother. My feeling is, I’ve taught him – he can teach her (assuming she doesn’t already know how).

Continue reading “Chocolat Soufflé de Mema”