
I had not planned to share yet another recipe with you today. I’ve shared three great recipes today, a couple of sides and an awesome BLT. But I learned that today is National Filet Mignon Day.
Good Ol’ Fashioned BLT is Comfort Food between Two Slices of Bread
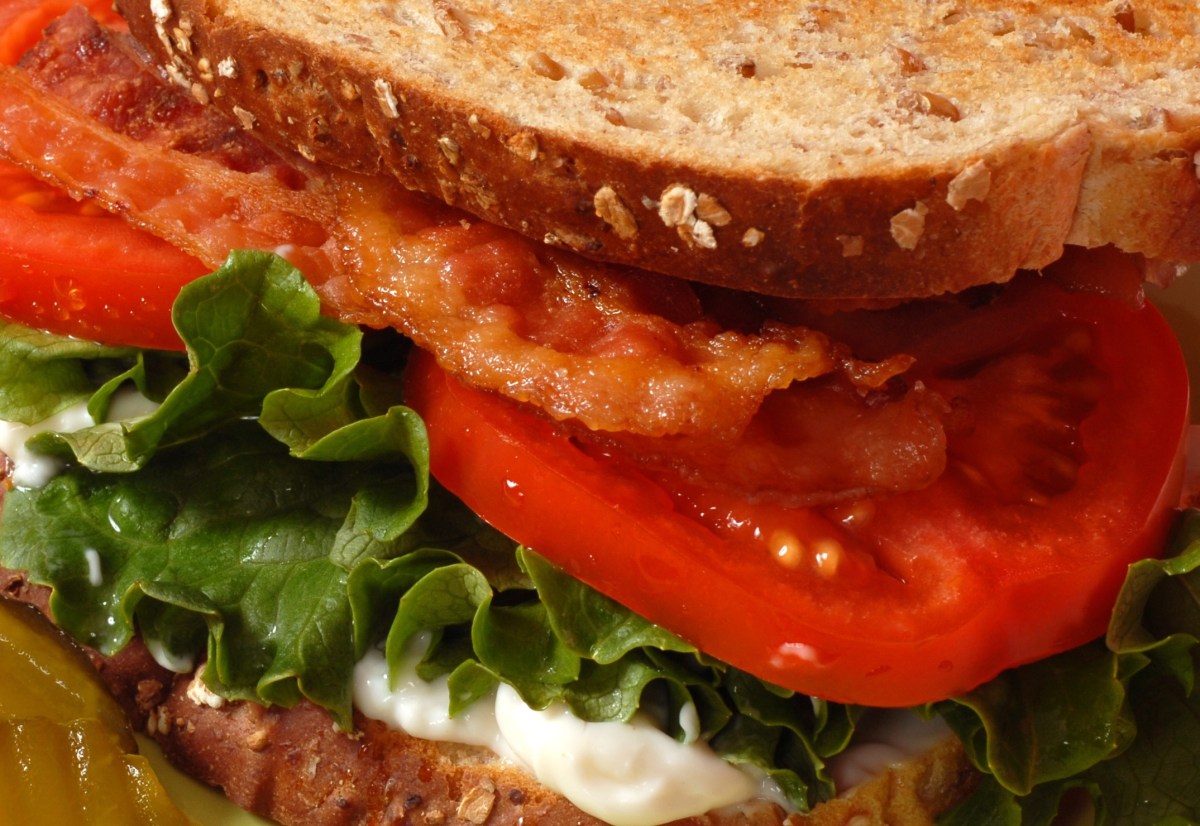
BLTs are about as American as a Hot Dog or a warm slice of Apple Pie. And a good BLT – made with smokey bacon, leafy lettuce and home-grown tomatoes – it doesn’t get much better. Did you know that BLTs are over 100 years old? Although the makings for a BLT have been around since the stone ages (or at least since the Roman era) it wasn’t until sometime around the turn of the century that someone decided to scrap the turkey in a club sandwich and there you go – a Bacon, Lettuce and Tomato Sandwich was born. Eventually they became known simply as a BLT.
 Do you remember when tomatoes smelled like tomatoes? Tomatoes smelled bright. Tomatoes smelled of summer. For as long as I can remember, I loved walking through the family garden, eating tomatoes, with the wonderful juices running down my chin. Up until a few years ago, with the California drought at its worse, we grew our own tomatoes to get that real tomato flavor. Now that we’ve settled in to our new old home, we’ve planted a garden again. We are not wasteful with the water, taking care when irrigating our crops. Home grown tomatoes means I get to enjoy a southern favorite for lunch – Tomato Sandwiches. Oh yeah, we love growing a garden, just like the good old days . . .
 Speaking of good old days – have you noticed that what is labeled “thick sliced” bacon these days is what we use to call “bacon” – as in everyday sliced bacon. The stuff they are passing off as bacon is so thin I swear you can hold it up and look right through it. That said, for good old-fashion BLTs, thick sliced bacon is a must. BLTs are supposed to be packed with smokey, yummy bacon – something to sink your teeth into that gets your taste buds dancing and your lips smacking. For BLTs I prefer smoked bacon – hickory or apple wood are my two all-time favorites.
 Hubby thinks Iceberg Lettuce is just fine for lettuce. I suppose it is – but I’m not a fan. When it comes to lettuce for sandwiches, give me green leaf lettuce any day. I love the color, the ruffled curls of the leaves – the flavor. I don’t mind Iceberg Lettuce – the exterior leaves are fine, but the more you peel back the layers, the less color there is. Get to the heart of Iceberg lettuce and it’s white. Maybe it’s me, but “white” isn’t a good color for lettuce. Green Leaf lettuce is my go-to choice for just about anything that calls for lettuce. Good in a salad (mixed with other “greens”) – great on sandwiches and perfect shredded for tacos. For the longest time, we bought “his” and “hers” heads of lettuce. Iceberg for him, green leaf for me. The problem was, not only were we spending money on two different heads of lettuce just to make a sandwich, but neither of us used up the lettuce before it began to spoil. (And in my opinion, iceberg seems to “spoil” faster). Eventually, I won out. If there’s lettuce in the house, it’s almost always of the green leaf variety.
BLTs are only as good as the ingredients used to create them. Like life, you get out of it what you are willing to put into it. Just food for thought as we savor the flavor of an American classic . . .
Old Fashion BLT Sandwiches
1 Cup Mayonnaise
1/4 Cup Olive Oil
3-4 Garlic Cloves, minced
Pepper to Taste
2 lbs. Thick-Sliced Smoked Bacon
Slices of Beefsteak Tomato
Green Leaf Lettuce Leaves
Good Quality Slices Bread, toasted if desired
Whip mayonnaise, olive oil and garlic together in a bowl until smooth and creamy. Add pepper to taste. Transfer to a jar and refrigerate until ready to use.
Slice tomatoes, set aside. Break lettuce leaves for sandwiches, rinse in cold water and set aside.
Cut bacon strips in half. Weave 6 pieces of bacon together to create a square (3 slices in one direction, 3 in opposite direction). Repeat to create one bacon weave square for each sandwich.
Cook bacon squares until crisp, about 10-15 minutes, turning and rotating often for even crispness. (If you own a bacon press, this is the perfect time to use it). Place cooked bacon on paper towel lined platter to drain.
Spread mayonnaise mixture onto half of the lightly toasted bread. Top bread with lettuce, tomato and a bacon square. Spread mayonnaise mixture on remaining bread, top sandwich and serve.
BLTs are great with chips, crisp pickle spears or deli-style salads such as macaroni or potato.
And if you are like Kiddo, you’ll be enjoying your BLT with more B . . .

Creamy-Cheesy Au Gratin Potatoes

Have you ever had that moment when you realize you’re missing something? That Wow – I coulda had a V-8 moment? I’ve written a great deal about main Entrées and shared a few delicious dessert recipes here in my kitchen But what about the much over-looked side dish casseroles I’ve prepared over the years? Aren’t those worthy of a moment in the spot-light? Casserole side dishes are great for large gatherings or pot luck functions. Anything in a casserole will serve a number of people and travel really well.
Colorful Mexican Pepper Skillet Corn
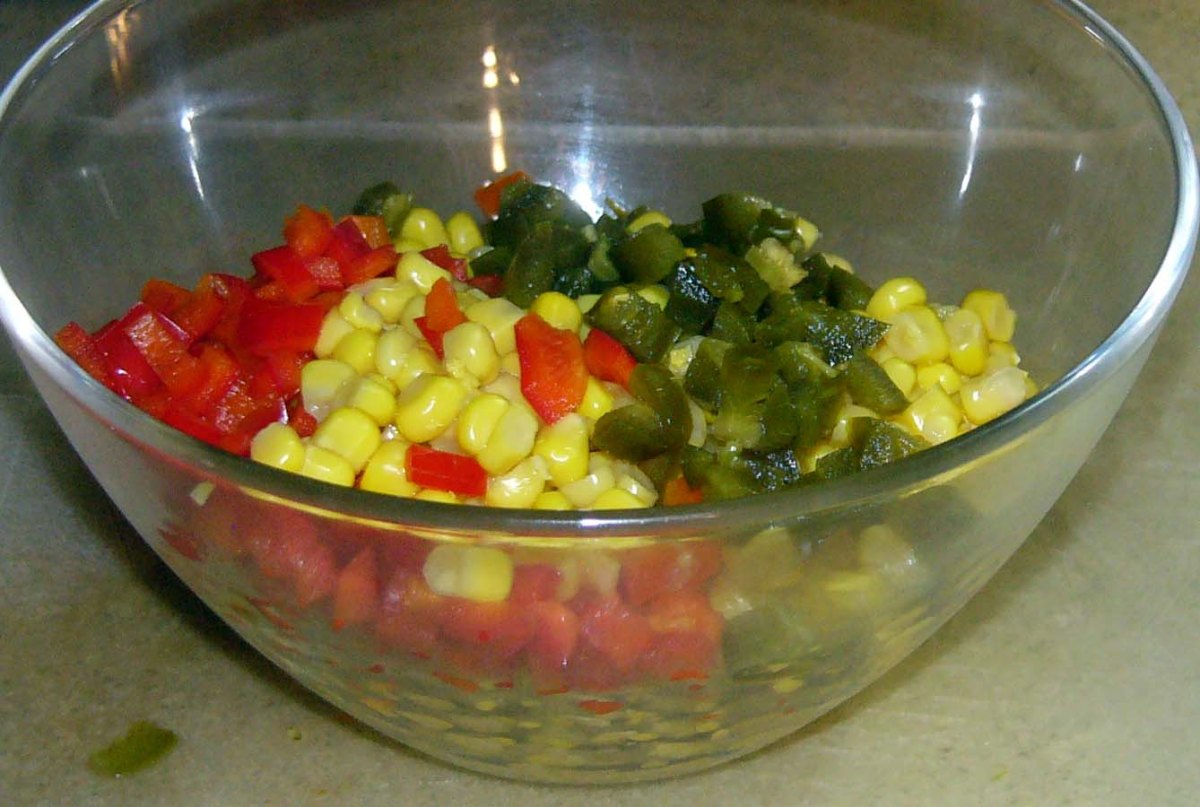
I love the colorful Mexican-Style corn you find in the canned vegetable section of the grocery store. It’s so pretty. Perfect for serving alongside spicy recipes such as Mexican Pork Chops with Ancho Chile Cornbread Stuffing or New Mexican Grilled Flank Steak. That said, I haven’t actually served the store-bought variety in years.
Arrachera a la Parrilla (Grilled Flank Steak)
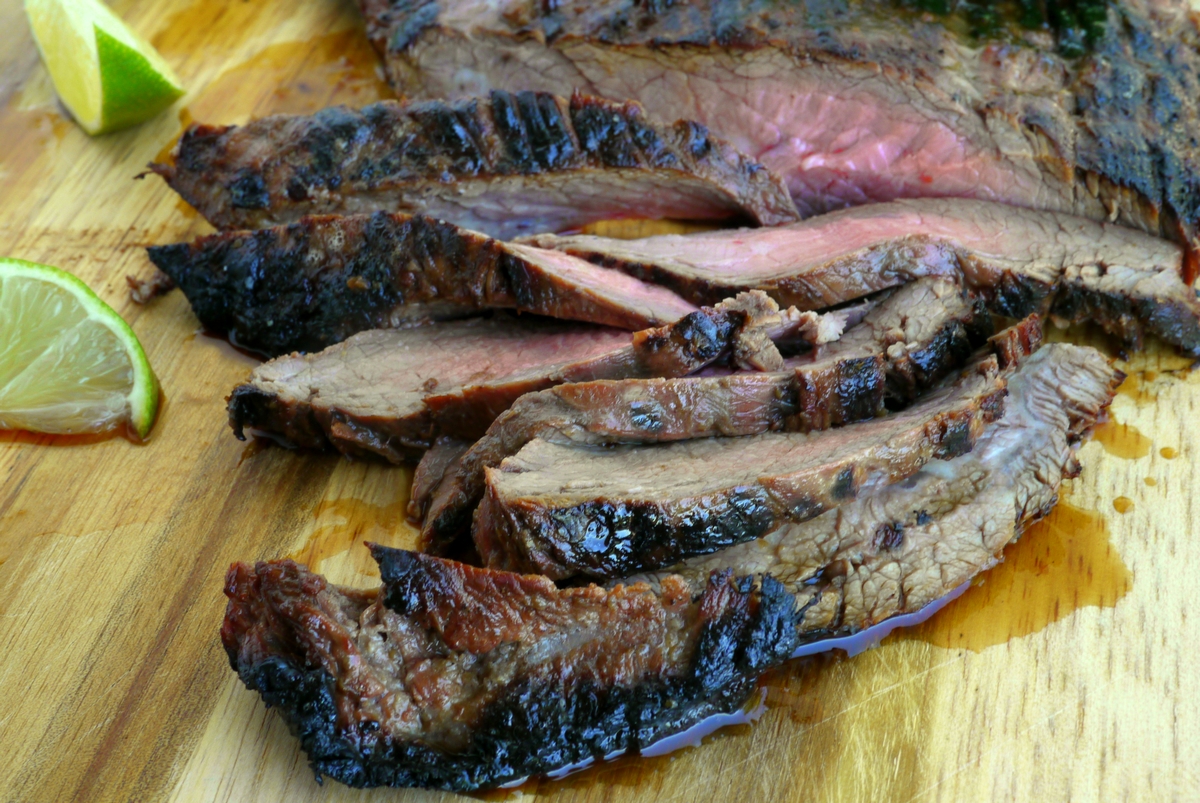
 Before the dog days of summer have completely slipped away, let’s throw a little something on the grill, shall we? Okay, excuse me while I meander elsewhere – we’ll get to grilling in a minute. What the heck are dog days of summer anyway? To me, it’s a way of conveying the slow, unhurried days of summer. Like a lazy hound dog resting on the porch. Continue reading “Arrachera a la Parrilla (Grilled Flank Steak)”
Baked French Toast with Streusel Topping and Being Brave

Oh how I wish I were brave. For several years now, Kiddo, Hubby and I have spent our vacation time meandering along the Pacific Coast Highway. I fell in love with everything about the Pacific Northwest – the tiny towns, the friendly people, the beauty that surrounds you. Rising early in the morning to the cold, crisp, clean air. Hearing the cries of seagulls circling overhead and the rushing sound of a grey whale’s spray as she breaks to the surface.

If I were truly brave, I’d pack up everything and head up north to open a little bistro serving breakfast and lunch. It would be family style, with guests feeling right at home. I’m just not that brave. More than 60% of restaurants fail within the first year. A staggering 80% will not survive to see five years in business. Why? There are a number of factors – location, start-up costs and the most dreaded of all – yelp. In this day and age of trendy eateries, all it takes in one bad review and you may as well hang a sign on your door with a giant thumbs down symbol.  Everything has to be perfect BEFORE the doors ever open. There is no room for mistakes. And no forgiveness should something go wrong. The power of the internet and opinion of others can snap a small business like a twig. It’s very scary out there. And yet I wish I were brave. Brave and younger – much, much younger.
Some of you might remember this offering from Calling on Home Cooks for Sunday Brunch Ideas. I was looking for brunch ideas and had offered up some of my favorite brunch recipes for consideration. While the Baked French Toast was not the winner, in my heart it is one of my favorites. Anything that can be assembled the night before and simply popped into the oven the next day is great when feeding a crowd. It allows plenty of time to scramble up a few dozen eggs and fry up a few pounds of bacon. Served along side fresh season fruit, the presentation is great.
Baked French Toast with Streusel Topping
French Toast
1 loaf sourdough bread, cut into 1-inch pieces
6 eggs
1½ cups whole milk
½ cup half and half
½ cup sugar
1 tablespoon vanilla
1 teaspoon ground cinnamon
pinch of salt
Spray a 13″x9″ casserole dish with non-stick cooking spray or liberally coat with butter. Set aside.
Cut bread into 1″ cubes. Place cubes in the casserole dish and distribute evenly.
In a large bowl, wish together eggs, milk, half and half, sugar, vanilla, cinnamon and a pinch of salt. Pour the egg mixture over the bread cubes. Cubes may begin to float. Gently press bread cubes into the dish to make sure they absorb all the custard mixture.
Cover dish tightly with plastic wrap to seal and refrigerate overnight. Next make the strudel topping.
Streusel Topping
½ cup All-purpose Flour
¼ cup Brown Sugar
1 Teaspoon Ground Cinnamon
½ stick butter, diced
In a small bowl, mix together flour, brown sugar and cinnamon until well-blended. Cut butter into spiced flour mixture. Break up into small crumbs.
Cover streusel topping tightly with plastic wrap and refrigerate overnight.
To Assemble and Bake
Heat oven to 350 degrees. While the oven warms, remove casserole dish and Streusel topping from the refrigerator. Uncover casserole dish and sprinkle Streusel topping liberally over the top of the French Toast.
Bake in the oven for 45 minutes, checking at 30. Remove French Toast from the oven and allow to rest on the counter to cool slightly, about 5 minutes, before serving.
Serve with warm Maple syrup and cups of fresh fruits.


Taco Baked “Fried” Chicken

Growing up, Fried Chicken – as in real fried chicken – was a stable in our house, especially on Sundays during the summer. Dad cut up the chicken, dredged it in flour and usually fried it in two big, black cast iron skillets filled with melted shortening. I can see him now in my mind’s eye, a kitchen towel draped over one shoulder.
Burnt Offerings – When Things Don’t Go as Planned

So often, we post only our successes – beautiful pictures of perfectly cooked foods. But let’s face it, we’ve all experienced our bombs – mistakes in the kitchen that render food hardly worthy of eating much less blogging about. I think it would be good to see those flops every now and then, as a reminder that everyone makes mistakes. It’s a humbling admission. Yeah, you should have seen my 7-layer Leaning Tower of Cake with a cherry on top!
Continue reading “Burnt Offerings – When Things Don’t Go as Planned”
Sweet Baby Ray’s BBQ-Coca-Cola Pulled Pork

In flipping through the recipes I’ve collected over the years since “discovering” the vastness of the internet, I’ve noticed that a growing number of Barbecue-Sauce based recipes call for Sweet Baby Ray’s. Even Burger King featured Sweet Baby Ray’s in their “Angry Whopper” concoction. Curiosity got the better of me – what’s the story behind this popular Barbecue Sauce? It’s gotta be southern, right? An old, a well-guarded secret recipe handed down from generation to generation.
Continue reading “Sweet Baby Ray’s BBQ-Coca-Cola Pulled Pork”
New Mexican Grilled Flank Steak
New Mexico – such a beautiful state. So colorful, so wild, so western. Yet very cosmopolitan in its own right – Santa Fe’s art community and Albuquerque’s balloon-filled morning skies are not to be missed.


When we lived in Las Vegas (Nevada); we could travel anywhere in the world – if asked the question “Where are you from?” the answer “Las Vegas” needed no further explanation – like New York or Paris – you just knew what was meant by the answer. That is unless we were anywhere in or near New Mexico. There is a Las Vegas New Mexico, not to be confused with the Vegas strip. While traveling through New Mexico, you had to clarify which Las Vegas.


The food of New Mexico has a Mexican influence; while remaining distinctively “New Mexican” flavor. Go to a Mexican Restaurant; Sopaipilla are found on the dessert menu. Sopaipillas are fried puffs of billowy pastry served with honey and a dusting of powdered sugar. Dine out in New Mexico, and Sopaipilla comes with dinner much the same way rolls come with your steak. Why? Depending upon the dish, you need that honey to coat your tongue and help put out the fire raging in your mouth. It’s take a bite of food, then follow-up with some honey, fan yourself, then take another bite of food. New Mexican is an animal all its own – somewhere between Mexican and Tex-Mex with a lot more spice. New Mexican cuisine is a regional cuisine developed in uniquely isolated circumstances and is therefore not like any other Mexican food in the United States. In New Mexico, green chile is hotter than red chile. New Mexican Green Chile pepper is grown in the state’s very high altitude (4,000–8,000 ft) and dry, hot climate of the state. Much like grapes for wine, these growing conditions contribute, along with genetics, to giving New Mexico green chile its distinctive deep green color, texture, and flavor. The climate of New Mexico tends to increase the capsaicin levels in the chile pod compared to pods grown in other regions. This results in the possibility of hotter varieties. New Mexico green chiles can range from mild to extremely hot. And some form of chile pepper is in everything. And yeah, it’s good stuff!
New Mexican Grilled Flank Steak
Spice Rub
1 teaspoon ground cumin
1 tablespoon kosher salt, or to taste
2 teaspoons ground coriander
2 teaspoons New Mexican Chile
1 teaspoon paprika
1 teaspoon freshly ground black pepper
1 teaspoon garlic powder (optional)
1 teaspoon cayenne pepper
To make the spice rub: In a baking dish large enough to fit the steak, stir together all the ingredients.
Add the steak to the spice rub, turning to coat the meat thoroughly with the rub and pressing with your fingers to help the rub adhere to the meat. Cover the pan, place in the refrigerator at least 1 hour. The longer the better, up to 6 hours for the rub to really flavor the steak..
Flank Steak – Ready to Grill
1 flank steak (about 3 pounds)
Olive oil for the grill
When you’re ready to cook the steak, let it rest at room temperature while the grill is heating. Build a hot fire in a charcoal grill or preheat a gas grill to high. Using a grill brush, scrape the heated grill rack clean. Lightly coat a paper towel with oil and, holding it with long tongs, carefully rub the oiled towel over the grill rack.
Place the flank steak directly over the flame or heating element grill and let it cook, undisturbed, for about 3 minutes. Rotate the steak 90° and let it cook, undisturbed, for another 3 minutes. Flip the steak and repeat on the other side so it cooks another 3 minutes undisturbed, is rotated 90°, and then cooks 3 more minutes. If you like your steak medium-rare, it should be done at this point
Although not recommended; if you like your steak medium or well done, transfer the steak to a cooler part of the grill for a few more minutes to cook to the desired doneness.
Transfer the steak to a cutting board, cover it loosely with foil, and let it rest for 10 minutes. Carve flank steak against the grain into slices about 1/2 inch thick, pile the slices onto a platter, and serve immediately.
Great with warm tortillas, rice and beans.
Grilled Chicken Ranch Burgers
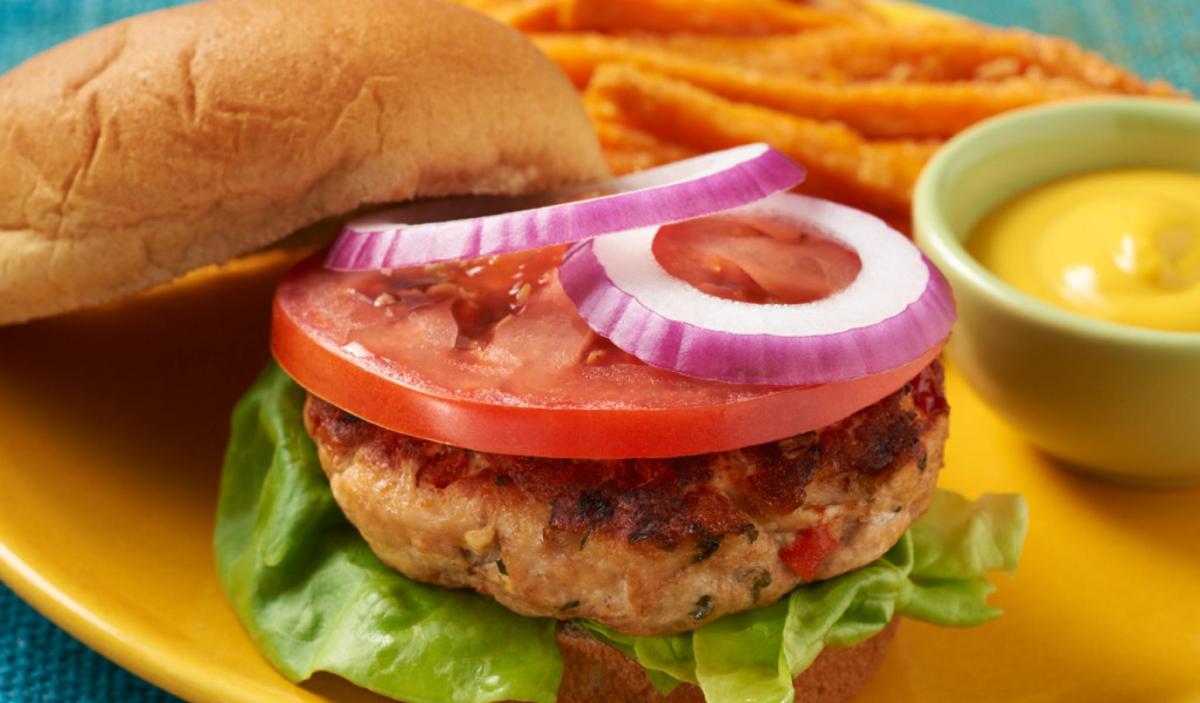
We’ve all had our share of ground beef burgers (at least the carnivores among us). When we think of burgers, we generally think “ground beef”. Some of the more health-conscious among us have elected to avoid the ground beef variety and instead get their burger fix from turkey burgers. These are just as convenient as their beef counterparts since both can be had from a bag of frozen pre-formed patties. Although, truth be told, fresh ground meat (be it beef or turkey) is the best was to get that burger fix.
While far from perfect, I am striving to make better choices in our diet. As a diabetic, I need to watch things such as fat intake. Recently, we decided to try something a little different. It’s a recipe I picked up from Julie’s Eats & Treats. Julie posted her rendition of the Chicken Ranch Burger back in March of 2013. It’s an adaptation of a recipe she picked up from Like Mother Like Daughter, Ground Chicken Burgers. That’s the beauty of recipes, foodies, blogs and the internet – home cooks can pass along their recipes, and with each passing something new is added – be it an ingredient, a tip, a story or fond memory.
Here’s my “passing” of this little gem, complete with a few tips. Hope you enjoy!
Grilled Chicken Ranch Burgers
1 1/2 lb Ground Chicken
1/2 cup Panko Italian Bread Crumbs
1/4 cup Italian Bread Crumbs
1 Tablespoon dried onion
1 teaspoon Seasoned Salt
2 Tablespoon Barbecue Seasoning
1/2 Teaspoon Mesquite Seasoning
1 Package Hidden Valley Ranch Dressing Mix
Sliced cheese (optional)
Green Lettuce Leaves (optional)
Tomato Slices (optional)
Red Onion Slices (optional)
Wheat Hamburger Buns
Since these burgers cook up quick, there’s no need to build a huge fire in your wood or charcoal grill. A small tabletop gas grill is perfect. If you plan to make oven French Fries from a frozen bag, simple preheat a small grill when the fries go into the oven. About 10 minutes into the cooking time of your fries, throw the burgers on the grill.
In a large bowl, mix bread crumbs, seasonings and ground chicken. Form 6 patties. (I know what you’re thinking – 6 patties from a pound of meat?! Sure, there’s a bit thin, but that’s okay, you’ll be amazed at how filling and satisfying these burgers will be.)
Place patties on grill. Grill chicken patties for about 4-6 minutes on each side, depending upon thickness.
Garnish buns as desired. Miracle Whip is nice on chicken burgers, giving a little zing to the overall flavor. Place burgers on buns and serve alongside French Fries or deli salad or anything else you like with your burgers.
Note: If you have a food processor fitted with a blade, you can always “grind” your own chicken. Simply use about a pound of boneless, skinless chicken breasts. Cut into chunks, then pulse in your food processor until coarsely ground. Remember, you’re making burgers, so you don’t want the meat to be too chunky or too fine.
Peppered Grilled Beef Tenderloin with a Port Sauce

The weekend is coming and I wanted to share something a little special for your backyard grill . . .
It’s been a while since we’ve done any “fancy pants” cooking at home. This awesome supper was a collaborated effort – Hubby, Kiddo and I. Hubby has been teaching Kiddo the fine art of grilling. This was the perfect recipe for fine-tuning Kiddo’s all-important grilling skills. The tenderloin must first be seared over a hot bed of coals, then grilled over indirect heat until medium-rare. While the menfolk were cooking with fire, I was busy preparing the wonderful deep Port Wine Sauce.
Before we get started, I’d like to take a few minutes to discuss cuts of meat. I know I’ve talked about cuts of meat before, but it never hurts to go over it again, especially if you’ve missed those previous conversations.
Beef tenderloin is, in reality, a really big Filet Mignon – about 3 pounds worth – that hasn’t been cut into “steaks”. The tenderloin (not to be confused with the short loin) runs along both sides of the spine, and is usually harvested as two long snake-shaped cuts of beef. The tenderloin is sometimes sold whole. (Check with your butcher, he might have a whole tenderloin that has yet to be carved into different cuts). When sliced along the short dimension, creating roughly round cuts, and tube cuts, the cuts (fillets) from the small forward end are considered to be Filet Mignon. Those from the center are Tournedos of beef; however, some butchers in the United States label all types of tenderloin steaks “Filet Mignon.” The shape of the true Filet Mignon may be a hindrance when cooking, so most restaurants sell steaks from the wider end of the tenderloin – it is both a cheaper and more presentable cut of beef. When prepared the tenderloin as a roast, take as much as possible from thinner, pointed end for a true “Filet Mignon”. The odd shape of the point will not matter in a roast presentation since it is tucked into the rest of the roast and bound in place by twine.

The tenderloin is the most tender cut of beef and is also arguably the most desirable and therefore the most expensive. The average steer or heifer provides no more than 500 grams of Filet Mignon. Because the muscle is not weight-bearing, it contains less connective tissue, which makes it tender. However, it is generally not as flavorful as some other cuts of beef (example, primal rib cuts), and is often wrapped in bacon to enhance flavor, and/or is served with a sauce.
When working with a whole beef tenderloin, you will need to trim and tie the meat, removing the excess fat and sliver skin. Believe me, with a good set of knives, this isn’t difficult to do. Once upon a time, trimming meat scared me. Now it’s no big deal – although I try not to think too much about the per-pound price of a tenderloin roast while trimming away.


A little personal FYI here. Once upon a time, my Dad was a partner in a butcher shop. My first “job” outside the home was in his shop. Once upon a time, Dad raised beef cows. From an early age, I’ve been interested in the whys and wheres of food production.
It’s been hard to get my guys retrained when it comes to Filet Mignon – medium toward rare is the limit. They generally like their “steaks” cooked to a nice medium, just under well-done, with very little, if any pink. Since a true beef tenderloin is almost completely void of fat, cooking the meat beyond medium-rare and you risk endangering the tenderness of the meat. This roast was so tender, it melted like butter in your mouth. The pepper gave it wonderful flavor, and the port sauce was the perfect finishing touch. By the way, the sauce spooned over mashed potatoes was excellent as well.

Delicious does not even begin to describe the incredible flavors. This wonderful grilled tenderloin will rival the finest five-star restaurant.
Peppered Grilled Beef Tenderloin with a Port Wine Sauce
Ingredients – Tenderloin
1 Beef Tenderloin (3 1/2 – 4 lbs), trimmed (make sure you stress to the butcher you need the tenderloin cut, including the thinner end)
2 tablespoons olive oil
2 teaspoons salt
1/8 cup coarse ground black pepper
With sharp knife, trim off excess fat and sliver skin from beef tenderloin. Fold narrow end of beef under to approximate thickness of remaining tenderloin. Tie folded end with butcher’s twine or heavy cotton string; continue to tie every 2 to 3 inches to hold shape. Pat beef dry with paper towels.
Brush beef with oil; sprinkle with salt. Rub pepper evenly over beef. Wrap beef with plastic wrap; let stand 30-45 minutes at room temperature.
Build a fire in your grill for indirect cooking. Once you’ve got a nice bed of coals and wood chips “glowing” in your chimney, empty and spread on half of the grill, leaving the other half empty.
Place beef on heated side of grill; cook 2 to 3 minutes on all sides or until browned.
Move beef to unheated side of grill. Insert meat thermometer into center of narrower end of beef.
Cover grill; cook over indirect heat for about 25 minutes. Move roast so that thicker side is over the coals and grill 10 minutes longer or until thermometer reads 135-degrees for medium-rare.
If thickest part of beef has not reached 130 to 135-degrees, it may be necessary to cut beef in half and leave thickest part on grill for 8 to 10 minutes longer.
Remove beef from grill; place on carving platter. Cover with a double wrap of foil to hold in the heat; let stand 15 to 20 minutes. Temperature will rise about 10-degrees during stand time.
Ingredients – Port Sauce
6 tablespoons butter, divided
1/2 Cup Finely chopped Shallots
1 1/2 Cups Beef Consume
2 Teaspoons Chopped Thyme Leaves
1/4 Teaspoon Pepper
3 Tablespoons Port Wine
3 Tablespoons Flour
While Filet Tenderloin rests, in 12-inch heavy skillet, melt 2 tablespoons butter over medium heat.
Add shallots; sauté until soft, about 3 minutes. Remove shallots from skillet and set aside.
Add port wine to deglaze pan. Melt 2 tablespoons butter with flour to create a roux. Cook roux 2 or 3 minutes.
Add broth, thyme and 1/4 teaspoon pepper. Return shallot mixture to pan. Increase heat to medium-high; heat to boil, stirring constantly, about 1 minute. Reduce heat to medium-low and allow to thicken.
Remove from heat, whisk in remaining 2 tablespoons of butter until smooth.
To serve, remove twine and cut beef into 1-inch slices. Serve with sauce.
Serve the tenderloin with buttery whipped potatoes and pan seared asparagus tips for a nice presentation. If desired, to add more pop and color to the plate, serve with two or three asparagus tips and two or three tender baby carrots with tops intact.

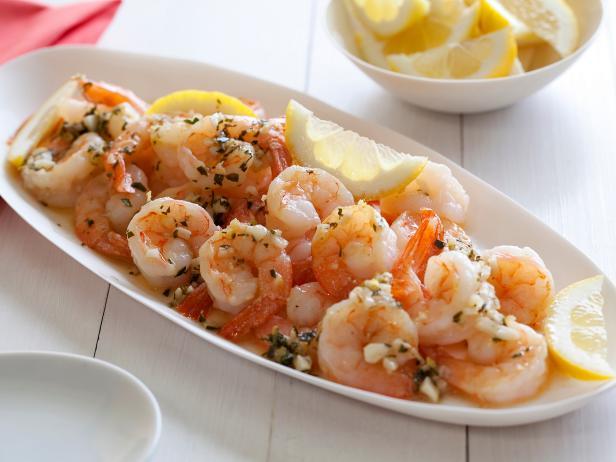
Shrimp Scampi with Scampi Butter
A few months back, I shared with you folks my Summer Birthday Bistro Style – a four course celebration featuring some of my favorite foods. I mentioned in passing that the prior birthday celebration featured many of my favorite Italian dishes. My family said it was more a party for them then for me. They were the ones treated to a impressive feast. It was a smorgasbord of foods. Two appetizers, three main meat/seafood courses, three sides, a salad and dessert. Something for everyone.
Cozumel Inspired Crab-Stuffed Skirt Steak in a Chipotle Cream Sauce

Many years ago, while in Cozumel, I had the most delicious grilled beef roll filled with succulent crab and served with a spicy cream sauce. The flavors, the textures, sweet citrus and spicy hot chilies dancing about on my tongue was amazing. This was a dish I wanted to have again and again. The problem was, I didn’t have a recipe.
Continue reading “Cozumel Inspired Crab-Stuffed Skirt Steak in a Chipotle Cream Sauce”
Country Style Southern Fried Taters

To peel or not to peel – that is the question. Wither it is better to eat potatoes in their skins or let them be “naked” is really a personal thing. I like my potatoes (baked, fried or even mashed) with their skins – better flavor with more texture and added fiber to your diet, but that’s just me and my needs. Potatoes are one of those wonderful things that you can have most any time. Great for breakfast (love fried potatoes with a big Veggie Omelette). Fried Taters are especially delicious accompanying grilled meats such as smoked Dry Rub Tri-tip or Beer-Can Chicken with Cola Barbecue Sauce. The one thing I didn’t like about fried potatoes was that the potatoes seemed to take forever to cook, and more often than not, had a greasy taste.
