
One Mother’s Day a few years back, my youngest sister and I decided to host a Country Brunch at the family farm. I had prepared a menu fitting a farm table, with a few “fancy” extras such as Blueberry Mimosa served in Lime Sugared Rim Champagne Glasses and a Chocolate Chip Pancake Casserole.
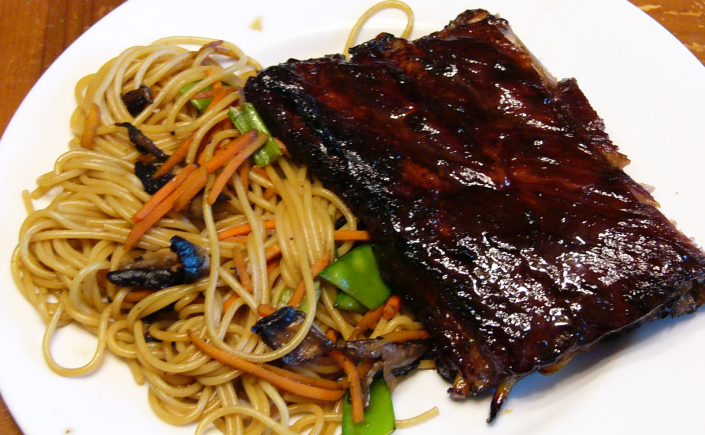
Sticky Filipino Spare Ribs
Have you ever had your appetite wet for something, only to be forced to settle for something else instead? I had been craving Asian Marinated Flank Steak with a side of Spicy Asian Stir-Fry Spaghetti– a family favorite that we haven’t had in a while. You know how it is when you get it in your head that this is what you want, and you are crushed when life gets in the way. It’s like driving to your favorite ice cream parlor for a big scoop of Butter Brickle only to find the place closed. There you are, with your nose pressed against the glass, knowing that no other ice cream flavor will do and this is the only place in town to serve it.
Brown Sugar Kahlua Glazed Baby Carrots

Have you ever wanted a little more color on the plate without getting so exotic that your family turns up their noses despite all your creative efforts? While shopping one Saturday morning, I was in just such a mood. I wanted to make Sweet Potatoes in a Brown Sugar Kahlua Glaze. (See – not too exotic.) When I mentioned the idea to my guys, the general response was “fine for you, but we aren’t eating them.” Darn. I really wanted that lovely orange color on the table without all the flax from the family. There had to be a solution – a compromise.
Carrots. I would use carrots. Carrots would give me the look I was going for as a side, and with a little luck, I could get everyone at the table to at least try the carrots.
Hubby likes carrots in his stew. He likes raw carrots with a good vegetable dip. Kiddo isn’t a fan of carrots. Oh, he’ll eat them just fine if I chop them up to the point that the carrot becomes invisible such as in a pasta sauce. Kiddo will eat shredded carrots in stir-fried dishes as well, but if left on their own, he would just as soon skip them. As for Brother Dear, the only carrot he would endure were those he didn’t know about. Still, it was worth a try, right?
As it turned out, glazed baby carrots were a big hit. I knew Hubby would go for them, had a hunch that Kiddo would like them, too. Much to my amazement even Brother Dear, when prodded enough, not only tasted the carrots, but actually was known to eating an entire helping whenever I made them. He concluded that eating the carrots themselves was actually an “evil” necessity in order to get the butter, brown sugar and Kahlua combination to his mouth. Maybe . . .
While this recipe calls for baby carrots with the tops intact, if you cannot find them or if the price is too high, baby carrots from those large bags will do just fine. While I haven’t tried this recipe with an assortment of colorful carrots (the white and purple variety finding their way into the produce market more often these days) I would think they would be equally delicious. (I especially like the purple carrots – could just be that it’s all in my head but they seem sweeter to me.)
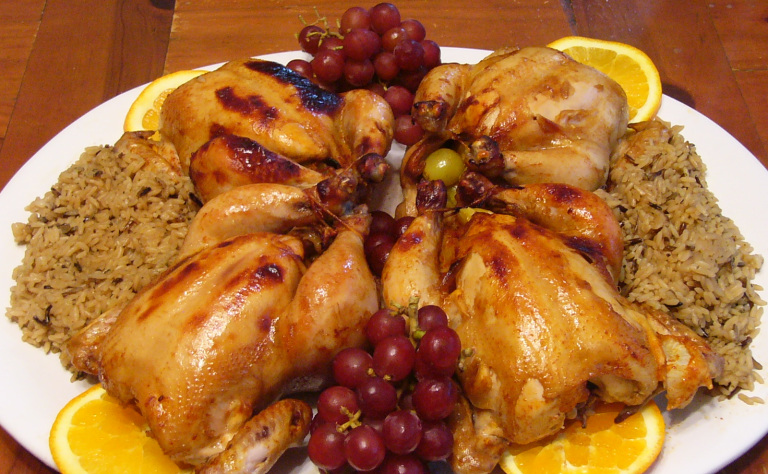
I like to serve these carrots with dishes such as Grape-Stuffed Kahlua Game Hens with Kahlua Sauce
What do you have planned for your Sunday Supper?
Brown Sugar Kahlua Glazed Baby Carrots
1 lb Baby Carrots, peeled, tops intact (optional)
½ teaspoon Kosher Salt
8 Tablespoons Butter
¼ Cup Brown Sugar
¼ Cup Kahlua
¼ Cup Finely Chopped Parsley for garnish
Bring a medium-size pot of water to a boil over medium-heat. Add carrots and salt. Cook at a rolling boil until carrots are tender, about 8-10 minutes. Drain carrots, pat dry and set aside.
In a sauté pan over medium-high heat, melt butter. Add brown sugar and Kahlua. Bring to a bubbling boil, reduce heat to medium. Add carrots. Cook, uncovered, until sauce thickens and is reduced by half, about 15 minute. Stir often to prevent carrots from browning.
Transfer to serving dish, sprinkle with parsley. Toss and serve immediately.
Enjoy!
Mema’s Chef Salad for Six

If you’ve ever been in Las Vegas in July or August, you can understand why this salad became a dinnertime favorite back in the day when Las Vegas was home. When it’s 125-degrees in the shade, the last thing you want to do is eat a heavy meal of any kind, let alone a HOT meal. Yet you still need to eat.
Filipino-American Pork Chops Adobo Style

There are certain “firsts” that just stick with you – first kiss, first dance and the first time you cooked for a boy. Yep, this is what I made, along with some green beans and sticky rice. My parents even let me set up a cozy table for two in the living room and kept my younger siblings out, although I can still hear the snickering – especially from Brother Dear. I sometimes think the reason God created little brothers in the first place is to torment big sisters.
Teriyaki Flank Steak Over Vegetable Fried Rice
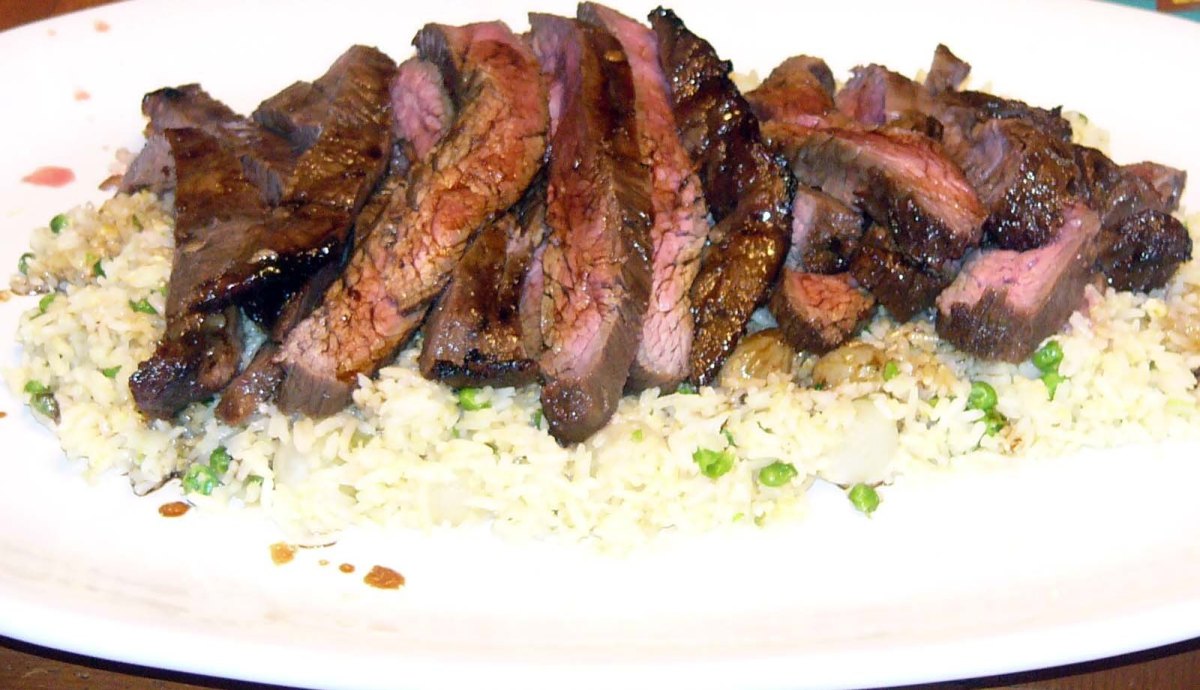
Have you seen the price of flank steak lately? Oh my – through the roof! The only cut of meat more expensive is Filet Mignon. The price alone nearly stopped me in my tracks. Yet I had a wonderful meal planned, and it all centered around the Flank Steak.
Continue reading “Teriyaki Flank Steak Over Vegetable Fried Rice”
Swedish Meatballs with Red Currant Sauce

A few months ago I made my guys Swedish Meatballs. This was another in a long line of recipes that was on my meal planner, then off again. It’s not that the recipe was difficult or complicated, just time-consuming in the prep work department. It seemed that as the day of cooking grew near, I became involved in other projects or (more often than not) grew lazy. Finally, the day of reckoning was upon me. No more excuses, no more procrastinating. It was time to get cooking!
These aren’t just meatballs cooked in Cream of Mushroom Soup and called “Swedish” – these are made with a blend of ground beef and pork, seasoned well, baked in the oven and then finished off in a wonderful, somewhat sweet Red Currant sauce. Meatballs that are to-die-for delicious. Hubby said they were the most flavorful meatballs he has ever tasted. While a bit labor intense, these meatballs are well worth the extra effort.
Swedish Meatballs with Red Currant Sauce
The Meatballs:
5 slices of sour dough bread, crusts removed, bread cut into pieces
2/3 cup milk
1 large yellow or white onion, peeled, grated (through a cheese grater)
2 Tbsp butter
2 eggs
1 pound ground pork
1 pounds ground beef
2 teaspoons salt
1 teaspoon freshly ground nutmeg
1 teaspoon ground cardamom
2 teaspoons black pepper
Red Currant Sauce:
6 Tbsp butter
1/3 cup flour
4 cups beef stock
3/4 cup sour cream
Salt to taste
3 Tbsp red currant jelly, more or less to taste
Handful Flat Leaf Parsley, finely chopped for garnish if desired
Preparation
Trim crust from bread, cut into pieces. Let bread dry out for about 10 minutes.
In a medium bowl, mix the bread pieces with the milk. Set aside for 15-20 minutes, or until the bread soaks up all the milk. When it does, pulverize the bread in a food processor and pour it into a large bowl.
While bread is soaking, grate onions using large holes of a cheese grater.
Melt 2 tablespoons of butter in a non-stick Sauté pan over medium-high heat. Once the butter has melted and begins to foam slightly, add onions.
Sauté the grated onion in the butter over medium-high heat until the onions soften and turn translucent, about 3-4 minutes. Remove from heat and let cool.
Add the cooled onions to the bowl of milk and bread. Add the rest of the meatball ingredients—eggs, ground pork, ground beef, salt, nutmeg, cardamom, pepper. Using your (clean) hands, mix well for about 2 minutes until the ingredients are well combined.
Use a 1 tablespoon scooper to measure out the meat for the meatballs. As you form the meatballs, set each one aside on a sheet pan or plate. You should get 60-65 meatballs.
Preheat oven to 425 degrees. Bake meatballs for 15 minutes. Do not fully cook meatballs all the way through since they will continue to cook in the sauce.
While the meatballs are baking, make the Red Currant Sauce. Heat 6 tablespoons of butter for the sauce in a large sauté pan over medium heat. Slowly whisk in the flour. Stirring often, let the flour cook until it is the color of coffee-with-cream; this is a classic roux. It will take about 5-8 minutes to reach the desired color.
As the roux is cooking, heat the beef stock in another pot until it simmers. When the roux has cooked until the color of coffee-with-cream, slowly add the hot beef stock a little at a time. Everything will sputter at first, and the sauce will seize up and solidify. Keep stirring and adding stock slowly, and it will loosen up and become silky.
Remove meatballs from the oven. Drain pan drippings into the sauce and stir to blend well.
Add the meatballs to the sauce, and turn the heat down to low. Cover the pot and cook on low heat for 10 to 15 minutes.
To finish, move the meatballs to a large serving bowl or casserole and keep warm. Add the sour cream and whisk well until smooth. Add the jelly to the sauce. Bring sauce up to medium heat to let the jelly melt into the sauce.
Pour sauce over meatballs, garnish with parsley if desired.
These meatballs go well served over buttery egg noodles.
Spicy Beef and Chorizo Tostadas on a Crisp Fried Shell

A popular dish when I was growing up were tostadas – simply an open-faced taco with a refried bean base, meat in the middle and melted cheese topping. Dad did not believe in store-bought tostada shells. We used soft corn tortilla taco shells and fried them crisp. For whatever reason, the frying was always assigned to me. If I were to venture to guess, I would say it was because I was the oldest, and Dad was confident in my ability to fry the shells without burning myself or the kitchen. All I know is that I hated the job – it was boring! (Maybe if we had I-Phones or I-Pads with digital music to dance to, it might not have been so boring).
Continue reading “Spicy Beef and Chorizo Tostadas on a Crisp Fried Shell”
Grilled Italian Marinated Chicken Skewers

This easy to make, yummy chicken isn’t very complicated. If you have boneless chicken breasts and Italian Dressing in the house, you are half way there. Add some cherry tomatoes (fresh picked best, but go with what’s available in the market), a bag of Boiler Onions, and maybe a jar of marinated mushrooms, and you are so there!
Continue reading “Grilled Italian Marinated Chicken Skewers”
A Simple Tea for Mother’s Day

 Next Sunday is Mother’s Day. What better way to make Mom feel like a Queen than to host an Afternoon Tea in her honor? Let all the mothers in your life know that they are special. New mothers, expecting mothers, and grandmothers. Let this day become a celebration of the beauty of motherhood in every stage of life!
Sesame Soy Green Beans
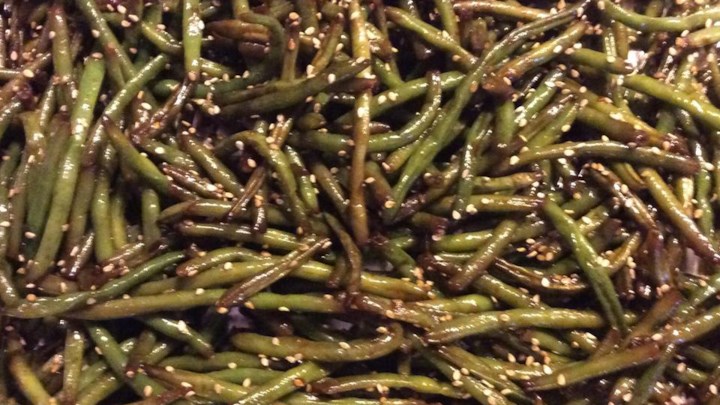
The first time I saw this recipe, I thought you have got to be kidding – fresh green beans in Soy Sauce? Mind you, I like stir-fried vegetables same as the next guy, but those are typically a medley of vegetables – broccoli, carrots and snow peas immediately spring to mind. Quick fried, still retaining their bright colors and crisp texture.
Continue reading “Sesame Soy Green Beans”Royal Toast aka French Toast

Saturday mornings and simple breakfasts just naturally seem to go together. Hands up – how many of you actually eat breakfast every morning? While most of us will whip up breakfast for our children, breakfast for us tends to be a quick cup of coffee and a bite or two of toast while rushing out the door.
The very first breakfast food that I taught myself to make (beyond maybe a scrambled egg) was French Toast. Since then, I have amassed a collection of French Toast recipes – some of these recipes have been plucked from old, obscure books on the subject.
Old cookbooks are a blast to read. Some are down right condescending toward women and their roles in the family. Others offer advice that is so out of the realm of life today. I have a cookbook that has an entire section dedicated to setting a proper table, everything from formal to casual to buffet dinners. This section includes the proper placement of cigarettes and ashtrays on the table! (My “jewelry” box on my nightstand is actually a cigarette box that once sat on the coffee table in our living room. It has a divider down the middle – filtered cigarettes were on one side, non-filtered on the other). I find old books that are a blend of recipes and “wifely” tips to be the most comical. We’ve come a long way, ladies. No longer is it a wife’s duty to fetch her husband’s slippers, among other things.
In 1887 The White House published a cookbook that contained recipes from their chef. Royal Toast is one of those recipes. It offers up two renditions of what we now call French Toast – one made with stale bread, the other with stale cake. I suppose it was a way of utilizing old breads and cakes. I don’t know about you, but generally speaking I don’t have a lot of old cakes just sitting about in my kitchen. If you were to read the original recipe from 1887, it would not contain a list of ingredients, only a brief set of instructions. (The instructions are intact; the ingredients I’ve written out for the sake of convenience). I’m not sure just when the White House first began publishing cookbooks or when that practice ended. I’ve tried googling that information but to no avail. I think the 1887 book might be the oldest, as it appears in most searches of White House cookbooks – or perhaps it is the most “famous”.
 Royal Toast – Made with Bread
6 Slices of stale Sweet or white Bread
1 Cup Fresh Milk
2 eggs, well beaten
1 Stick Butter
Dip thin slices of bread into fresh milk; have ready two eggs well beaten; dip the slices in the egg and fry them in butter to a light brown; when fried, pour over them a syrup, any kind that you choose, and serve hot.
 Royal Toast – Made with Cake
1 Stale plain cake, sliced
1 Cup Cream
1 Stick Butter
Equally as good is to cut a stale cake into slices an inch and a half in thickness; pour over them a little good sweet cream; then fry lightly in fresh butter in a smooth frying pan; when done, place over each slice of cake a layer of preserves or you may make a rich sauce appropriate to the hour to be served with it.
Note for Cake Recipe: Since most of us do not have stale plain cake just sitting around, use a store-bought butter loaf, pound cake or even Angel Food Cake for this twist on French toast. Use preserves such as berries and serve with warm blueberry syrup. Some fruit on the side is always a nice touch with French Toast.
************
If you are interested in reading a few old recipes from the White House, here’s a link:
https://books.google.com/books/about/White_House_Cook_Book.html?id=FjgEAAAAYAAJ
Mango and Jicama Salad

Growing up, we were all fans of Mangoes – except my brother, but then his eating habits are beyond bad. I guess that’s to be expected since Mangos are the national fruit of the Philippines, my mother’s homeland. The little heathens that we were, we ate our mangos “uncivilized”. Mom would cut the top and bottom off the mango, stand it on end and slice the flesh away from the pit. Mom would then “dice” the flesh, taking care not to cut through to the tough skin. We turned the mango inside out and we would eat the yummy, sweet fruit right out of the skin. A civilized person, it seems, would slice along the skin and serve the cubes in a bowl. But hey – Mother Nature already provided the bowl – right? I love mangos! While mangos of the Mexican variety are more fibrous than their Asian counterparts, both are very sweet and juicy when fully ripe. An un-ripened mango is sour, more commonly found in chutney.
Off to the Races in Style

Have you ever hosted a Kentucky Derby Party? As much as I love to host parties, this is one I have never done. And that is really surprising since the Derby itself is not so much a horse race as it is an event.
Grilled King Crab Legs with Garlic

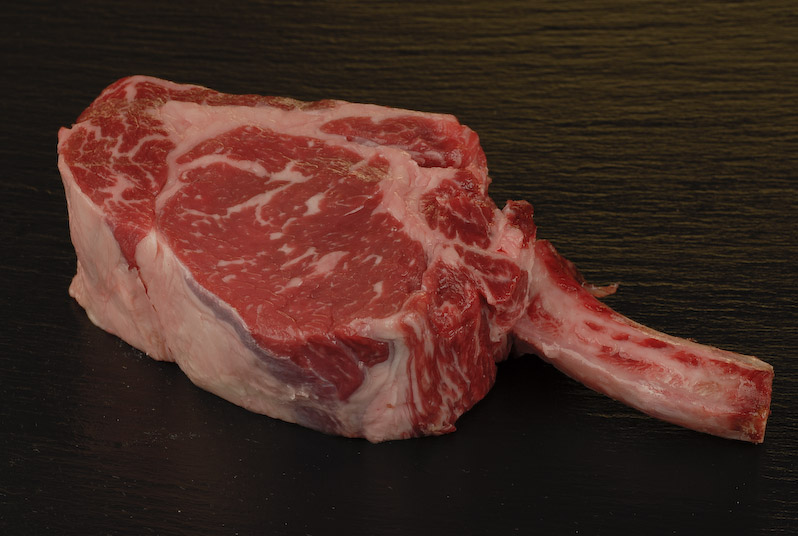 Since just before Thanksgiving, our local Costco has had a seafood and meat case in the middle of the fresh food section. It looks like those cases in the old-time butcher stores, with offerings behind glass and an apron-clad clerk waiting to take your order. The steaks and roasts in the cases are enormous! You know those Cowboy Cut Rib Eye Steaks that were making the rounds on the cooking shows a while back, but you couldn’t seem to find them at your local grocery store? Yep, they got them! One steak will feed an entire family. And those big steaks come with an equally big price tag. While the presentation is on a grand scale, you are paying a good deal of money for a handle bone that you cannot eat. Did I want to buy one? You bet. However; I just could not justify the cost.
