
To peel or not to peel – that is the question. Wither it is better to eat potatoes in their skins or let them be “naked” is really a personal thing. I like my potatoes (baked, fried or even mashed) with their skins – better flavor with more texture and added fiber to your diet, but that’s just me and my needs. Potatoes are one of those wonderful things that you can have most any time. Great for breakfast (love fried potatoes with a big Veggie Omelette). Fried Taters are especially delicious accompanying grilled meats such as smoked Dry Rub Tri-tip or Beer-Can Chicken with Cola Barbecue Sauce. The one thing I didn’t like about fried potatoes was that the potatoes seemed to take forever to cook, and more often than not, had a greasy taste.
Author: Rosemarie's Kitchen
I'm a wife, mother, grandmother and avid home cook.I believe in eating healthy whenever possible, while still managing to indulge in life's pleasures.
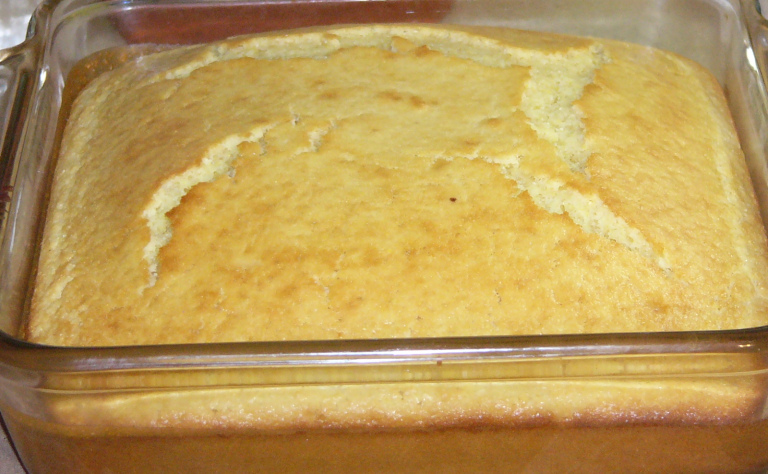
Northern-Style Sweet Corn Bread
As many of you already know, I am a huge fan of Southern Style corn bread. I’ve featured Southern Style Corn Bread as a side with a number of dishes. I love the fact that Southern Cornbread is cooked up in a cast iron skillet. I’ve even considered the possibility of buying a bunch of small cast iron skillets for a nice presentation when baking Corn Bread for a crowd. Can you imagine? There are your backyard barbecue diners, with giant dinner platters (not plates, but big Texas size platters) with a slab of ribs, some barbecued chicken, and a small skillet of individual Southern Style Corn Bread. Oh and let’s not forget the little bowls of Ranch Beans. Now that’s what I call barbecue.
That said, I wanted to share with you my favorite “Northern” bread. Unlike its Southern counterpart, Northern Corn Bread is more cake-like in constancy, with a sweet, buttery flavor. When it comes to baking up perfect Northern Corn Bread, Kiddo is my baker and it’s awesome every time.
This bread is super easy to make and goes well with a number of dishes – especially chili that is extra-hot. The sweetness of the bread can help to off-set the heat of the chili. It’s also yummy as a side bread for barbecued ribs or chicken when a less gritty bread is desired. My Dad likes to put the left-over corn bread into a big glass of milk – I know, strange. It might be an Okie thing. Dad likes to break up Ritz Crackers in a glass of milk, too. I will confess, I like the Ritz Cracker thing – there’s something about the salty crackers and milk that is comforting, bringing to mind fond childhood memories.
But we aren’t here to talk about Okie eating habits – especially since we are featuring a “Northern” side dish. This particular corn bread is especially sweet. It’s my all-time favorite sweet corn bread recipe, one I’ve relied on for years. And it never fails to please. It’s even been known to convert a few Southerners who swore nothing but true Southern bread would ever do.
Northern Style Sweet Corn Bread
Dry Ingredients:
1 1/2 Cup Flour
2/3 Cup Sugar
1/2 Cup Yellow Corn Meal
1 Tablespoon Baking Powder
1/2 Teaspoon Salt
Wet Ingredients:
2 Large Eggs, slightly beaten
1 1/4 Cups Milk
1/3 Cup Vegetable Oil
3 Tablespoons butter, melted
Preheat oven to 350-degrees. Lightly grease an 8-inch square baking pan. Set aside until ready to use.
Combine dry ingredients in a medium size bowl. Set aside.
In another bowl, lightly beat eggs. Add wet ingredients and whip until well blended.
Pour wet ingredients into dry ingredients. Mix until well incorporated. Pour batter into baking pan.
Bake until golden brown, about 35 minutes. Remove from oven, serve warm with plenty of sweet, creamy butter.
Yum!
Mahi-Mahi Burgers

The first time I had a Mahi-Mahi Burger was during a visit to Bloody Mary’s Bar and Grill in Bora Bora. It was the most incredible fresh-caught fish burger I had ever tasted. Hubby and I so loved these burgers that we made it a point to have lunch there at least once during our visits to the island. We simply could not get enough of them. While we have since sampled other Mahi Burgers, none compares to the ones you can get at Bloody Mary’s. The only way I know of to get the real deal is to board a plane and head to the beautiful South Pacific island of Bora Bora.
Polynesian Hot Dogs over Rice
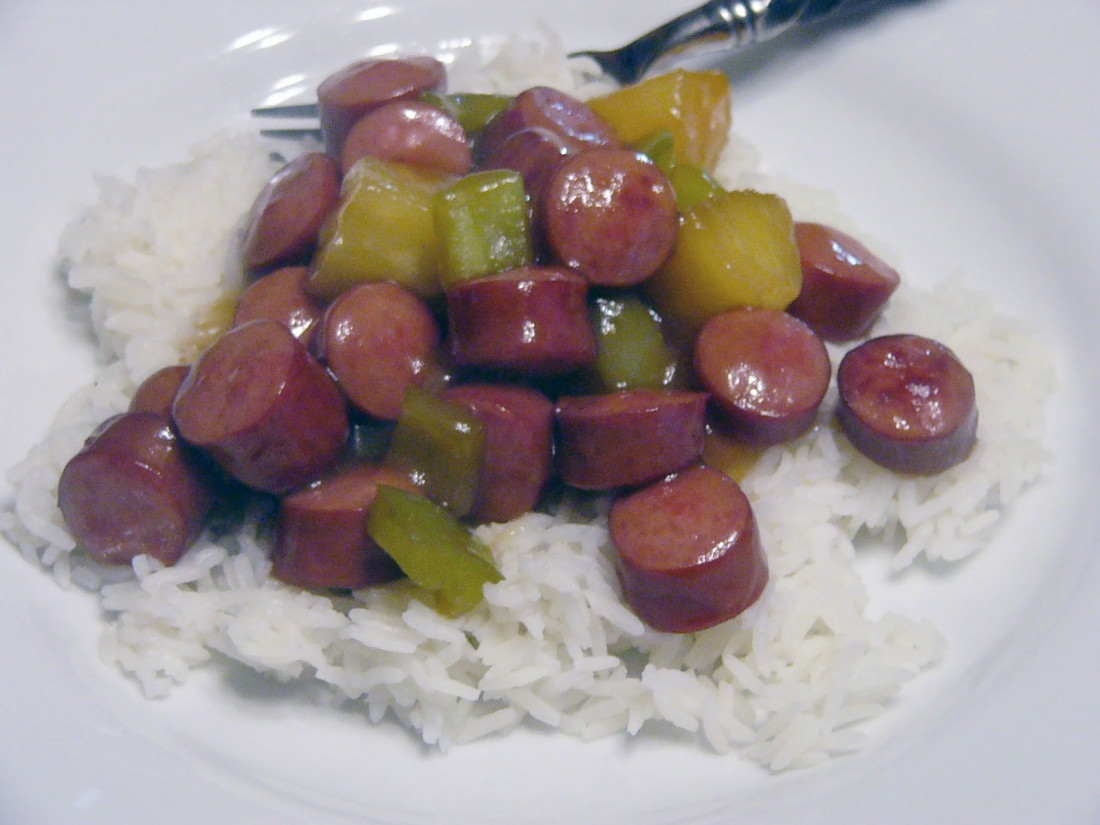
Hubby stood near the packaged meat section – you know, with the lunch meats and pre-cooked sausages and hot dogs. He has our grocery list in hand and was busy looking over the various deals on dogs.

Busy Cook’s Hamburger Helper Style Cheesy Taco

Yep, it’s time for another installment of “Hamburger Helper without that box of stuff”. Thus far, this is the best one yet.
I remember fondly the first time I made this dish for my family. I first started by gathering all the ingredients and lining them up to have at the ready. Kiddo wandered into the kitchen to see what he could do to help. He took one look at the table – rice, chips, cheese and a lineup of seasonings – and gave me a funny look.
“What on earth are you making?”
“Hamburger Helper.”
“Again?”
I frowned and promptly put him in charge of browning the meat while I mixed up a bowl of seasonings.
This dish cooks up is like a giant one-skillet taco – the Frito Chips give it that corn tortilla “crunch” – with meat, rice and tons of zippy flavor. While the original recipe did not call for Taco Seasoning, when the tasted the “broth” (before thickening) I knew it needed something to bring out that whole taco flavoring thing. The original recipe called for 1 cup of chips. After a quick stir, the chips all but vanished into the dish. That simply would not do, so I tossed in a second cup. Yeah, that was the ticket – a little “crunch” in every bite. It was ready for the final test – my fellows. When dinner was served, I heard a lot of wows – this is good and yummy eating sounds from my guys. They went back for seconds, polishing off what was left in the pan.
Hamburger Helper Cheesy Taco
Ingredients – Seasoning Package
1 Tablespoon Cornstarch
1 Tablespoon Chili Powder
1 Tablespoon Taco Seasoning
1 Teaspoon Onion Powder
1 Teaspoon Garlic Powder
½ Teaspoon Salt (optional)
¼ Teaspoon Sugar (optional)
½ Teaspoon Paprika
In a small bowl, mix together Seasoning Pack. Set aside until ready to use.
Ingredients – Hamburg Helper
1 lb Lean Ground Beef or Ground Turkey
2 ¼ Cups HOT water
½ Cup Milk
1 Cup Converted Rice
1 Can (15 oz) Stewed or Diced Mexican Style Tomatoes, drained
1 Cup Cheddar Cheese, shredded
In a large skillet, brown the ground beef. Drain well and return to pan.
Add water, milk and rice. Bring to a boil.
Stir in seasoning package and Mexican Tomatoes. Cover and simmer, stirring occasionally, 12-15 minutes or until liquid as evaporated and the rice is tender.
Stir in 1 cup of cheese, cover and simmer a few minutes more to allow cheese to melt.
Ingredients – Final Toppings
1/2 Cup Cheese
2 Cups Frito Corn Chips
Chopped Jalapeno Peppers (Nacho Style), Optional
Remove from heat, uncover, sprinkle with ½ cup Cheddar cheese and 2 cups Frito Corn Chips. Allow to sit for 5 minutes for sauce to thicken.
Give everything one final stir, serve with Jalapeno Peppers for added heat as desired.
Now stand back and watch it disappear!


Crab Bisque Made Simple
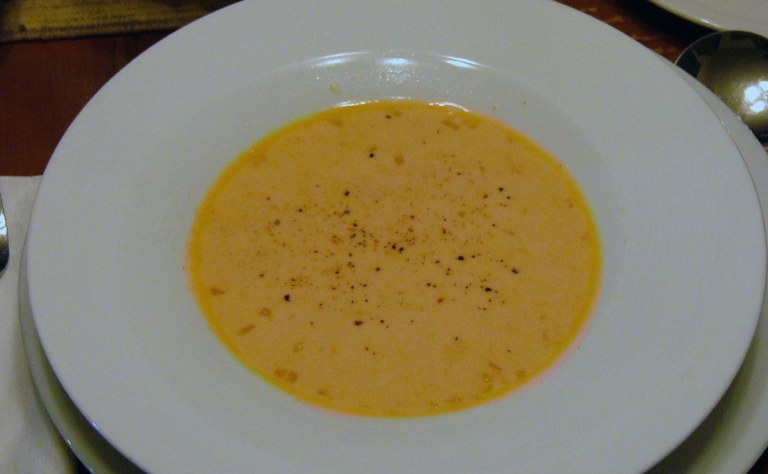
I have always been a fan of Bisque anything – crab, lobster, tomato. It’s another of those wonderful French things with lots of cream. A while back I came across a recipe for Crab Bisque on William Sonoma’s website (another of my favorite things – William Sonoma anything!) I’ve had the recipe for a while now, but every time I read it, it seemed like a lot of work to obtain a pound or so of crab meat. Yeah, I know, good food isn’t fast food. The soup itself didn’t cook long, which struck me as odd. I thought about my family, and what their particular tastes are – I know what works and what will get a turned up nose. So I decided to do a little tweaking, and the results were wonderful! My non-fish eater ate it gladly and my beloved husband had seconds! Yay! So tonight I’ve decided to post both recipes – take your pick.
Warm Tortillas – Perfect as a snack, a side or something to fill
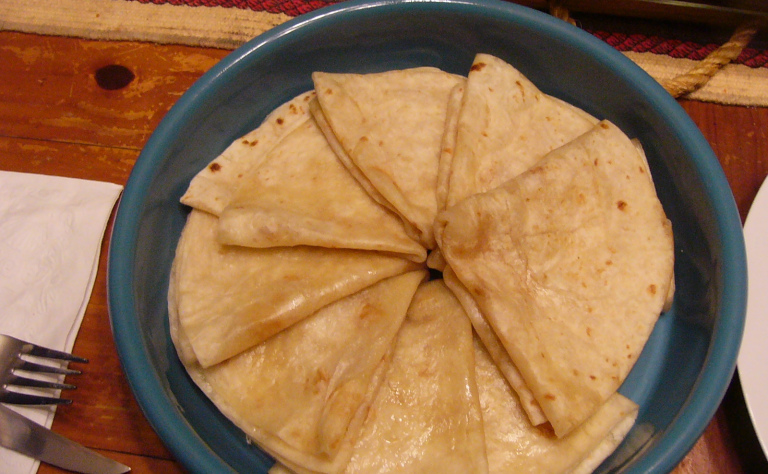
I know, this seems like a crazy post. Really – a recipe for warm tortillas? Yet so often, I see people trying to fill soft shell tacos or a flour tortilla only to have their tortillas fall apart, crack and just turn into a filling nightmare.
Continue reading “Warm Tortillas – Perfect as a snack, a side or something to fill”
Mexican Pork Chops with Ancho Chile Cornbread Stuffing

Sometimes I get on a kick – spending several nights “dining” in the same country before moving on to another part of the world. Lately, I seem to be fixating on Mexico. It began with the notion of Taco Tuesday a while back. But let’s face it, Tacos are such a small part of the culinary delights of a country that is as diverse as Mexico. It would be like saying America is all about hamburgers and hot dogs. I’ve expanded the Taco Tuesday thing to be Mexican Tuesday.
Continue reading “Mexican Pork Chops with Ancho Chile Cornbread Stuffing”
How ’bout a Cup of Joe

As I started to write this latest posting, I wondered why do we call a cup of coffee a cup of Joe? So I began my quest for the definitive answer. As it turns out, the answer is shrouded in mystery and speculation. There is no definitive answer, no matter who you ask.
French Dip Italian Roast Beef Sandwiches
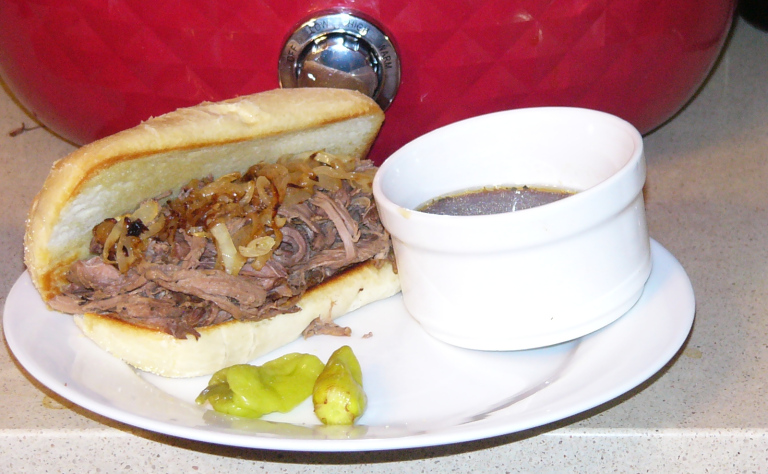
Strange title, I know. But keep reading – it will make sense. I promise! This recipe was inspired by a recipe I found on allrecipes.com. It’s one of those awesome cooks itself recipes that we all love so much. Yep, I tweaked it a bit right out of the gate, and I am oh so glad I did.
Carrots Lyonnaise

Typically, I shy away from trying two new recipes at the same time. Yet these carrots were so bright, flavored with onions and chicken bouillon, they simply demanded that they be paired with another new recipe; Chicken Breast Tarragon. While the Chicken is initially cooked in a pot with carrots and shallots, those are discarded from the final dish, used instead as a flavoring agent.
Fathers and Daughters – A Tribute to My Dad

When I was a little girl, my Dad would sometimes just show up at school. The bell to dismiss class would ring, and there he’d be, standing out on the sidewalk waiting for me. The family wagon was packed with sandwiches; cold drinks and a couple of fishing poles. We’d stop along the river to get some worms (in the sleepy little town of Freeport). At the edge of town stood an iron bridge all painted green. Up, over the railroad tracks and across the river we went, turning due west, toward the coast. To this day, whenever Hubby and I have an occasion to cross that bridge, my heart skips a beat.
Continue reading “Fathers and Daughters – A Tribute to My Dad”
Irish Cream Crème Brûlée

If the recipe looks oddly familiar, it is – I originally posted this recipe as part of my Saint Patrick’s Day Supper menu collection. Have I mentioned that Crème Brûlée is one of my all time favorite desserts? It ranks right up there with Chocolate Mousse and Grand Marnier Souffles. (Hubby’s favorite French dessert is my Chocolate Souffle with a Grand Marnier Cream Sauce. But that’s a recipe for another day).
 Once upon a time, back in our “traveling” days, while on vacation I dined on Crème Brûlée every day. Some days it was dessert, other days I ate Crème Brûlée with tropical fruit as a light brunch. (It’s made with eggs, isn’t it? Eggs equals brunch.) I know that brunch is bit of a stretch, but hey I had good reason. We were vacationing in the South Pacific at the time – with its heavy French influence and tropical island delights. The Vanilla Crème Brûlée, made with Tahitian Vanilla Beans – oh my, I’m telling you it was to die for! Such a treat isn’t something to be missed. Now I suppose I could be wrong – perhaps it was the beauty of the islands that made everything taste delightful. Perhaps it was the tropical breeze, the shimmering waters, the sunsets that took your breath away that made island life so wonderful. All I know with any certainty was that one visit to the islands of the South Pacific and they will forever steal your heart away. The warmth of the people, the simple uncluttered existence and unhurried pace. The islands of Tahiti will quite your mind and refresh your spirit. Words cannot describe a Tahitian Vacation. Just be sure to pick your islands wisely – the further from “tourist” destinations the better – unless the tranquility of a pristine blue lagoon shattered by the sound of jet skies is your idea of a good time. If that’s the case, by all means stay at a chain hotel on one of the larger islands – they specialize in American Tourist activities. (Again, a “rant” posting for another day). Today we’re talking about the virtues of Crème Brûlée . . .
Crème Brûlée as we know it today has been a part of French cuisine since 1691. While Vanilla Crème Brûlée is the most common, the cream can be flavored in a variety of ways – everything from Bananas to White Chocolate. Case in point, Irish Cream.
Irish Cream Crème Brûlée
3 Cups Heavy Cream
1 Vanilla Bean
3 Tablespoons Irish Cream
8 Large Egg Yolks, at room temperature
1/3 Cup Sugar
½ Cup ULTRA FINE sugar
 Note: White sugar caramelizes best. Brown sugar contains too much moisture to give that golden bubbly crunch expected of Crème Brûlée. Raw sugar is too coarse to properly bubble. If you do not have ultra fine baker’s sugar, regular sugar will do. Run it through a food processor to break down into an ultra fine grain.
Heat oven to 300-degrees. Have six ¾-cup ramekins and shallow roasting pan at the ready.
In a saucepan over medium heat, combine the cream and vanilla bean. Bring to a gently boil, remove from heat, cover and set aside for 15-30 minutes to blend the flavors. Remove the vanilla bean from the cream. Using the tip of a knife, split the pod and scrape the seeds from the vanilla bean into the cream. Discard the bean.
Return the cream to medium heat and bring almost to a boil. Remove from heat.
In a bowl, whisk together the egg yolks, and 1/3 cup sugar until just blended. Slowly whisk in the hot cream. Return the mixture to the saucepan over medium-low heat. Add Irish Cream and cook, stirring constantly, until the custard is thick enough to coast the back of a spoon, about 3-4 minutes. DO NOT let it boil. Pour the custard through a strainer into the ramekins, dividing it evenly among them.
Arrange the ramekins in the roasting pans. Pour very hot tap water into the pan to come halfway up the sides of the ramekins. Cover the entire pan with foil. Bake until the custards are set but the centers still giggle slightly when the ramekins are gently shaken, about 40 minutes. Remove from the oven but leave in the water bath until cool enough to handle, then lift out the ramekins. Cover and refrigerate overnight until well chilled. Remove from refrigerator about 20 minutes before serving.
Just before serving, preheat the broiler. Sift ½ cup ULTRA FINE sugar over the tops of the custards to form a thin, even layer. Place the ramekins on a baking sheet. Slip the baking sheet under the broiler, 2-3 inches from heat source. Broil until the sugar melts and caramelizes, 1-2 minutes. Turn the ramekins as needed to cook the sugar evenly.
 Alternate Method: Use a small kitchen blowtorch to caramelize the sugar. Serve immediately and enjoy the crunch of the caramel, and the smooth richness custard with just a hint of Irish Cream.
Chicken Breast Tarragon
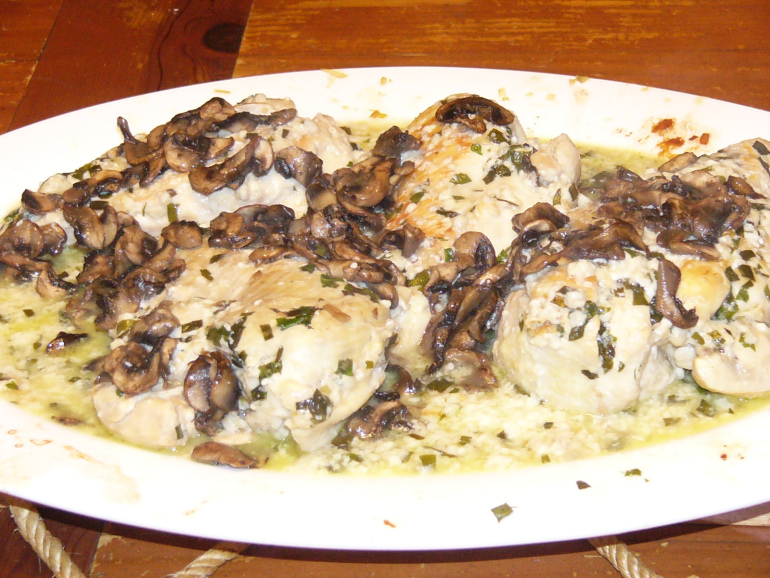
On a beautiful Sunday, Kiddo and I spend the afternoon in the kitchen together, cooking up a wonderful Chicken dish made with fresh Tarragon, lots of booze and a little arguing.
Heading Home from the Wilds of Wyoming – Day 8

We have reached the end of the road. Our time in the wilds of Wyoming is over, and this is the day we head home. The car is loaded with our carry-on bags and personal items (two lap tops and a camera backpack). We’ve made several passes through the various rooms, making sure that precious cords, batteries, chargers and other things have not been forgotten. Leave behind a pair of socks and it’s no big deal. Misplace the digital camera charger and it’s a real pain in the behind. It’s time to say good-bye to Joel and Krystal. It’s time to say good-bye to our temporary home at Rand Creek Ranch. By the end of the day, it will be time to say good-bye to Wyoming.
Continue reading “Heading Home from the Wilds of Wyoming – Day 8”
