This delicious and super simple Macaroni Salad has been in our family forever (or at least since the 1950s). With the exception of cute little garnishes and presentation ideas, very little has changed. It’s Mom’s recipe and growing up I loved it. Hubby’s favorite, too. He’s a basic kind of guy, so uncomplicated foods suite him just fine. Rather than leave this little gem of a recipe obscured in a montage of recipes, I thought it would be nice to bring it out of hiding. After all, these are the fading days of summer. Soon enough we will be packing away the picnic baskets, backyard grills and whatever else is a part of our summer fun in the sun. In our house, macaroni salad is all a part of this type of year.
When entertaining, I usually make Mema’s Potato Salad to go with my Macaroni Salad. Have you noticed that there are Potato Salad eaters or Macaroni Salad lovers – preferring one type over another? For big gatherings or when I’m asked to make a few dishes, I like to make both just to keep everyone happy.
Mema’s Macaroni Salad
6 Eggs, hard-boiled
1 lb Salad Macaroni
¼ Cup Green Onions, finely chopped
¼ Cup Red onion, finely chopped
2 Celery Stocks, finely chopped
1 Tablespoon Dill Pickle Relish (more to taste)
1 ½ Cups Best Food Mayonnaise
½ Tablespoon Red Wine Vinegar
Salt and Pepper to taste
Green Onions for Garnish (Optional)
½ Cup Chopped Black Olives (Optional)
Peel hard-boiled eggs and set in refrigerator to cool completely.
Cook pasta in a large pot of salted boiling water according to package directions. Drain and rinse well under cold running water. Set aside to continue draining.
In bowl, combine onions, celery, pickle relish, mayonnaise and red wine vinegar. Whisk to combine. Taste dressing and season with salt and fresh ground black pepper to taste. Adjust seasoning according to personal tastes.
Chop 4 eggs. Add to dressing. Cut V marks in remaining 2 eggs to create tulip flowers. Reserve 3 flowers, chop remaining flower and add to dressing. Taste dressing a second time, adjust seasonings as necessary.
Place macaroni in a large bowl. Pour egg dressing over macaroni. If desired, add chopped olives and toss to coat. Smooth out top.
Using the back of a spoon, create 3 indentations in the top of the salad. Place Egg flowers into indentations. If desired, sprinkle lightly with paprika. Cover with plastic and refrigerate until well chilled.
Note: Did you know you can color the macaroni to suite the celebration? Check out the photo below – same salad, colored for the 4th of July. Orange for Halloween, maybe red and green for Christmas – you get the idea.


 A little research revealed the follow about this lovely dish: Chicken Provencal hails from South France – in the Provence region. The basic characteristics of Provencal cuisine are herbs, olives and slow cooking. Naturally, there is much more involved; but those are the basics in a nutshell. One look at the breathtaking charm of the countryside and it’s easy to see why. The use of Thyme, Rosemary, Marjoram and Sage are prevalent in Provencal cooking, as are olives and olive oils. Slow cooking is a must. After all, who would want to be in a hurry here? The countryside invites one to slow down, to savor and live in the beauty of the moment; don’t you think?
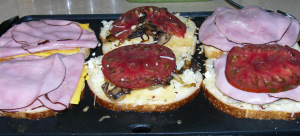 Thin slices of Black Forest Ham add yet another layer to the sandwich. When offered, Hubby and Kiddo go for the ham. Me? I’m an Heirloom Tomato kind of gal. Kiddo added blue cheese to his, while I went for a few slices of White Cheddar Chipotle cheese for mine. You could follow our cheesy lead or you could just use the cooking techniques, like Hubby. His is the sandwich with American Cheese and Ham, simple and basic. When it comes to grilled cheese, it’s to each their own. Pile it on or keep it simple.
 The most difficult part about this sandwich will be deciding what cheeses to use. Once you’ve done that, gather them together and be ready to pile it on. While you need not work at lightening speed, you’ll want to layer your ingredients quickly – the sooner the cheese is piled on the more time you’ll have for the cheese to melt while the bread reaches golden perfection.
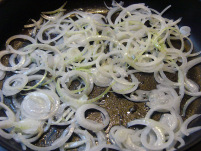
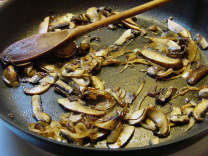 In a skillet, melt the remaining ½ tablespoon of butter and add the sliced onions. Sauté over medium heat until they begin to soften and caramelize, turning a light golden color. Add the sliced mushrooms. Season with salt & pepper and sauté for about 2-3 minutes or until mushrooms release their juices. Continue to saute about a minute or so longer, until most of the liquid is gone. Remove from heat and set aside.
 Grill bread slices for about 1 minute, then add the cheese mixture to each slice. If you are including ham, now would be the time to layer ham over the cheese. Cover and allow the steam to melt the cheese for around 1-2 minutes. (A shallow rimmed baking pan about the same size as your griddle works well. Just place up-side-down over the griddle to create a “lid”).