Egyptian Meatballs in Seasoned Tomato Sauce over Rice

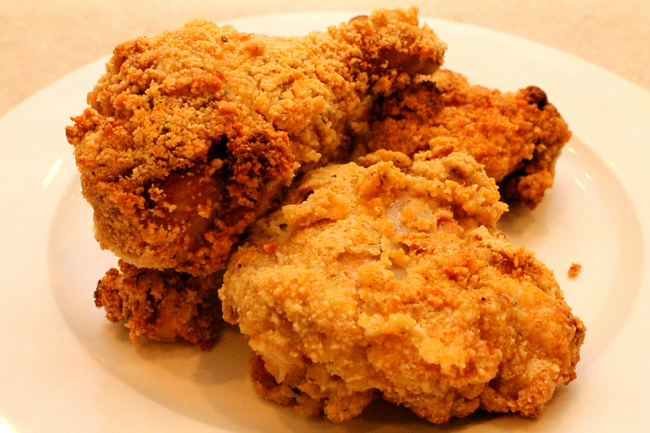
This recipe first appeared in 365 Foreign Dishes (published 1908). If you’ve ever read old cookbooks, the language, technique and instructions seem almost foreign to today’s home cook. Perhaps a trained chef might not find some of the terminology so strange, but for the average home cook, it’s a bit odd. Terms such as slow oven; quick oven took some research to get a temperature. Sure, slow was not as hot, quick was hot – but how hot is hot? (Slow oven is about 325-350 degrees; quick oven can be as low as 375 or as hot as 475, depending upon which site you follow – so it’s really guess-work and common sense based on what you are trying to cook in the first place). It took me a minute to figure out that “pulverized” sugar is powdered sugar. Measurements such as salt spoonful also needed to be converted – that’s about 1/4 teaspoon. Even with all their odd measurements and strange terms to digest, I enjoy reading vintage cookbooks. The beauty of older cookbooks is that they contain recipes completely made from scratch. No shortcuts of modern conveniences.

The older books are also a glimpse into the past. I especially enjoy the Etiquette and Advice sections of these older cookbooks. One of my cookbooks from the 1940s has an entire section dedicated to the proper placement of ashtrays and lighters for the formal, informal and buffet tables. A small leaflet book from 1906 explains what a woman’s role should be in the household and her submissive duties to her husband.

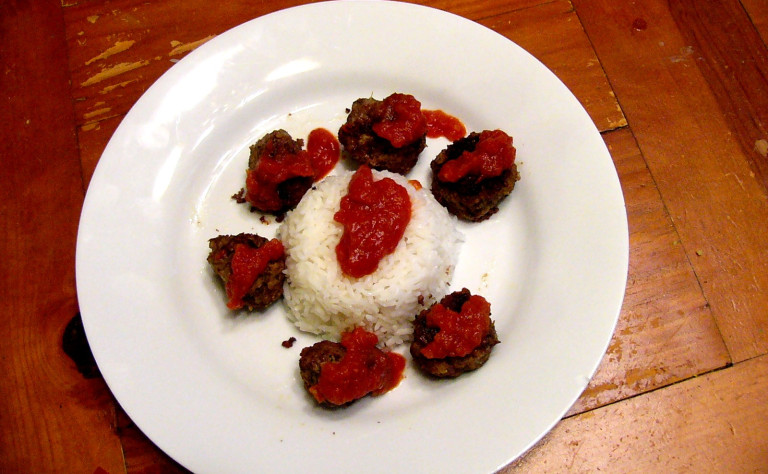
Anyway, the recipe that follows is more my take on the spirit of the original recipe rather that the original recipe itself. The recipe for Egyptian Meatballs called for raw meat, finely chopped. Okay, that’s ground beef by today’s standards. The recipe also called for Highly Seasoned Tomato Sauce. Hum – that’s open to so much interpenetration. I searched the internet for the definitive “highly seasoned” by 1908 standards, and that varied drastically from recipe to recipe. Not to be discouraged,  I came up with my own take, based on availability at the time and spices that are popular in Egypt.

Egyptian Meatballs in Seasoned Tomato Sauce over Rice
Ingredients – Egyptian Meatballs
1 small onion, finely chopped
2 Celery Ribs, chopped
2 beaten eggs
1 lb Ground Beef
salt, pepper
1 teaspoonful of curry-powder
Cumin to taste, about 1 teaspoon
Thyme to taste, about 1 teaspoon dried or 1 tablespoon fresh
Chopped parsley for color, dried parsley okay, about 1 tablespoon
1/2 cup of bread-crumbs
2 1/2 Cups boiled rice*

* While the recipe calls for boiled rice, I make mine with steamed rice.

Preheat oven to 350-degrees. Lightly brush a rimmed baking sheet with olive oil. Set aside until ready to use.

Peel and finely chop onion. Set aside until ready to use.

Finely chop celery, set aside until ready to use.

In a small bowl, beat eggs. Set aside until ready to use.

Season ground beef with salt, pepper, thyme, cumin and curry-powder. Add chopped celery, onion and some chopped parsley. Mix with beaten eggs and bread-crumbs.

Shape meat mixture into small meatballs. Place on prepared baking sheet.

Place meatballs in the oven to bake, about 25 minutes, rotating and shaking pan about mid way.

While the meatballs are cooking, make the Highly Seasoned Tomato-Sauce:

Ingredients – Highly Seasoned Tomato-Sauce
1 1/2 tablespoon olive oil
1/2 cup finely chopped onion
3-4 garlic cloves, minced
1 1/2 teaspoon paprika
1 teaspoon coriander
Dash Cayenne pepper
1 (15 oz) Can tomato sauce
1/2 cup Red wine

Chop onions and garlic. Set aside until ready to use.

Heat oil in a large skillet over medium heat until hot. Add onion; cook 4-5 minutes or until softened, stirring occasionally. Add garlic, cook 30-60 seconds or until fragrant.

Sprinkle with paprika, coriander and cayenne pepper. Add tomato sauce and wine; cook until sauce thickens and is reduced, stirring occasionally, about 20 minutes.

Place meatballs into seasoning tomato sauce. Gently stir to coat well in sauce. Allow meatballs to simmer in sauce for about 5 minutes to take on some of the flavors.

To Serve: Mold rice into a bowl or cup for individual servings and invert onto serving dish or plates. With a slotted spoon, transfer meatballs to a serving platter or plates, creating a ring around the rice. Add Top with seasoned tomato sauce and serve hot.


If you would like to read the original recipe, here’s the link:

http://www.vintagerecipes.net/books/365foreigndishes/egyptian_meat_balls.php

Jack-in-the-Box Style Tacos

I came across this recipe recently on food.com.  The kiddo and I really like Jack-in-the-Box tacos – for reasons I don’t understand.  (Hubby thinks we are daft). So we decided to give them a whirl. I added more beans than the original recipe called for, as well as more taco sauce to the meat mixture. The original recipe said it made 12 tacos. I only got 8 out of mine, but I was heavier on the filling than those you get at Jack-in-the-Box. The only draw back that I found was how much the grease splattered when the tacos were fried. You’ll need plenty of paper towels handy to blot the oil from the tacos before serving. These are NOT healthy tacos – it’s fast-food junk all the way. Even so, they are really good.

Continue reading “Jack-in-the-Box Style Tacos”

French Onion Pork Chops and Creamy Mashed Potatoes

This dish was so basic yet so tasty that I decided to photograph it in all its simple, messy and unadorned glory. All I can say is yum!

Continue reading “French Onion Pork Chops and Creamy Mashed Potatoes”

Salisbury Steak with Mushroom Gravy – Simple Comfort Food

There’s something wonderful about simple, old-school comfort foods. The simplicity of the food and the warmth of fond memories transports us to another place and time. It’s good for the soul, especially when life seems to be running away with your sanity.

Continue reading “Salisbury Steak with Mushroom Gravy – Simple Comfort Food”

Brioche Tressee French Toast with a Kiss of Orange

brioche-tresse beradBrioche Tessie is a lovely, thick sliced brioche loaf. While brioche looks like sliced bread, it’s actually a bread-like pastry. Brioche is made with extra eggs, butters and creams than a loaf of bread. It is rich, dense and oh so delicious.

Brioche Pasquier is a family owed French base bakery that has been baking up the most incredible, sweet buttery breads since 1936. In 2002, they expanded their baking facilities to San Francisco, but up until a few years ago, unless you shopped in Paris or the City by the Bay, you couldn’t buy this wonderful bread. Safeway Stores in Northern California now carry the SF produced breads. Unfortunately, finding a loaf of Brioche Tessie is a hit and miss, and a loaf can be a little expensive. Oh but so worth the search and the price tag – the bread is so soft and sweet and exquisite. The first time I tried a loaf, we toasted it and served it with Wild Maine Blueberry Preserves. It was awesome as toast goes. I knew instantly that this would make a great base bread for French Toast. Just as I had predicted, Brioche Tressee makes a wonderful French Toast. So luscious with a golden “crunch” on the outside while retaining all the soft sweetness on the inside. Guess you could call it French French Toast.

Brioche Tressee French Toast
6 Slices Brioche Tressee, cut into 2 triangles each
1 Cup Whole Milk
2 Eggs
1/4 Teaspoon Cinnamon
1/4 Teaspoon Nutmeg
2 Tablespoons Orange Juice
Butter as needed
Syrup as needed
Powdered Sugar for dusting

Warm a flat griddle to 325 degrees. Lightly brush griddle with butter.

In a 4-cup Measuring cup, measure 1 cup of milk. Add eggs, cinnamon, nutmeg and orange juice.

With a hand-held electric whisk, whisk batter CAREFULLY on low until well blended and frothy.

Pour the orange-custard batter into a rimmed bowl or pip pan. Dip slices of Brioche Tressee two at a time into batter and place on griddle. Cook until lightly browned and golden, about 3 minutes.

Flip toast over, butter top side with butter while still on the griddle. The butter will melt nicely, seeping into the bread. Continue to cook about 1 minute longer.

Transfer to warmed plates. Serve with syrup. If desired dust Powdered Sugar just before serving.

For a pretty presentation, garnish with fresh fruits such as strawberries and orange twists.

Buttery-Lemon Tarragon Chicken

Check out this awesome Buttery Lemon Tarragon Chicken from Melissa’s Southern Style Kitchen. Fresh Tarragon – grilled lemons – moist chicken – what’s not to love? The pan drippings are so flavorful. The lemons roasted in the pan add an incredible zest to the final pan drippings. Fresh Tarragon not only bring color, they also imparts a distinct flavor that is unmistakable.

Continue reading “Buttery-Lemon Tarragon Chicken”

Spicy Chicken Thighs Smothered in Spanish Rice

Here’s a delicious Mexican supper that utilizes leftover Spanish Rice. If you’ve made my Authentic Spicy Spanish Rice, then you know this recipe will cook up a ton of spicy rice. The leftover rice is great to reheat as a side for so many Mexican dishes or to use in burritos. Or you could try a Rosemarie Original.

Continue reading “Spicy Chicken Thighs Smothered in Spanish Rice”

Tri-Tip Barbecue with Herb Dry Rub

One of Hubby’s favorite cuts of meat to cook up on the grill has got to be Tri-Tip. When cooked right, it is flavorful and tender, with just the right amount to fat-to-meat ratio to keep everything moist. With Tri-Tip, it’s not so much what the meat is rubbed with (although different combinations of spice and herbs does render various flavors) but how you grill it that makes this cut of meat so awesome. We like to make sure there’s plenty of rub worked into the fat as well as the meat.

Tri-Tip is grilled fat-side up to start, allowing the seasoned fat to melt down into the brisket, imparting all the wonderful flavors of the rub and the cut of meat.

I love Tri-Tip served with all the usual sides – country fried taters and Ranch Style Beans are two of my favorites. Late in the season, when fresh local corn is at its peak, there is nothing so wonderful as husk-wrapped corn cooked up right on the grill. While I have noticed ears of corn in the markets already this year, taking a drive out into the country lets me know it’s not locally grown. When the time is right for corn, we like to drive out to the farms that sell only what is picked that day. It means getting an early start because once the morning’s pickings are sold, that’s it – no more corn.

Tri-Tip Barbecue with Herb Dry Rub
3-4 lbs Tri-Tip Brisket
¼ Teaspoon Fresh Ground Black Pepper
1 ½ Teaspoon Garlic Salt
½ Teaspoon Celery Salt
¼ Teaspoon Onion Powder
¼ Teaspoon Sweet Paprika
¼ Teaspoon Dill Weed
¼ Teaspoon Dried Sage
¼ Teaspoon Rosemary

Mix all ingredients for Herb rub. Generously sprinkle Dry Rub all over Tri-tip. With your fingers, massage rub into the meat. Wrap Tri-tip in plastic wrap, refrigerate for 1 hour 15 minutes(longer if you need to or like to but no less).

Remove Tri-tip from the refrigerator. While still wrapped, allow meat to rest on counter for about 45 minutes. (Total marinating time for rub is a minimum of  is 2 hours).

While meat is coming to room temperature, build a nice fire in the grill.

Build nice bed of hot coals. Open the bottom and top vents half way, place grate over coals and close lid to heat, about 5 minutes. Clean grate and oil paper towels dipped in vegetable oil.

Raise coals to high position (or lower grate, depending upon grill). Grill meat, fat side up, for 3-5 minutes or until nicely seared. Turn and sear other side. Lower coals (or raise the grate, depending upon grill), cover and continue to cook meat 7-10 minutes longer. Turn and cook 6-8 minutes longer or until cooked to desired doneness. Transfer to platter and tent loosely.

The key to a juicy piece of meat is to let the meat rest 10-15 minutes after grilling to allow the juices to soak back into the meat rather than run all over the cutting board.


beef tri tip steak
While a Tri-Tip may appear to be lean, there is a fat side. Usually face-down in the meat case. While you do want a layer of fat, it’s okay to trim it back to about 1/8 to 1/4 inch layer.

tri-tip-with-herb-rub-2
Gather all your ingredients for the herb rub, a nice bowl for mixing and your measuring spoons.

tri-tip-with-herb-rub-3
Mix ingredients for herb rub into a bowl. Rub Tri-tip well with seasonings.

tri-tip-with-herb-rub-4
Massage rib into the meat, wrap with plastic wrap. Place meat into the refrigerator for about 1 hour, 15 minutes. Remove from refrigerator about 45 minutes BEFORE grilling. Rest on counter while still wrapped.

tri-tip-with-herb-rub-5
Remove from grill, tent to keep warm and allow to rest 10 minutes. Slice and serve. If desired, spoon puddled drippings over slices for added flavor.

tri-tip-with-herb-rub-6
Tri-Tip Barbecue is great with Country Fried Taters and Smoke-House Ranch Beans. Yummy country eating at its best.

Happy Grilling Everyone!


Baked Polenta with Parmesan and Rosemary

I’ve heard tell you can have Polenta without baking it. I’ve never done so. There’s something about the texture that just doesn’t sit well with me. Just as grits don’t feel right in my mouth. It’s a personal thing. However; when additional flavors such as herbs and good quality cheeses are added to the mix, and then everything is fried or baked into a bread-like dish, it’s absolutely divine! But then again, I’m a big fan of cornbread and the main ingredient in Polenta is ground cornmeal . . .

Continue reading “Baked Polenta with Parmesan and Rosemary”

Linguine with Basil Tomato

This is another of those wonderful One-Pot Wonders. I love them, if for no other reason than because everything cooks up in a single pot. (Making this equally popular with my KP crew – Hubby and Kiddo). Always one to give credit where credit is due, we can thank Donna at Apron Strings for this beautiful one-pot creation. Don’t you simply adore any meal that can be cooked up in just one pot?   Continue reading “Linguine with Basil Tomato”

Frozen Georgia Peach Daiquiris

Today is National Daiquiri Day. Lucky us – a good excuse to unwind with a wonderful Peach Daiquiri at the end of the day. Oh how I adore anything with a peach – one of my all time favorite fruits! We all know that summer and Georgia Peach go hand in hand. What better way to enjoy that luscious fruit than as a slushy for grownups. So break out the blenders everyone and come join the party!

Continue reading “Frozen Georgia Peach Daiquiris”

Crock Pot Chuck Roast with Creamy Dripping Gravy

As pot roasts go, I really like a boneless chuck roast. It holds together well while slow-cooked in a crock pot and has a nice, beefy-flavor. That is not to say a chuck roast won’t cook up fork-tender – it will. Unless you take a fork and shred the roast, it will stay together. This is important – especially when transferring the roast from the crock pot to a serving platter. I would much rather serve nice big pieces of roast beef that you can really sink your teeth into than shredded meat more fit for a sandwich.

Continue reading “Crock Pot Chuck Roast with Creamy Dripping Gravy”

Celebrate National Caviar Day with Pasta Amnesia

If ever there was a day made for celebration, it’s got to be National Caviar Day. After all, fancy caviar and celebrations just go hand in hand, right?

Continue reading “Celebrate National Caviar Day with Pasta Amnesia”

Twice Baked New Potatoes with Caviar

Did you know that July 18th is National Caviar Day? It is – and I could not be more thrilled.  National Caviar Day is as good an excuse as any to eat caviar. These tasty potatoes are similar to a twice baked potato, since they are hollowed out, the pulp whipped nicely, then stuffed back into their jackets and baked again. There you go – little two-bite twice-baked new potatoes, how delightful! Add a little dollop of sour cream and a little caviar – now we are talking indulgent! I love these fancy potato bites.

Continue reading “Twice Baked New Potatoes with Caviar”

Southern “Fried” Oven Chicken – No Lie!!

Like most of us, I’ve got my collection of oven “fried” chicken. These are good recipes, but they all seem to fall just a little short of that true “fried” chicken texture. One morning, while I was making my spice rubbed picnic chicken, (Let’s Pack a Picnic!) it occurred to me that the problem with oven fried chicken was the pan.

Continue reading “Southern “Fried” Oven Chicken – No Lie!!”